User manual
You have in your hands the possibility of making your home work harmoniously easily and without worries. Get ready, you are in command of Mirubeee!
Introduction
Welcome to Mirubeee!
You have in your hands the possibility of making your home work harmoniously easily and without worries. Get ready, you are in command of Mirubeee!
Mirubeee is a management system for large household electrical consumption that allows you to make the most of your photovoltaic installation and avoid consumption during the most expensive hours. All this intelligently, automatically and without complications.
When your photovoltaic installation produces more energy than is consumed at home at that moment, surplus photovoltaic production is generated. Normally these surpluses are poured into the electrical grid (export) and are paid at a value much lower than the electricity purchase price (import). The ideal is to take advantage of all the electrical production from your solar panels in your own home (that would be a self-consumption rate of 100%).
One way to increase the self-consumption rate (or reduce surpluses) is to shift the use of some electrical loads to align them with the times when there would be photovoltaic surpluses. This ability to shift loads is also used to avoid its use during “peak” hours or when electricity is more expensive.
Thus, Mirubeee takes into account the price of electricity at each hour and the import or export of energy at each moment to use energy usefully at the right time. An example would be to heat water in an electric water boiler whenever there is solar surplus and never during peak hours.
The Mirubeee system is especially interesting in houses with photovoltaic self-consumption installations without a battery. Precisely, Mirubeee’s energy management capacity makes it less necessary. However, the system is prepared to also operate in battery-powered installations. In this case, it will be necessary to indicate it in the “Settings” section and the system will apply another algorithm adapted to this use case.
It is planned that later Mirubeee will be able to limit the maximum power consumed in a house by disconnecting non-priority loads at times of high consumption. This avoids a “general blackout” due to power excess and would even make it possible to reduce the contracted power.
The devices that can currently be managed are:
- Electric water heater (for hot water)
- Radiator/electric heater
- Aerothermal
- Air conditioning / Heat pump (operated with IR remote control, infrared)
- Pool filtration system
System elements
The Mirubeee system is made up of the following elements:
- Actuators
- Photovoltaic inverter / compatible meter (Wibeee)
- Gateway (coordinator)
- Mobile APP
· Actuators
The actuators are the control elements, those that turn on, turn off or change the temperature setpoint of the devices. Mirubeee currently has three actuators:
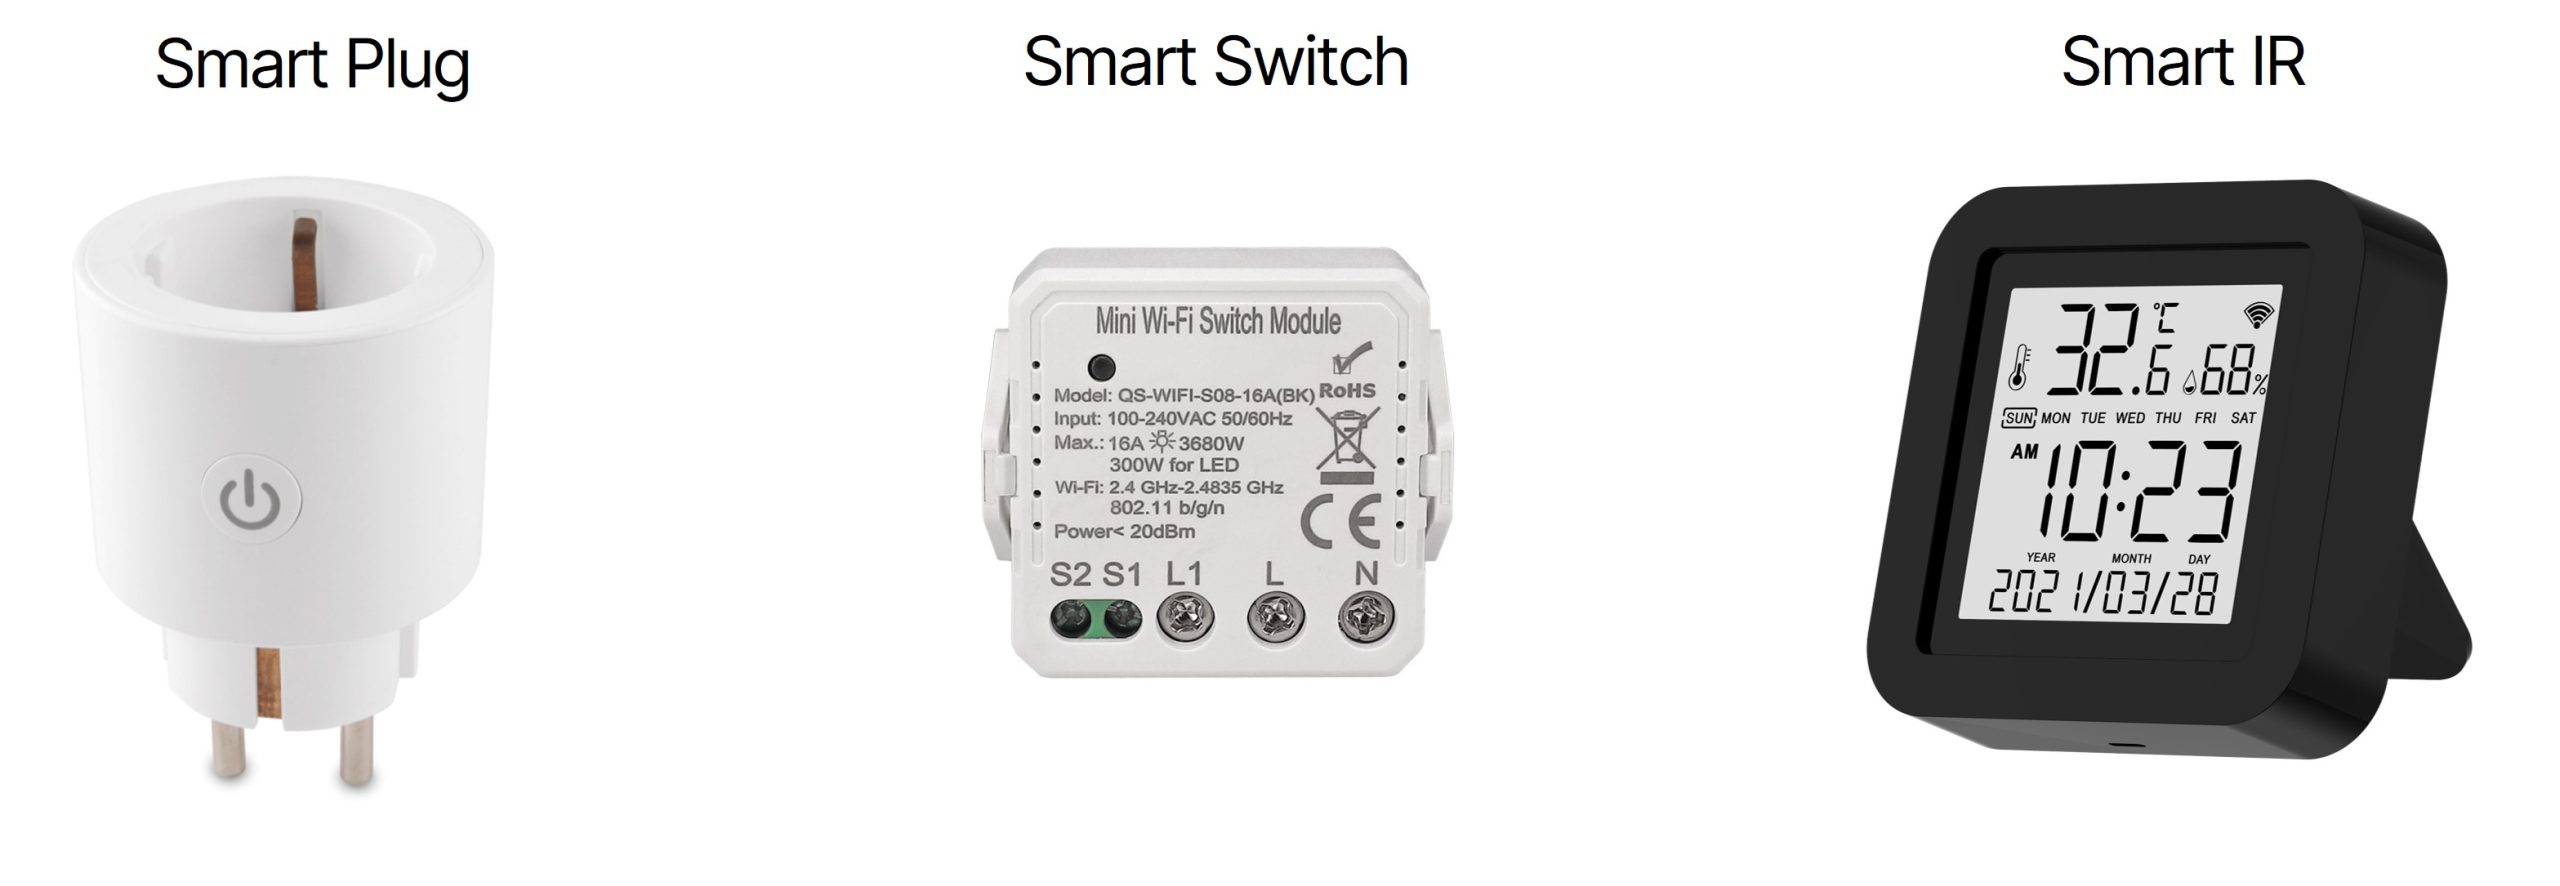
The Smart Plug controls the electric water boiler, the radiator or any plug-in load. It is a 16A plug with electricity consumption measurement and a cut-off relay. It is placed in the power outlet of the managed device. To manage the radiator, you can optionally link a Smart IR to manage it according to the ambient temperature (a Smart IR can serve data to multiple radiators).
The Smart Switch typically controls pool filtration or an aerothermal heat pump. It is a box with screw terminals with a 16A cut-off relay. It works similar to the Smart Plug. Small in size (39 x 39 x 15 mm) it can be mounted on a DIN rail. It is NOT potential-free contact. Therefore, to manage an aerothermal heat pump it will be necessary to place a contactor in between that acts on the “Normal/Boost” operating mode pins.
The Smart IR controls the Air conditioning / Heat pump. It is an infrared emitter that, installed on a table with direct view of the Air conditioning unit, sends commands to the unit as your remote control would (On/Off, temperature setpoint). It is not suitable to control equipment without a remote control. It also measures ambient temperature and humidity. It is powered by USB.
All actuators communicate via WiFi, without the need for wiring.
· PV inverter / compatible meter (Wibeee)
The Mirubeee system, in order to function, needs to know the solar production and consumption of the house (import / export). The source of this data can be the photovoltaic inverter itself (if accessible via the local network) or a compatible meter such as a Wibeee .
Solar inverters, at least the most modern ones, usually have data not only on solar production but also on the import/export of the house thanks to an external meter. In order to avoid duplication of meters and for the economy of the solution, Mirubeee connects through the local network with the photovoltaic inverters to collect energy data. The compatibility of the Mirubeee system with various solar inverters depends on the make and model of the inverter (and even the firmware version in some cases). Depending on the manufacturer, access to the inverter data via the local network is feasible or not. In some cases, it may be necessary to activate access from the inverter configuration.
The compatibility of Mirubeee with the various brands and models of inverters is a “handcrafted” and progressive process. Each integration is a major or minor development with its own singularities. Currently Mirubeee has been successfully tested on the following inverters:
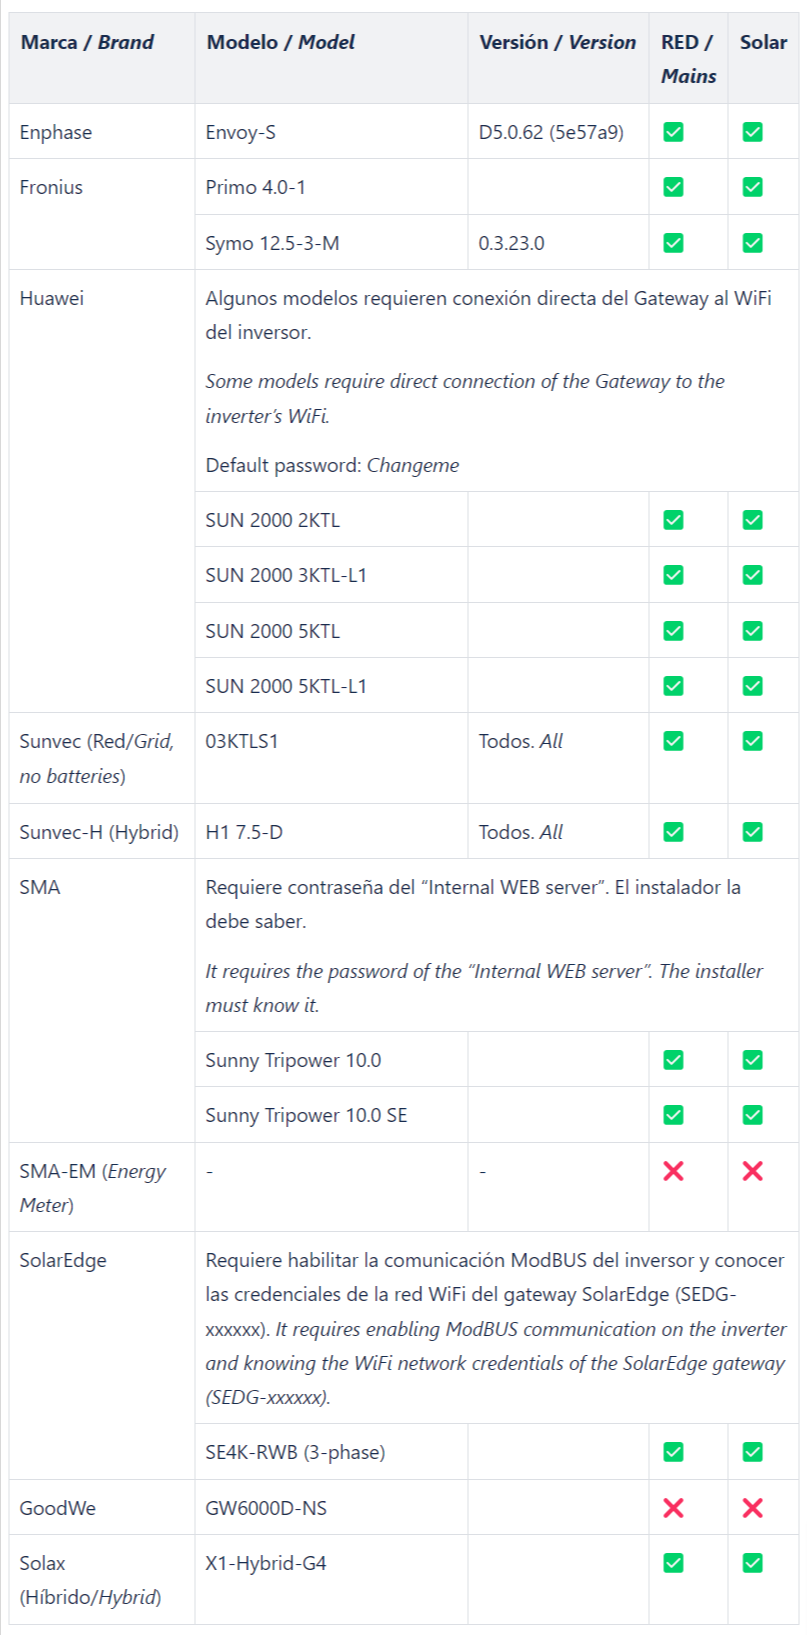
Although Mirubeee will typically work for the listed make and model, compatibility can only be guaranteed with the listed firmware versions (tested versions).
As an alternative to accessing inverter data, Mirubeee also works with a universal meter such as Wibeee. Similar to the inverters, Mirubeee can access the Wibeee data via a local network. The installation of the Wibeee device is done according to the manufacturer’s instructions and using the manufacturer’s APP. However, for the purpose of Mirubeee, it is only necessary that the meter is connected to the home WiFi network, it is not essential that it is linked to the Wibeee platform.
· Gateway (coordinator)
In the previous section it was explained that access to the energy data is via the local network. The equipment in charge of managing these readings and transmitting them to the Mirubeee server is the Gateway.
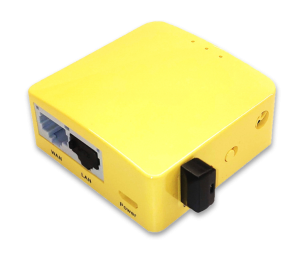
The Gateway is the central coordinator of the Mirubeee system. In addition to reading the energy data from the inverters (or from the Wibeee meter) it also communicates with the actuators and makes the actuation decisions. It is powered by USB and accesses the local network via Ethernet (cable). It will typically be installed next to the home router, occupying a network port.
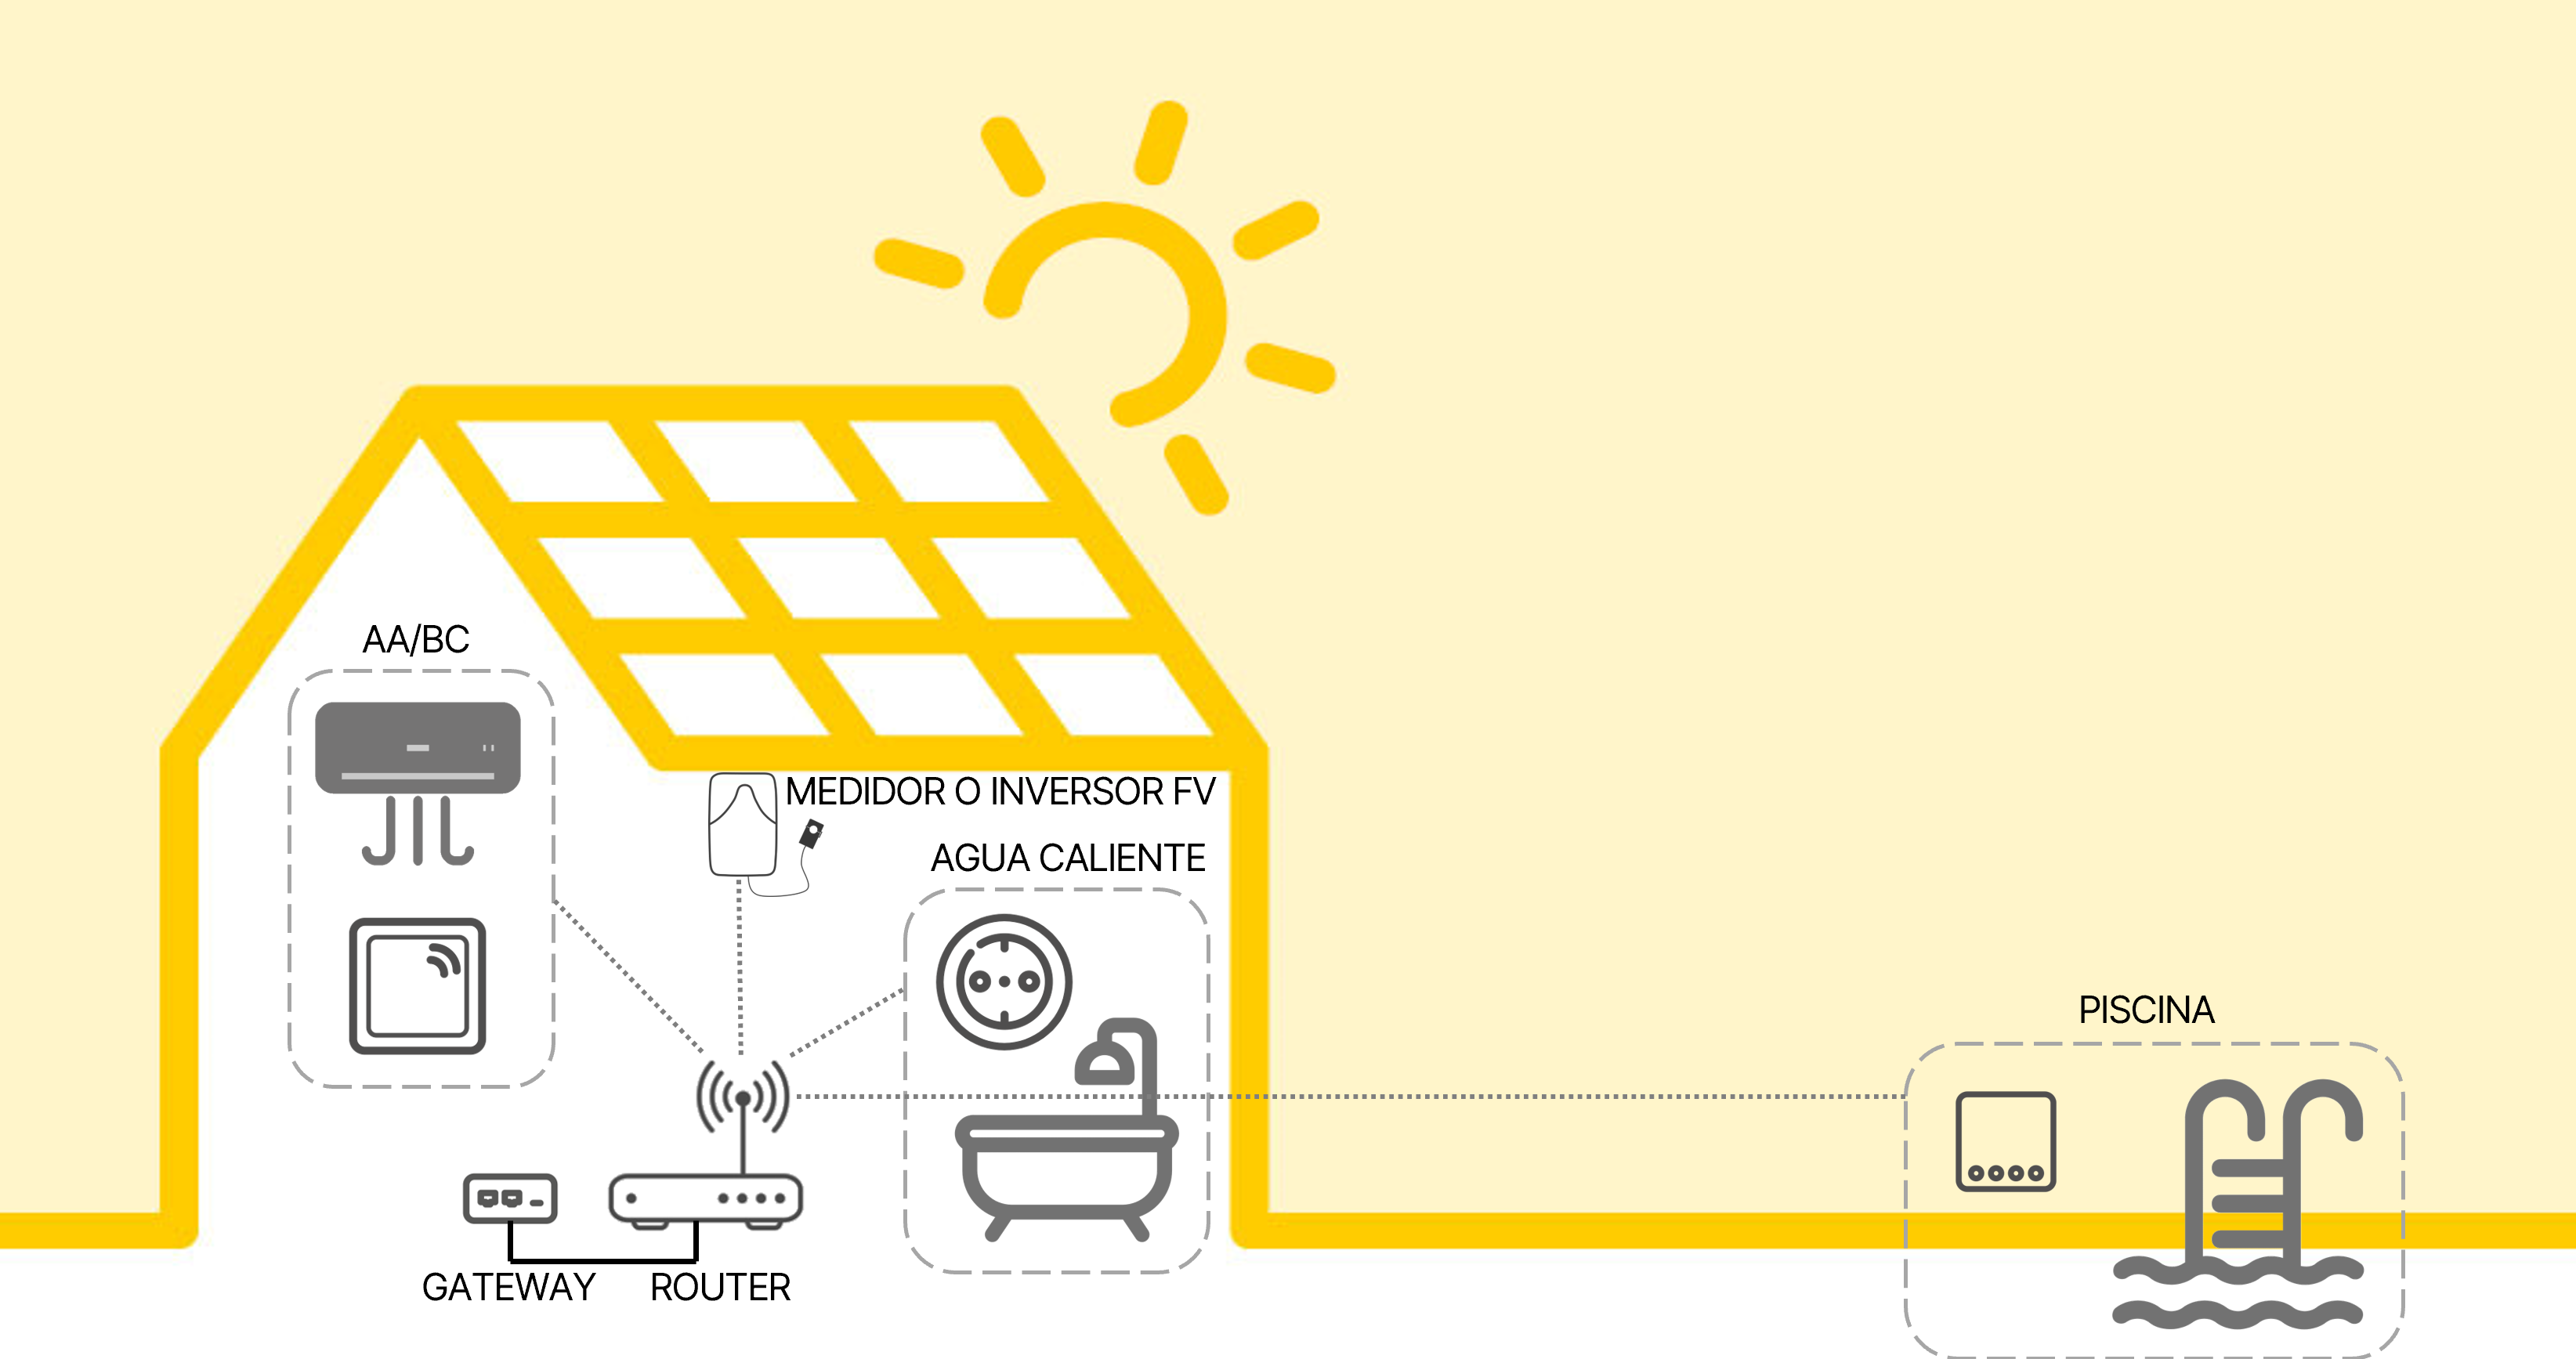
· Mobile APP
The entire Mirubeee system has a single point of interaction which is the mobile application (for iOS and Android, there is no WEB access). The APP allows you to register users, configure control equipment, link a Gateway, configure operating modes, schedules, rates, etc.
Once everything is configured and working, the APP can also be used to visualise production and consumption, the price of energy on the current day, monitor self-consumption targets, check that everything is working properly, etc.
System operation
The Mirubeee system is a surplus manager different from the usual systems. Manufacturers of photovoltaic inverters or other specific solutions for surplus diversion mainly use one of these two strategies:
1. On/Off system based on simple rules such as: “If the energy export exceeds ‘X’ W, turn on a specific load” (normally with a contactor or a smart plug). This system has the advantage of simplicity, but the disadvantage that it does not take advantage of the surplus until it reaches a certain export threshold. Therefore, many surpluses may remain unused .
2. Regulation system for resistive loads, typically for hot water heaters or electric heaters. It is a system that regulates the energy delivered to the consumer so that it adjusts exactly to the surplus that exists at all times. It is a very good system for using surpluses, but it has the following drawbacks: it only works for resistive loads (NOT suitable for air conditioning or pool pump, for example) and it is more complex than a simple smart plug (as it has to regulate) and therefore potentially more expensive.
Both common strategies provide instantaneous energy management, based on the power (kW) exchanged with the electrical grid at any given time.
A major difference of the Mirubeee system is that it manages based on the accumulated energy (kWh) exchanged with the grid every hour. The electricity company, within each calendar hour, makes a “net balance” between imported and exported energy so that, for each hour, only one “compensated” figure is billed, which can be positive or negative. Thus, for example, if the first half hour a household exports 1 kWh, and the following half hour the household imports 1 kWh, at the end of the calendar hour the company will bill 0 kWh.
This is precisely the aim of Mirubeee. To reach a “0 balance” of energy exchanged with the grid at the end of each calendar hour. This balance means that 0 € is billed for the purchase of energy and that, by exporting 0 kWh, all the energy produced by the solar panels has been used locally.
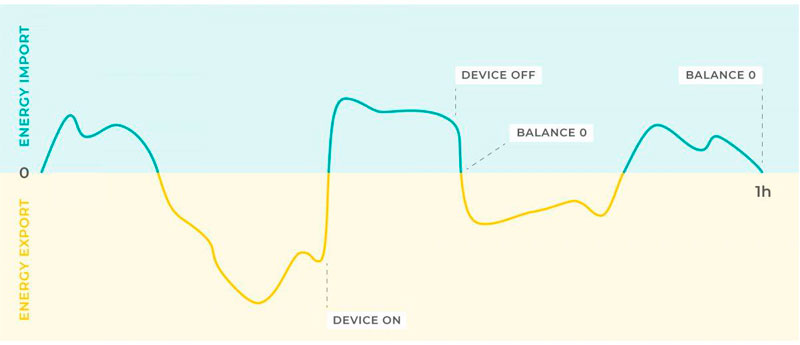
The general operation of Mirubeee follows the following flow:
- At each moment the net energy exchanged with the electrical grid during the current hour is checked.
- A certain amount of surplus is allowed to accumulate on the grid, and when a certain threshold of exported energy is reached, a load is turned on to offset that energy with imported energy.
- Operation is maintained until the balance is reached (balance “0”), then the load is turned off and the cycle starts over again.
The advantages of managing surpluses through accumulated energy are the following:
- It allows you to take advantage of 100% of surpluses using simple actuators (On/Off type), without dimming, even without knowing the consumption of certain variable loads such as air conditioners.
- It is more “inertial” so it significantly reduces the number of startups and shutdowns on the managed equipment compared to an instantaneous system.
The system can turn on multiple loads sequentially if there is a lot of solar production and little consumption, it is not limited to a single load. By design, the system works correctly even with variable consumption loads such as inverter air conditioners, as it keeps the loads on for more or less time as required to reach equilibrium. Mirubeee has been programmed to prevent loads from turning on and off too frequently (especially with air conditioning in mind).
If the Mirubeee system is used in a battery-powered installation, the system will apply a somewhat different management logic, more similar to instantaneous management but with some limitations of minimum on and off time. This is essential to avoid unnecessary discharge of the battery at the end of the day (the battery masks the load shutdown conditions so, with a standard algorithm, the loads could remain on).
In addition to surplus management, Mirubeee also optimizes the use of devices to avoid consumption during the most expensive hours. Mirubeee downloads energy prices every day and calculates what the “peak” hours are. Based on the price of the hour and based on the user’s configuration, Mirubeee can keep a device off during a peak hour or apply a less demanding temperature setpoint.
· Air conditioning / heat pump operation
The operation of the AC/HP is based on a weekly usage schedule that specifies when it is required to have that space heated and at what temperature. The calendar setting also specifies the desired behaviour in case of surplus production or during “peak hours”. Thus, for example, if there are surpluses in heating mode, a switching on or a change to a higher setpoint can be programmed to accumulate heat in the environment (the heat will accumulate in the materials that surround that environment). After accumulating heat, when there is no surplus or when electricity is more expensive, heating consumption will be lower. Similarly, during peak hours you can program a shutdown of the equipment or a lower setpoint to minimize consumption during the most expensive hours. The same but in reverse occurs with the refrigeration calendar.
In this way, taking into account scheduling and electricity prices, it is possible to play with the thermal inertia of the space and use energy optimally.
· Radiator operation
The electric radiator can work in two ways:
- WITH temperature sensor
- WITHOUT temperature sensor
The operation of the electric radiator WITH a temperature sensor is the same as that described above for the heat pump. The only difference is that the operation of the radiator will be linked to a Smart IR (which will not use the infrared emitter function but rather its environmental sensor). Several radiators can be linked to the same Smart IR (such as a house with gas heating and a single thermostat in the living room) or have a temperature sensor for each room.
Sometimes radiators/heaters incorporate their own thermostat to stop the equipment at a certain temperature. So that the own thermostat does not interfere with the management of Mirubeee, it is recommended to set the radiator’s own thermostat to the maximum (or above the maximum planned setpoint).
The operation of the electric radiator WITHOUT a temperature sensor has similarities with that of the heat pump but is somewhat simpler. It is based on a weekly usage schedule in which you specify only when you need to have the space heated. In the calendar configuration, the desired behavior is also specified in case of production surpluses or during “peak hours”, but only in terms of On/Off, without temperature setpoint variations.
It should be noted that in operation without a temperature sensor, if the equipment has its own thermostat, this limits the room temperature (and in this case it is not recommended to set the thermostat to maximum).
· Operation of aerothermia (heat pump)
Aerothermal energy is an increasingly used system for the generation of domestic hot water and/or heating (and cooling) in homes. Although it is a very efficient technology, aerothermal equipment consumes a lot of electrical energy throughout the day. The use of aerothermal energy is especially interesting in homes that have a photovoltaic solar installation. The two technologies combined allow a high level of comfort at a low cost.
The Mirubeee solar surplus manager is the ideal tool to connect the photovoltaic solar production system with the aerothermal equipment and make them work in a coordinated manner. Aerothermal equipment has two particularities that differentiate it from other equipment managed by Mirubeee:
- They cannot be turned on and off by cutting off the power as if it were an electric radiator (not recommended).
- Frequent variations in operating conditions should be avoided.
The Smart Switch is used to manage the aerothermal systems with Mirubeee. The interaction is done on contacts on the electronic boards of the devices, in no case the power supply of the device is cut off. Depending on the status of these contacts (open/closed), the operating mode of the device is switched between Normal and Boost. Switching to Boost mode increases the setpoint temperatures of the hot water tank and the heating circuit, according to how the aerothermal equipment itself is programmed.
Aerothermal management does not require programming calendars, it is completely automatic. When there is solar surplus, it changes to boost mode and, when there is none, it returns to normal mode.
· Hot water boiler operation
The Domestic Hot Water (DHW) system, through an electric water boiler, is an excellent energy accumulation system in the form of heat, something like a “thermal battery”. The operation of the boiler is based on an operation calendar in which the hours of “critical use” are indicated. Normally the use of a shower is considered critical (the water has to be at the normal temperature so as not to lose comfort) while the rest of the uses such as washing dishes or hands would be non-critical uses (in principle it would not be serious if the water came out a little warmer). At all times, it is the user’s decision as to what is considered critical and non-critical use.
The water heater will always turn on during the hours indicated as “critical use”, regardless of the energy price, to guarantee the availability of hot water during critical uses. The rest of the time, the boiler will be switched off and available to be switched on when there is a PV surplus.
It is recommended to schedule the start of the “critical use” period about two to three hours before the intended use to ensure that the consumption temperature is reached at the expected time. This precaution does not imply greater consumption. If the boiler was already at the set temperature (due to solar surpluses from the previous hours), forcefully turning it on some time before will cause the boiler to be just powered without consuming.
As an example, if hot water is needed for a shower at 7 a.m., the recommended schedule would be from 5 a.m. to 7 a.m. If the intended use is several showers between 7 a.m. and 8 a.m., then the recommended schedule would be 5 a.m. to 8 a.m.
Ideally, after the showers, the boiler should be left cold in order to utilise its solar energy storage potential throughout the day. It should be borne in mind that any time that the boiler is switched on after the last shower is wasted surplus management potential.
· Operation of the swimming pool
The pool cleaning and filtering system is a major electrical consumer that has the advantage of being very flexible. It is normally established that pool filtering must operate a certain number of hours a day, without being particularly relevant at what specific hours. Traditionally, a mechanical clock/timer installed in the pool’s electrical panel has been used to do this management. Mirubeee uses the Smart Switch to replace the mechanical clock and act at the right time based on the price of energy and available solar surpluses.
Pool management has three modes of operation:
- Fixed schedule – The user indicates the hours per day in which it should operate (without surplus control). Equivalent to the traditional electromechanical watch.
- PV surpluses only – The system only works when solar surpluses are available. The user can indicate a maximum number of daily hours of operation to avoid excessive use on days with a lot of surplus. If one day there is no surplus, the system does not turn on.
- Optimized – Daily hours – The system guarantees the operation of a number of daily hours, always prioritizing surplus usage. The user indicates the target daily filtering hours and the system turns on filtering whenever there are surpluses. After sunset, the remaining operating hours to meet the target are calculated and, if they are missing, the filtering will be switched on in the cheapest hours until the next sunrise. It is also possible to indicate a minimum operation during daylight hours (so that it does not happen that the filtering only works at night).
Installation of the system
· Download of the mobile APP
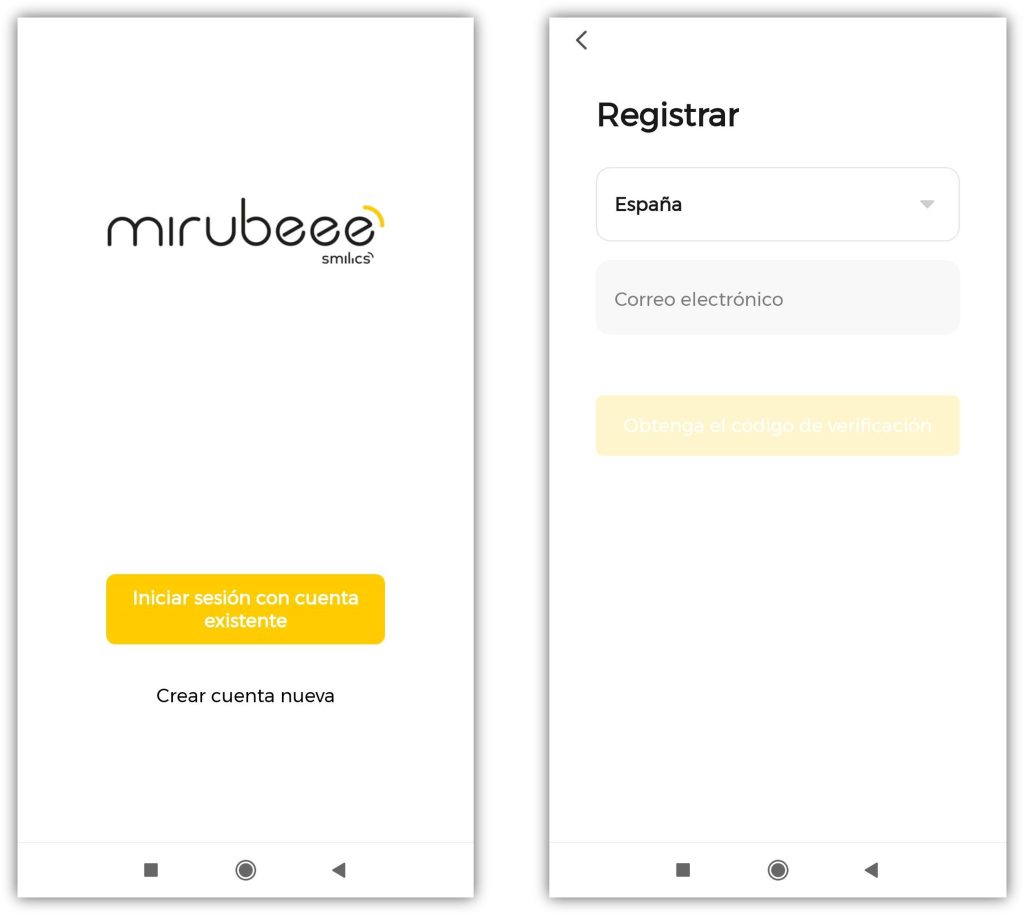
The first step to install and use the Mirubeee system is to download the Mobile Application. You can download it at the following links:


The first time you open the APP, you must create a new user account with a valid email .
· Linking the actuators
Once inside the APP, the available actuators must be added. You must be in the house where you want to install them, have the phone’s WiFi and Bluetooth connectivity turned on , and know the password for the house’s 2.4GHz WiFi network.
Normally, the process of linking the actuators will be very simple. First you must physically install the actuator (Plug, Switch or IR) and wait for it to initialize (blue light flashing).
Automatically, a message like the following should appear on the APP screen:
![]()
If the message does not appear automatically, the installation can be forced to start by pressing the “+” button at the top right. If the blue light on the actuator does not flash, the reset button must be pressed for 5 seconds.
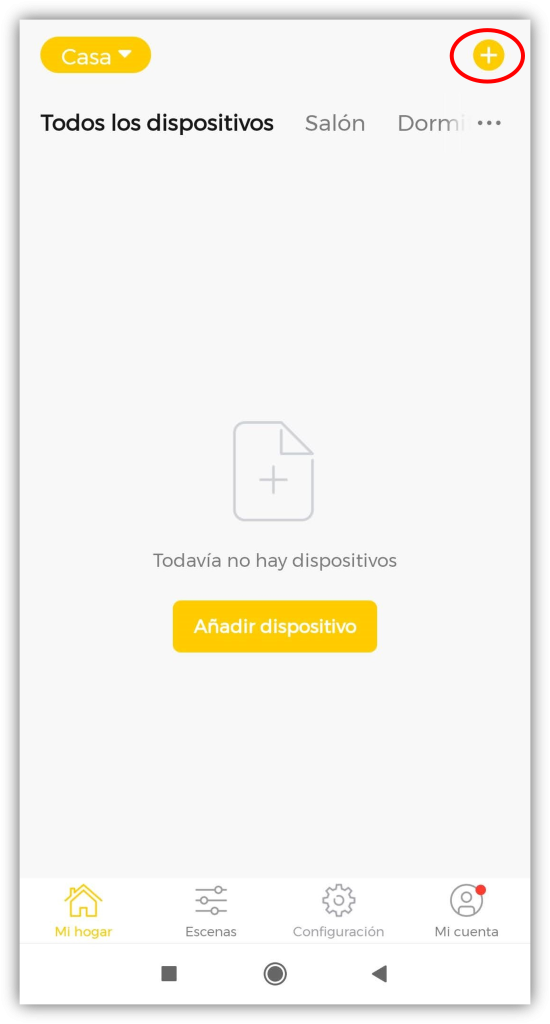
We must indicate that we want to continue the process (“Go to add”), select the home WiFi network, enter the password and wait for the linking to finish. At the end of the process, you can give the actuator a familiar name (e.g. “Living room aircon”).
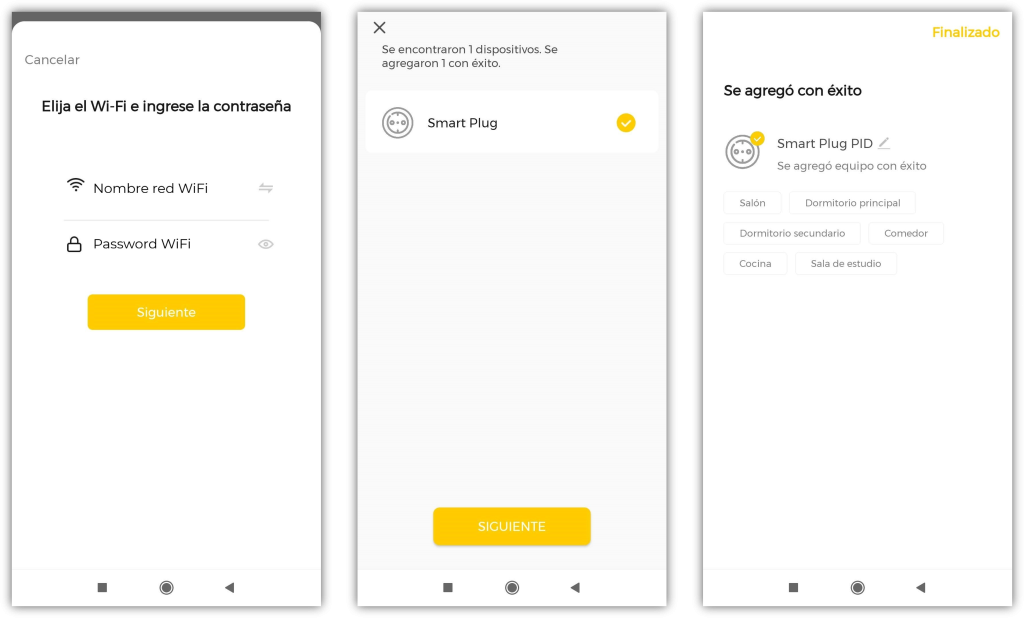
The newly added actuator will then appear on the main screen. Repeat the process for the other actuators.
Special case of Smart IR
The configuration of the Smart IR (Infra-Red or Infrared) is a little different from the Plug or Switch. After linking the actuator, the unit will be connected to the WiFi and reporting the ambient temperature and humidity. However, it will be necessary to do some additional configuration to find the right infrared library for the specific Air Conditioner to be controlled. It is like finding the “universal controller” that works with that Air Conditioner.
To do this, enter the Smart IR panel and click on the “Add” button. Click on the “Air conditioning” icon and then select the Air brand from the list (you can type in the name to search).
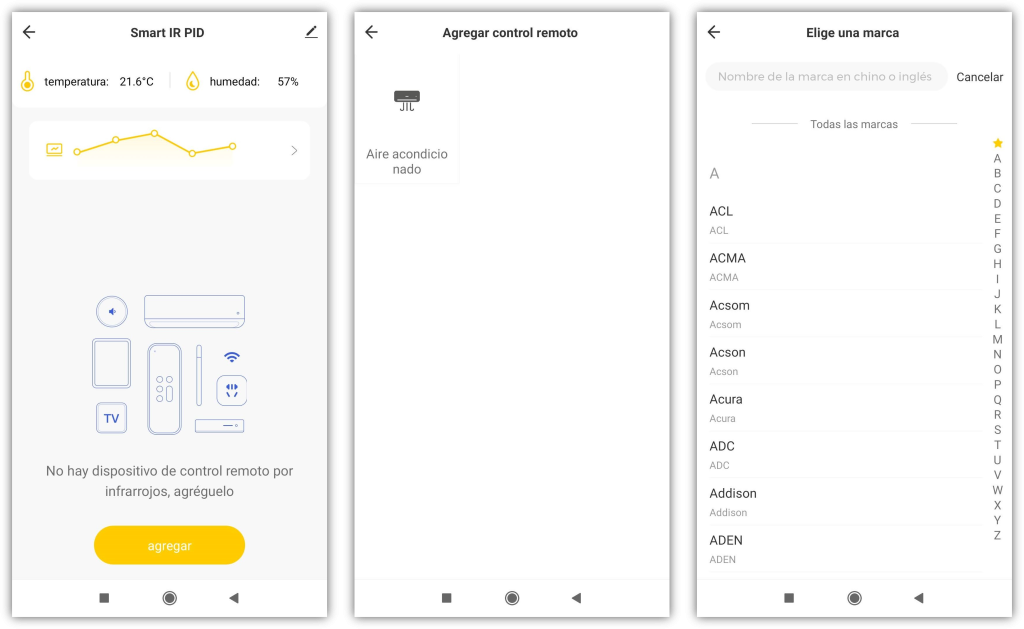
In order to filter through the many libraries of that brand, a number of function tests are carried out. The first one will be to try turning on the Air. If it works, click on “Works fine!”, if not, “Try another one” until it works. In the same way, other operating modes or temperature setpoints will be tested, until the “final test” is reached.
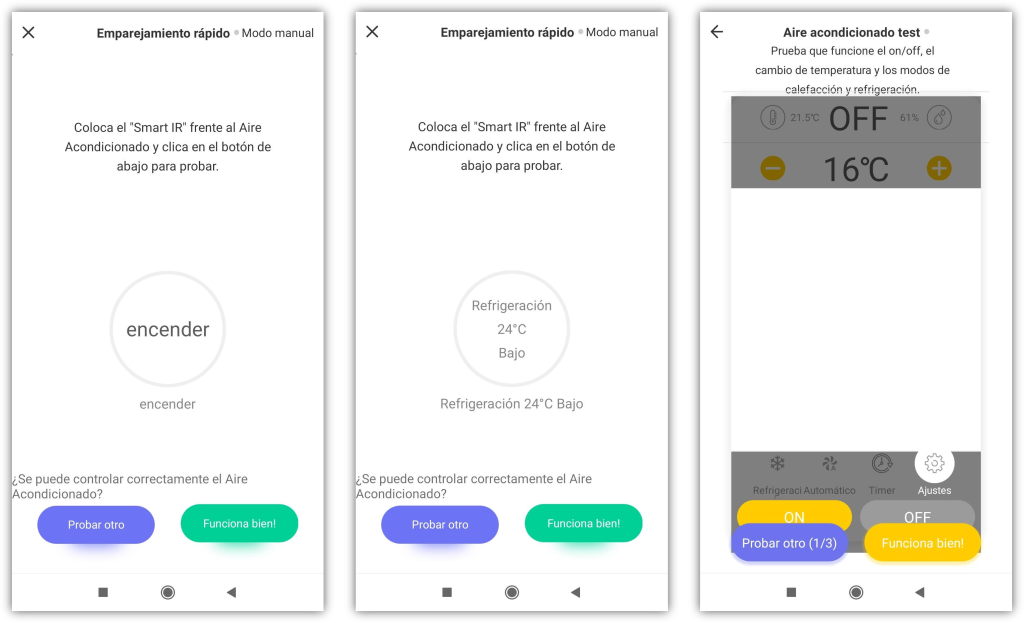
In the final test we will have to check that everything we are interested in is working, which is the following:
- Switching on and off.
- Change temperature.
- Set the operating mode to cooling and/or heating.
(Mirubeee does not handle fan speeds or other modes of operation).
If the final test is satisfactory, after clicking on “Works fine!”, all that is left to do is to name the device and finish (OK button).
![]()
If after trying several libraries you do NOT reach a satisfactory final test, you should go back to a filter test and press the “Try another” button several times until you reach the “No matching code library” message:
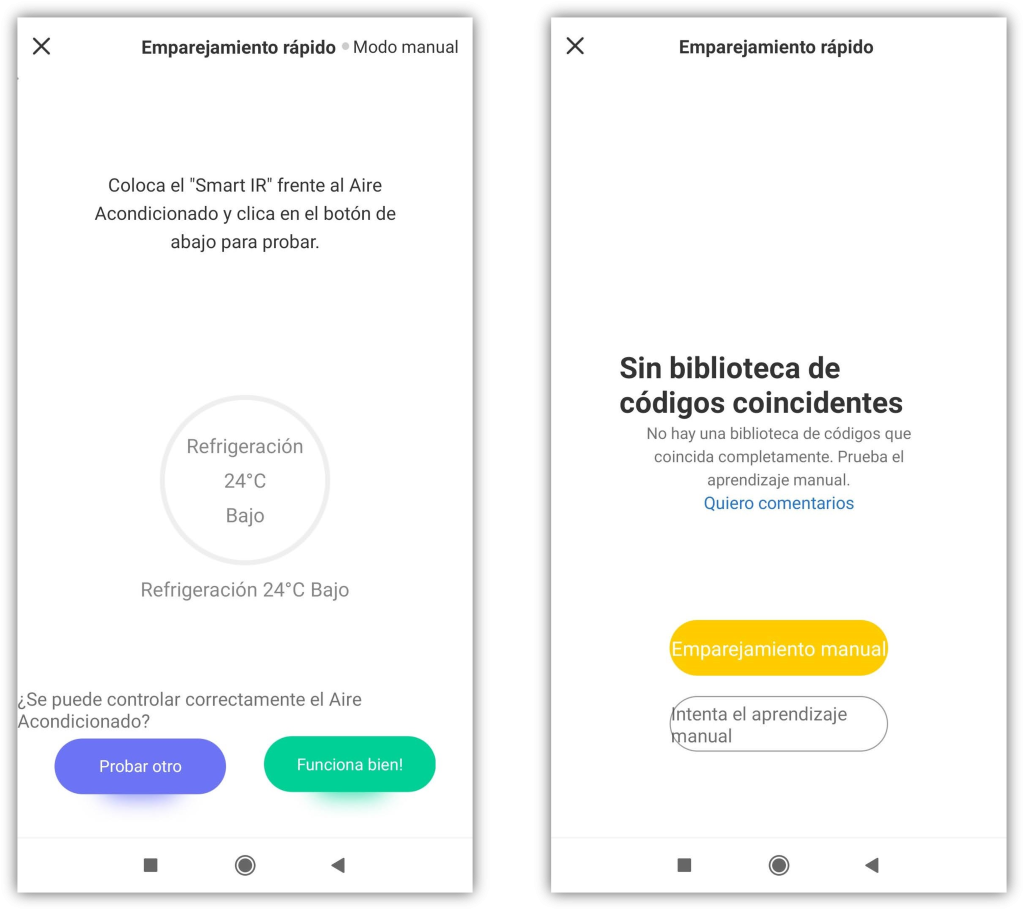
In this screen, the option of the WHITE BUTTON: “Try manual learning” must be selected. This will allow the Smart IR configuration to be done in another way.
In this configuration mode, the instructions on the screen must be followed so that the Smart IR “learns” the codes used by the Air conditioning equipment. After pressing “OK” on the initial screen, you must point the Aire remote control at the Smart IR and press several buttons:
- On/Off
- Increase/Lower temperature
- Operation mode
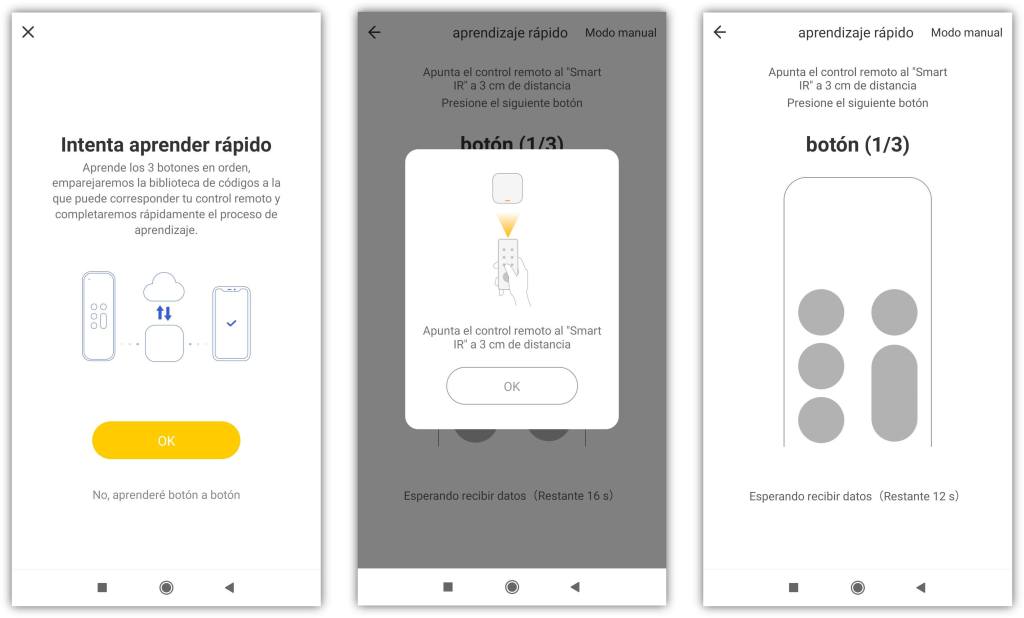
In this learning mode, the Smart IR searches for the appropriate library based on the signal it receives from the remote control, instead of searching by brand. The manual learning process ends in the same final test screen seen previously, where other infrared libraries can be tested.
Usually, after this process, it is possible to find a control library that works well. If it were not achieved, unfortunately, this Aire would not be compatible with the Mirubeee system.
Alternatively to manual learning, in some cases another search can be done by “compatible brand”. Given that some commercial brands share a factory or components, it is possible that a control library from another “sister” brand will work well. List of Air Conditioning brands that share infrared libraries:
- Airwell – Johnson – Electra
- Daitsu – Hiyasu
- Fujitsu – General – Fuji Electric
- Kelon – Dicair – Shunde
- MundoClima – FanWorld – AUX
- Sharp – IVT
- Saunier Duval – Chigo
· Gateway Installation
Installation of the Gateway is very simple. The only requirement is to have previously installed at least one actuator (Plug, Switch or IR).
Physically, the Gateway is typically installed next to your home router or anywhere where an Ethernet port (RJ45) is available. The Gateway needs to be connected to the same local network as the actuators and the photovoltaic inverter. Of its two Ethernet connectors, the WAN port will be used. The Gateway is powered by USB (USB-230V power supply included). The Gateway works with an external USB flash drive, also included.
Once connected and powered, the Gateway will initialize for the first time, connect to the Internet, check for possible firmware updates and after a few minutes it will be ready to work. The first time it may take a little longer than subsequent restarts (about 20 minutes). During the initialization process only a white light will flash. When there are three solid white lights, the Gateway is ready to operate.
Once initialized, the Gateway automatically finds actuators on the same local network and is linked to the user. No intervention required.
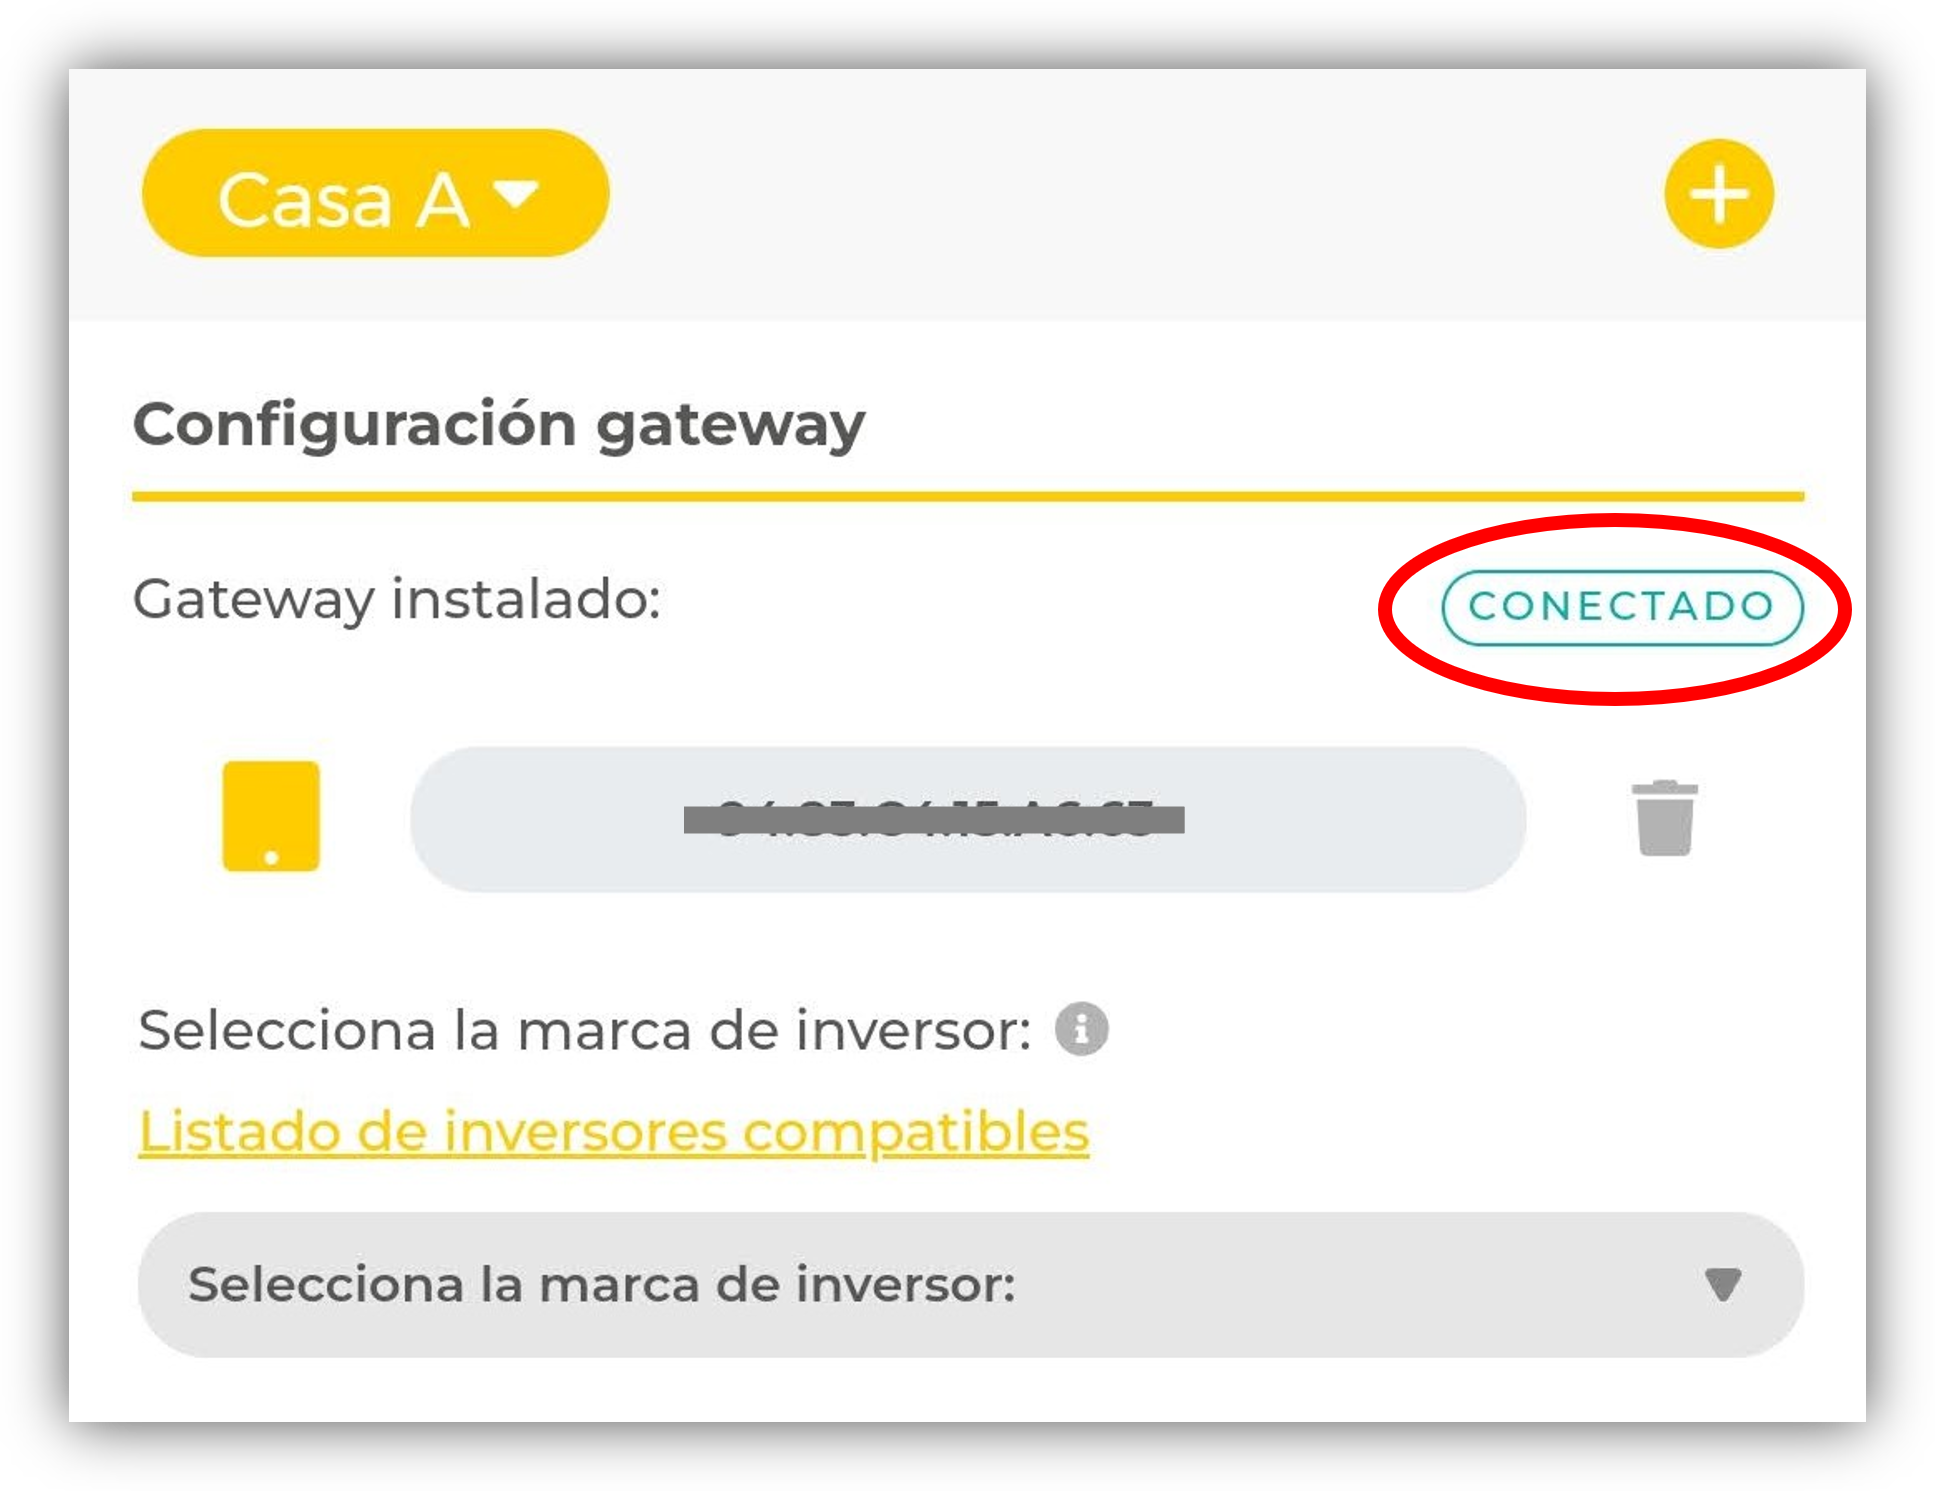
We will confirm that the Gateway is correctly connected and working with a CONNECTED message in the configuration section of the mobile APP.
· PV inverter / compatible meter configuration
Once the Gateway is installed, the solar inverter can be configured to read the solar production and grid consumption data (import/export).
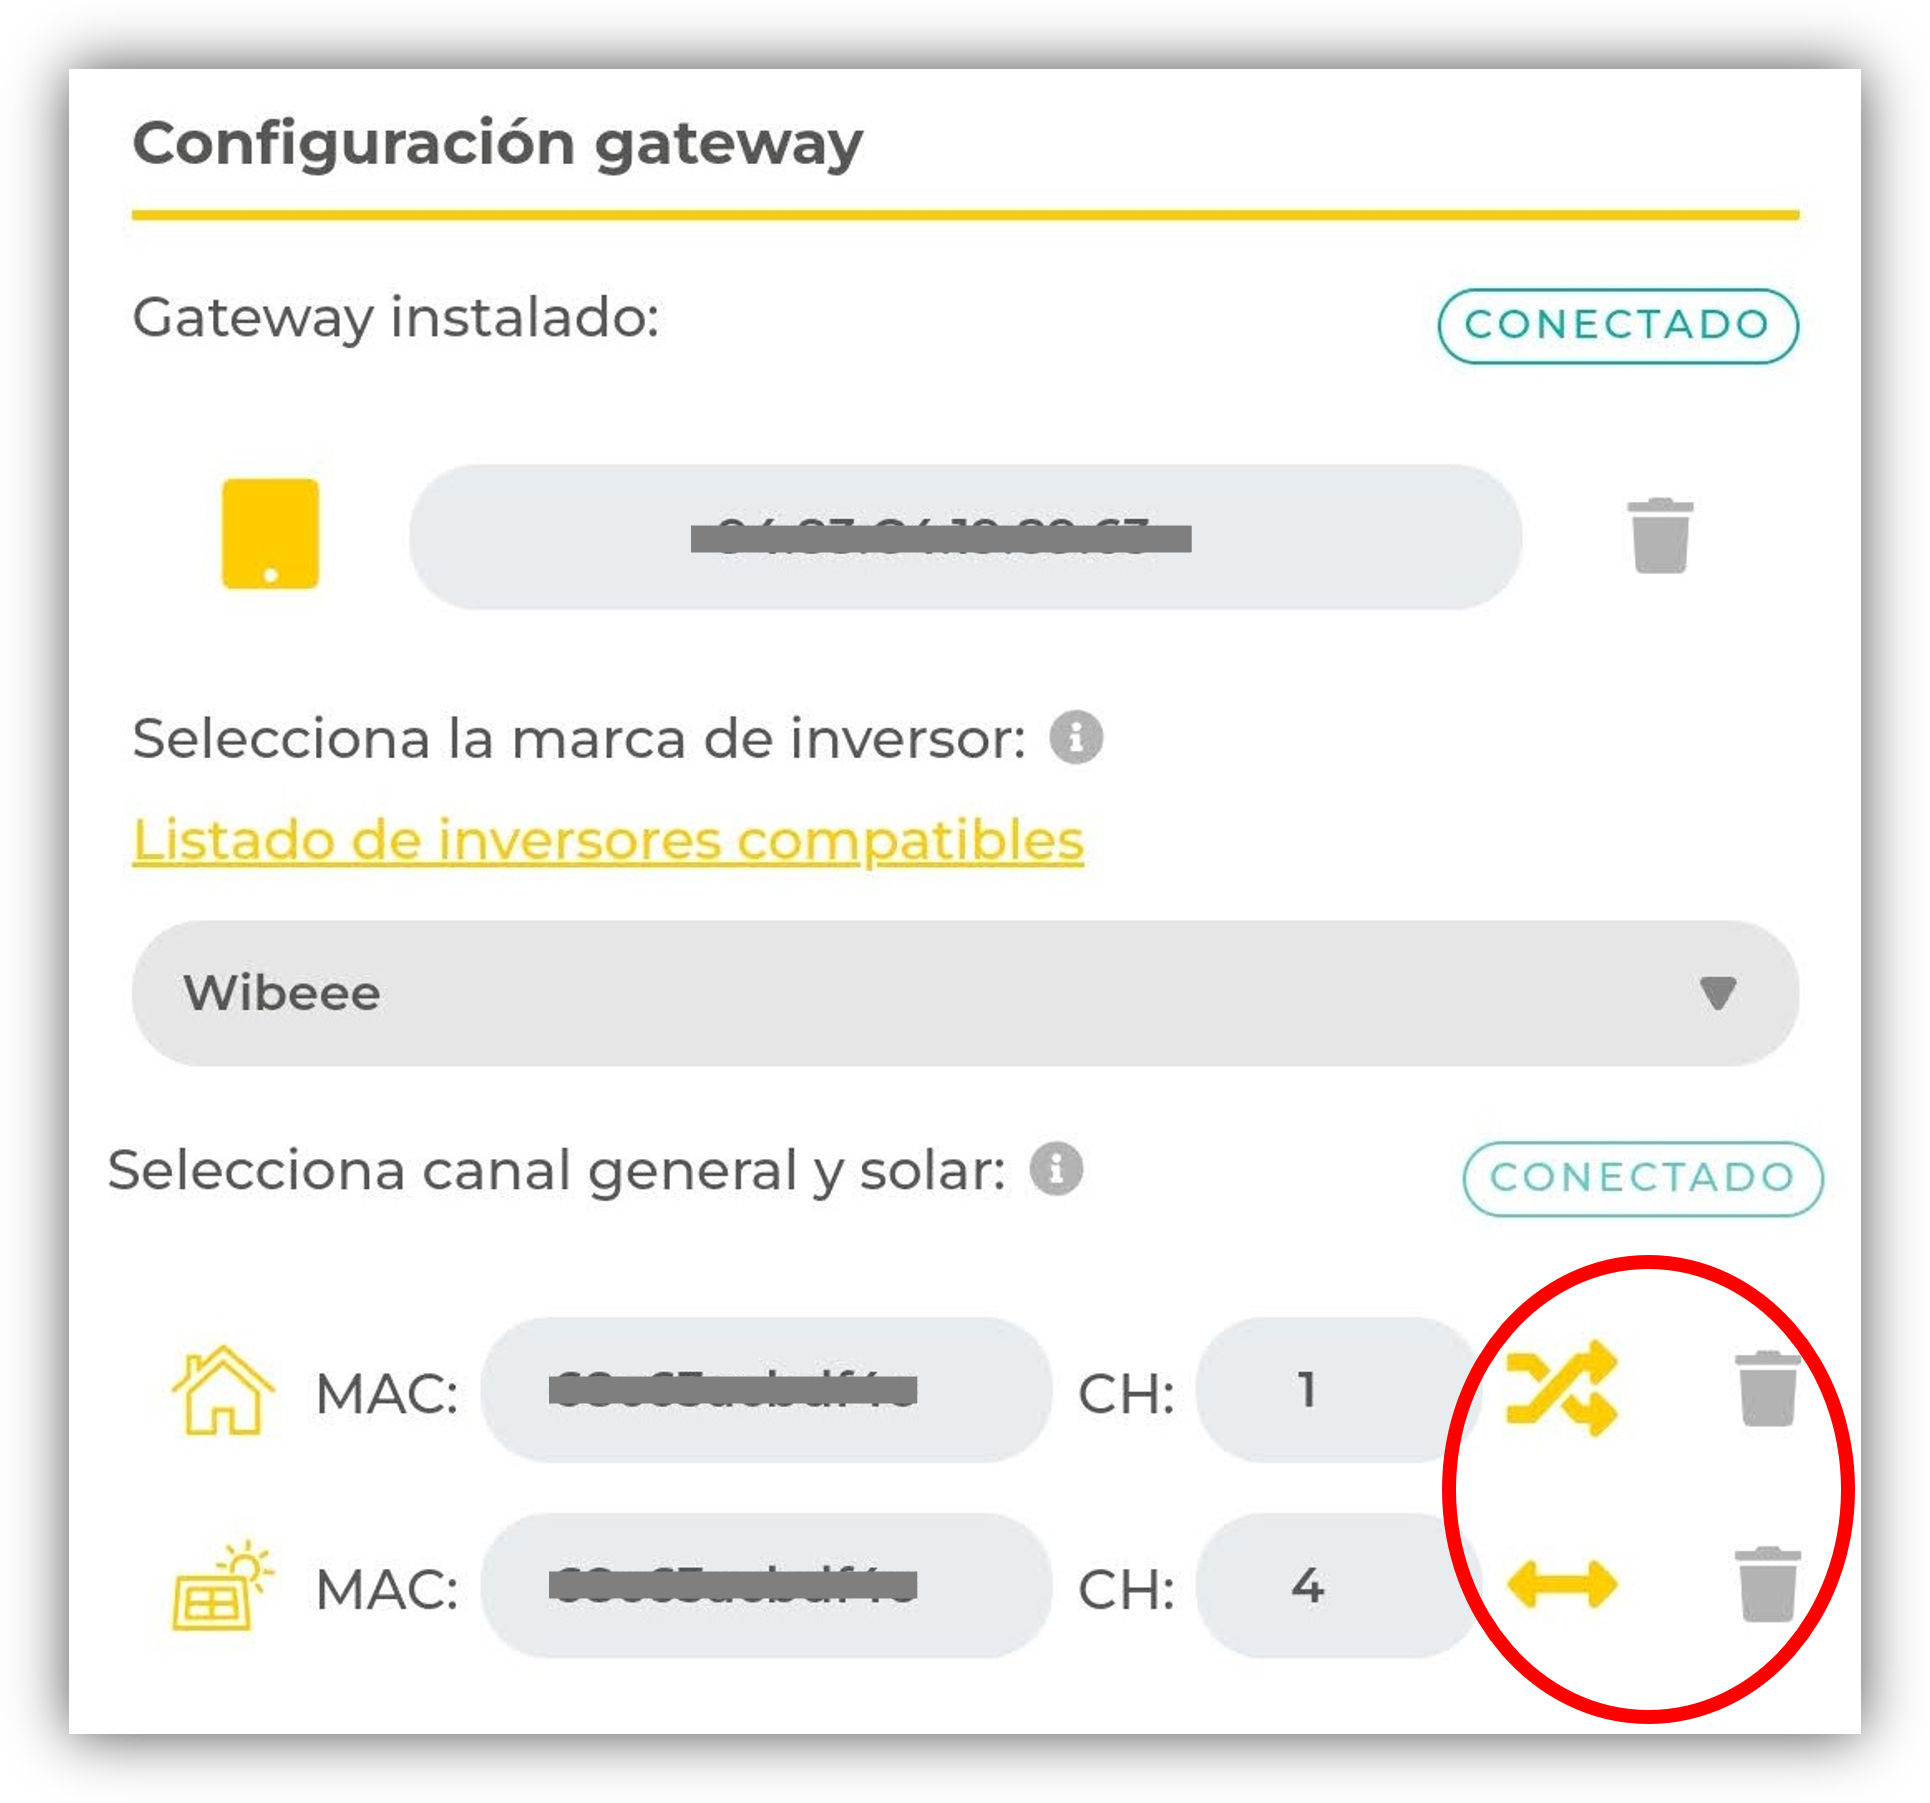
In the “Settings” section, the installed Gateway should appear (automatically detected) and a drop-down menu in which you can indicate the brand of the solar inverter or the compatible universal meter (Wibeee).
The Gateway will then search for the device automatically and display what it has found on the screen (it may take a few minutes). You can find more than one device (for example, if there are multiple Wibeee).
Depending on the solar inverter in question, different configuration steps are required. The individual configuration for each brand of inverter (and for the universal meter) is described below.
Wibeee meter
If Wibeee meters are used as a data source, you must select from the drop-down menu which device and channel is used for solar production and for measuring general consumption. If three-phase Wibeee equipment is used, the channel to select is channel 4 (the aggregate of the 3 phases). Each device will be identified by its MAC address (12-digit, letter code found on a silver sticker on the Wibeee device).
To finish the configuration process you will have to press the “Save” button.
Now, on the main screen (“My Home”), you can see “instant” data on solar production and grid consumption (updated every minute). The solar production data must always be positive while the grid consumption data will be positive when there is import and negative when there is export (discharge to the grid).
If the current direction is reversed (for example, export at night), the current direction must be changed in the configuration menu. To modify a configuration made, you must delete the current one (trash icon) and select the parameters again.
Enphase
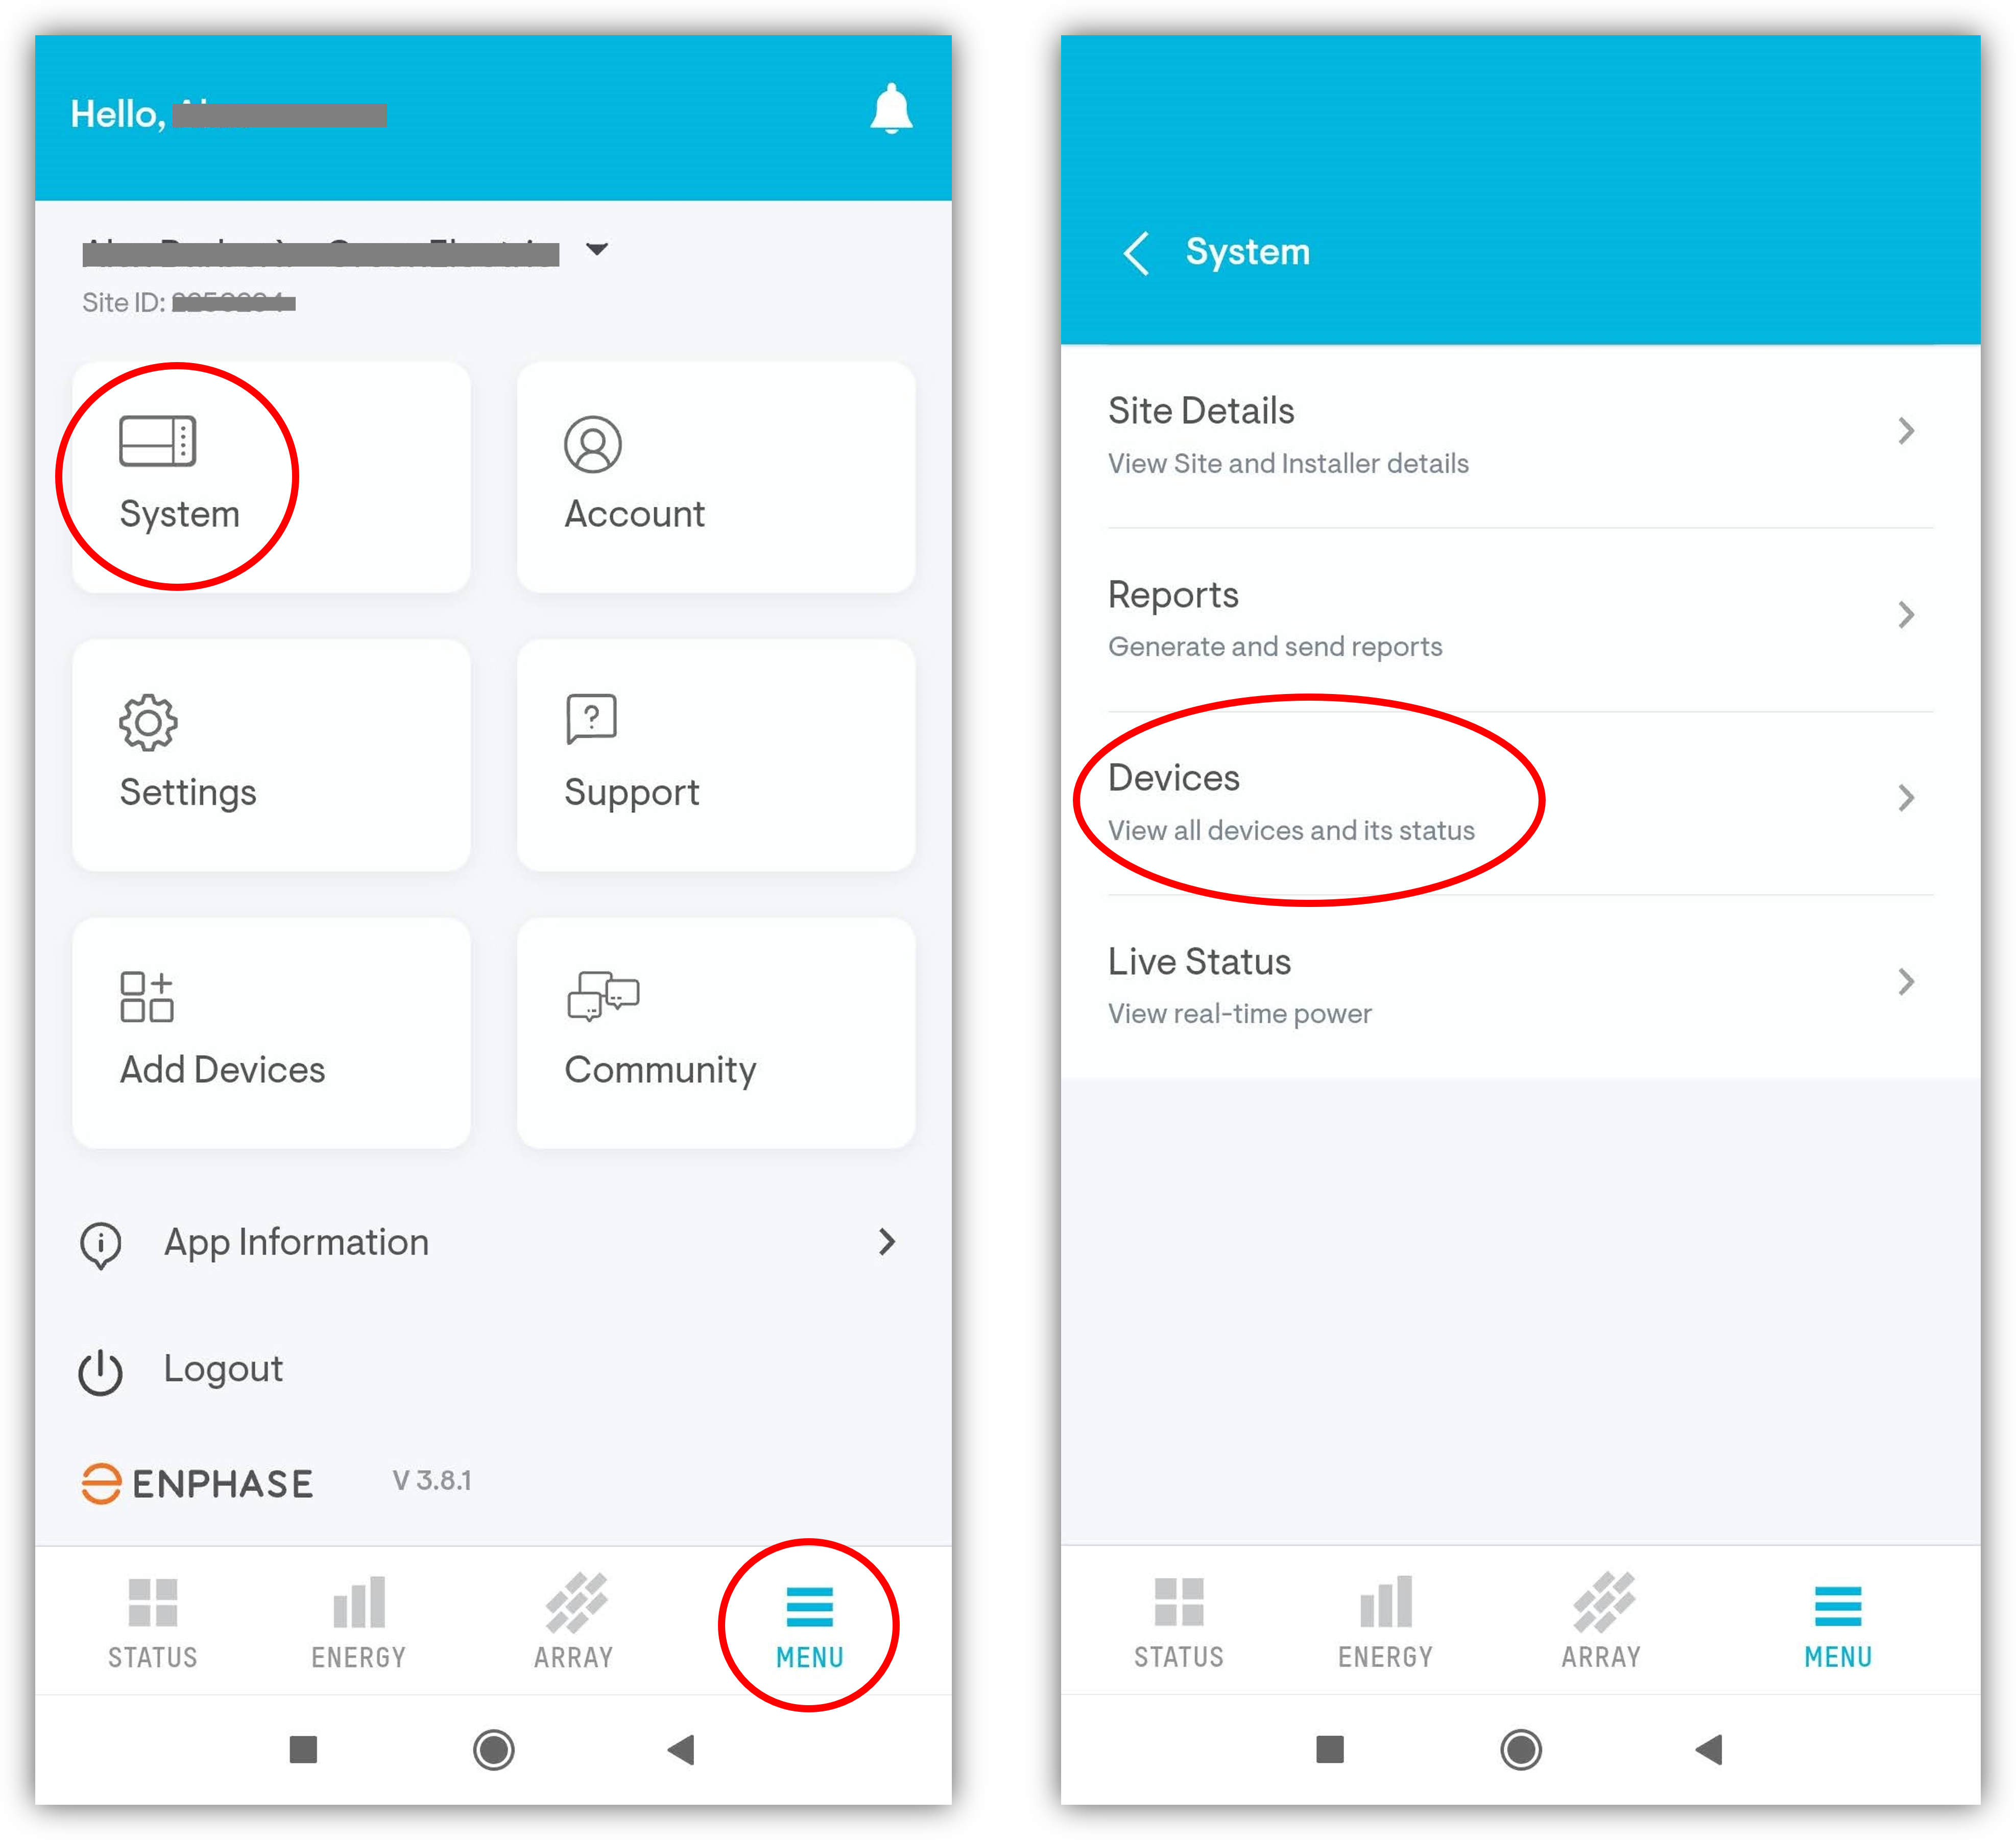
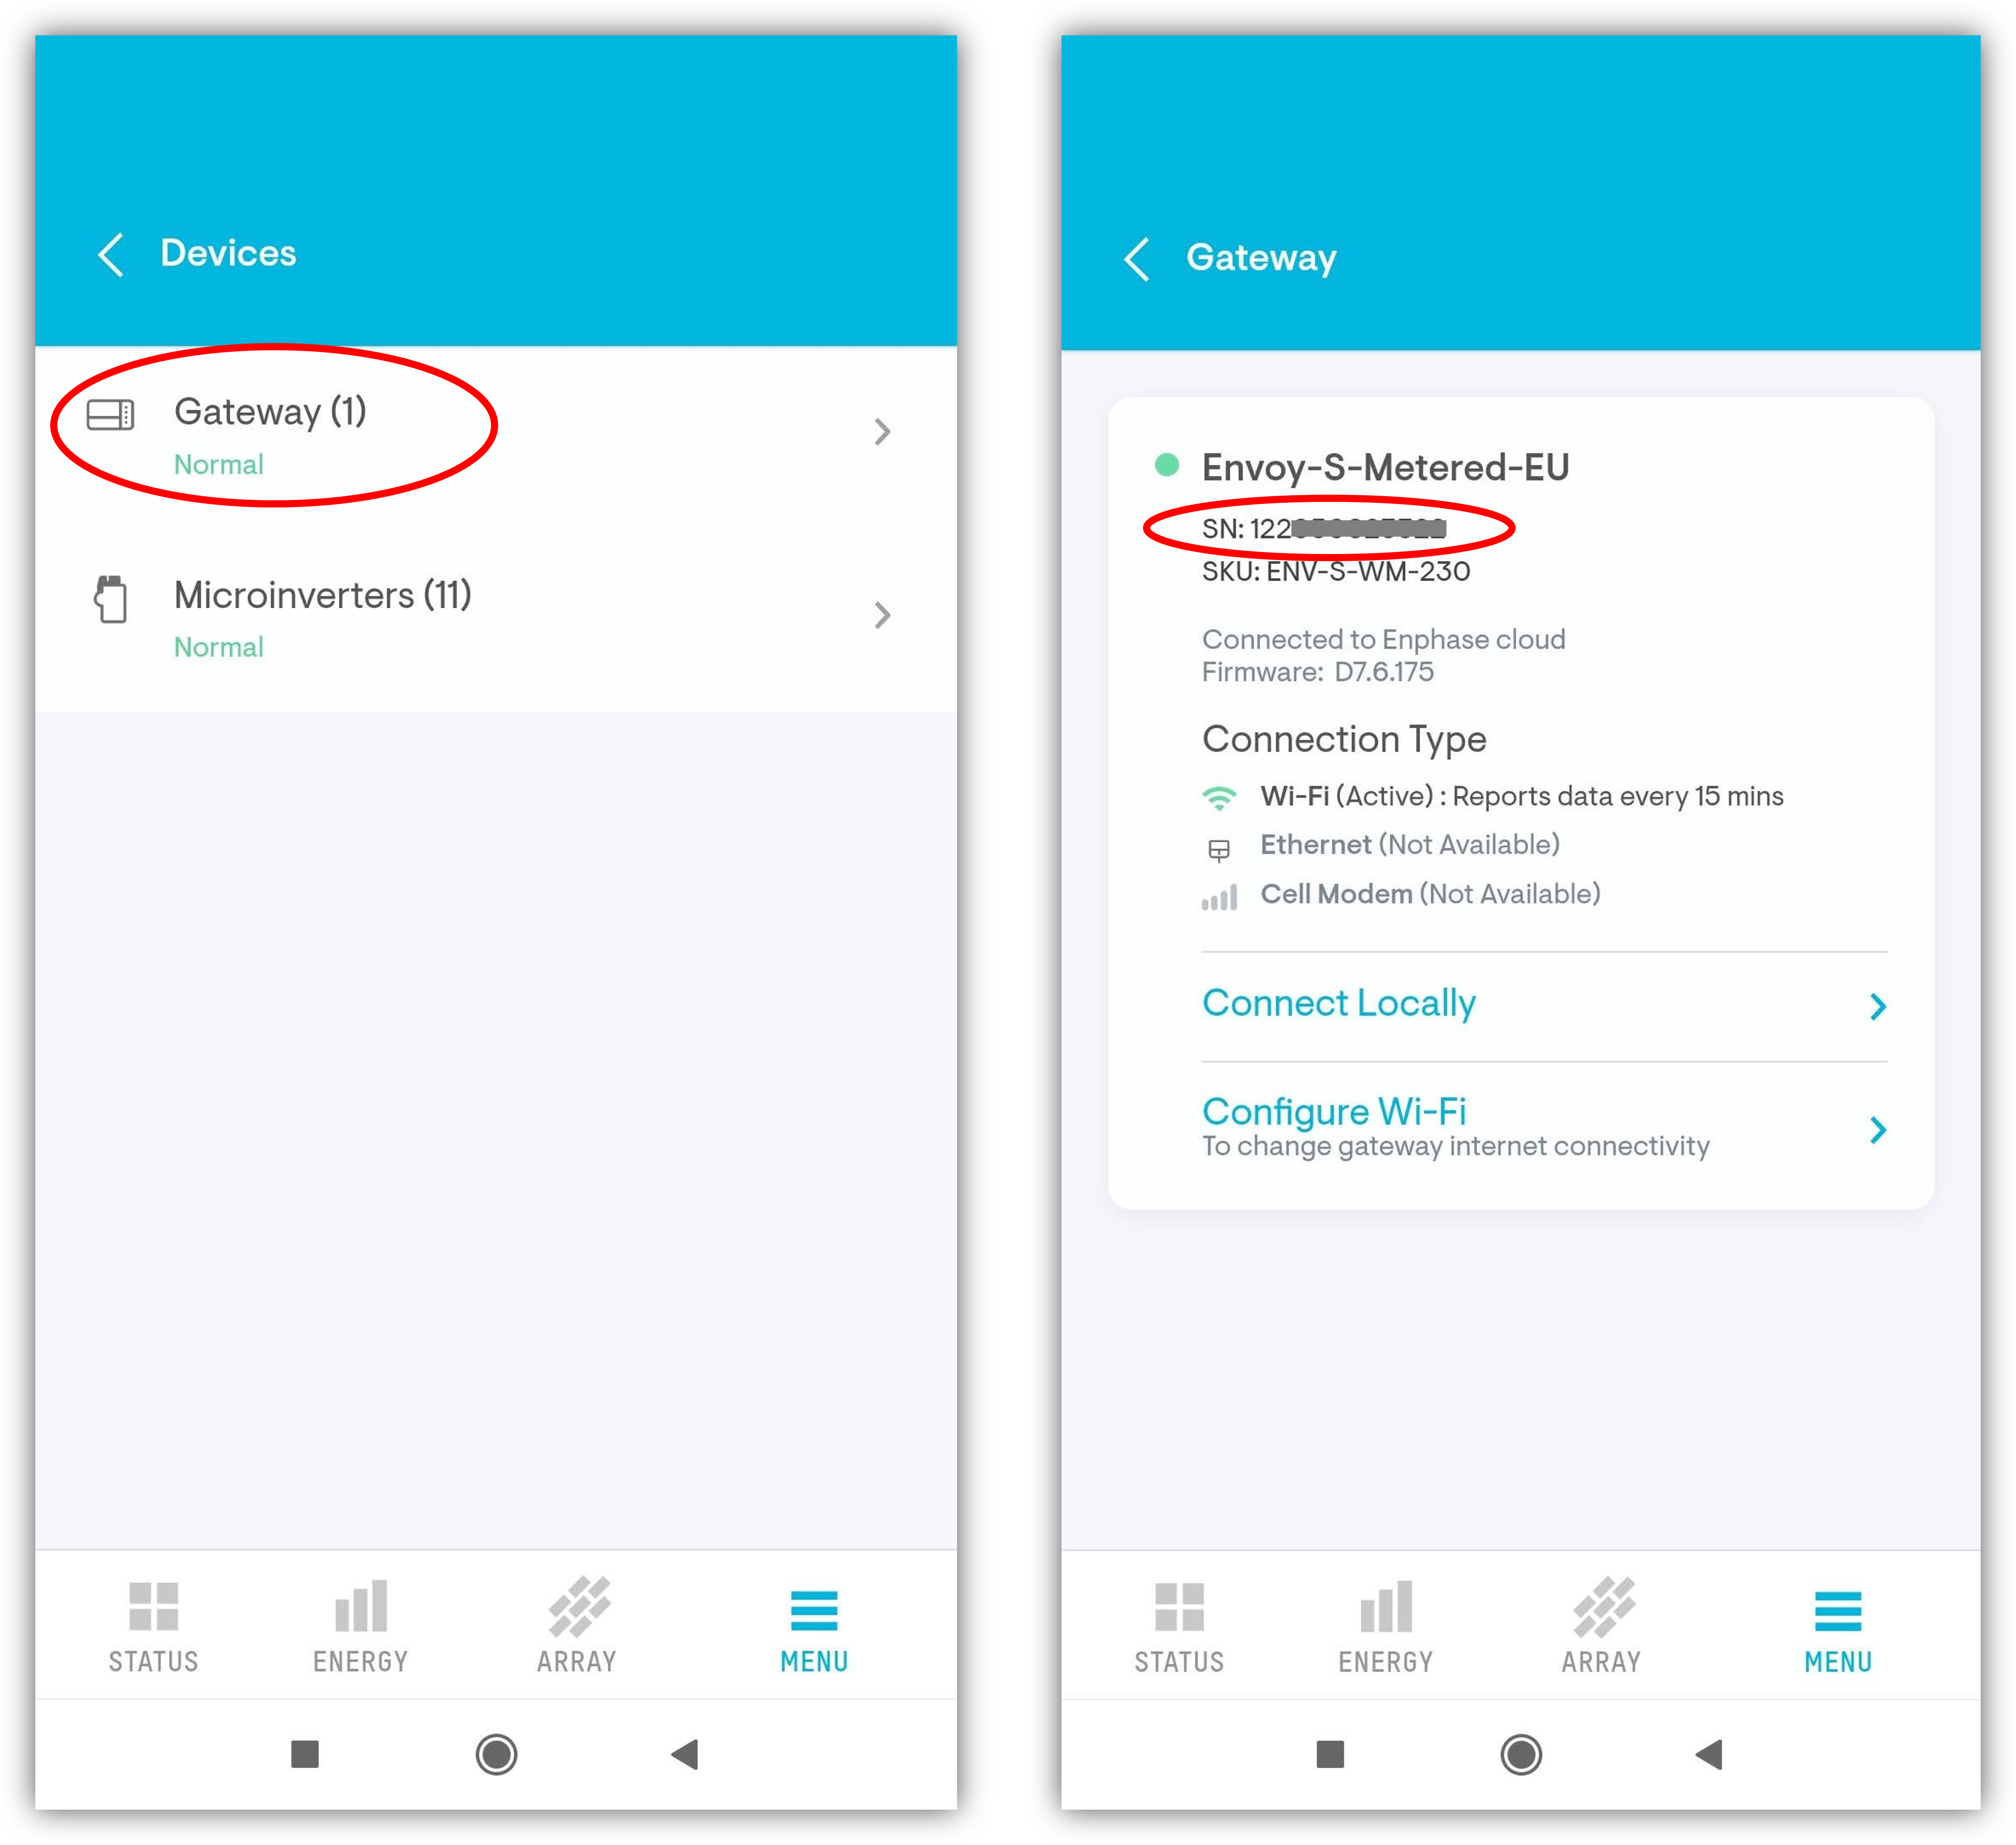
To access Enphase production and consumption data over a local network, you need to have the following information on hand:
- Enphase web access credentials (email and password)
- Envoy serial number
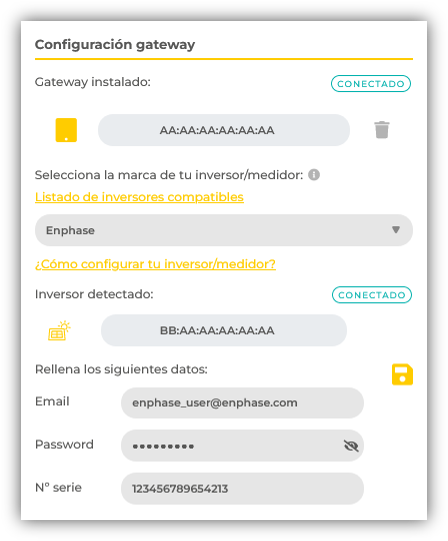
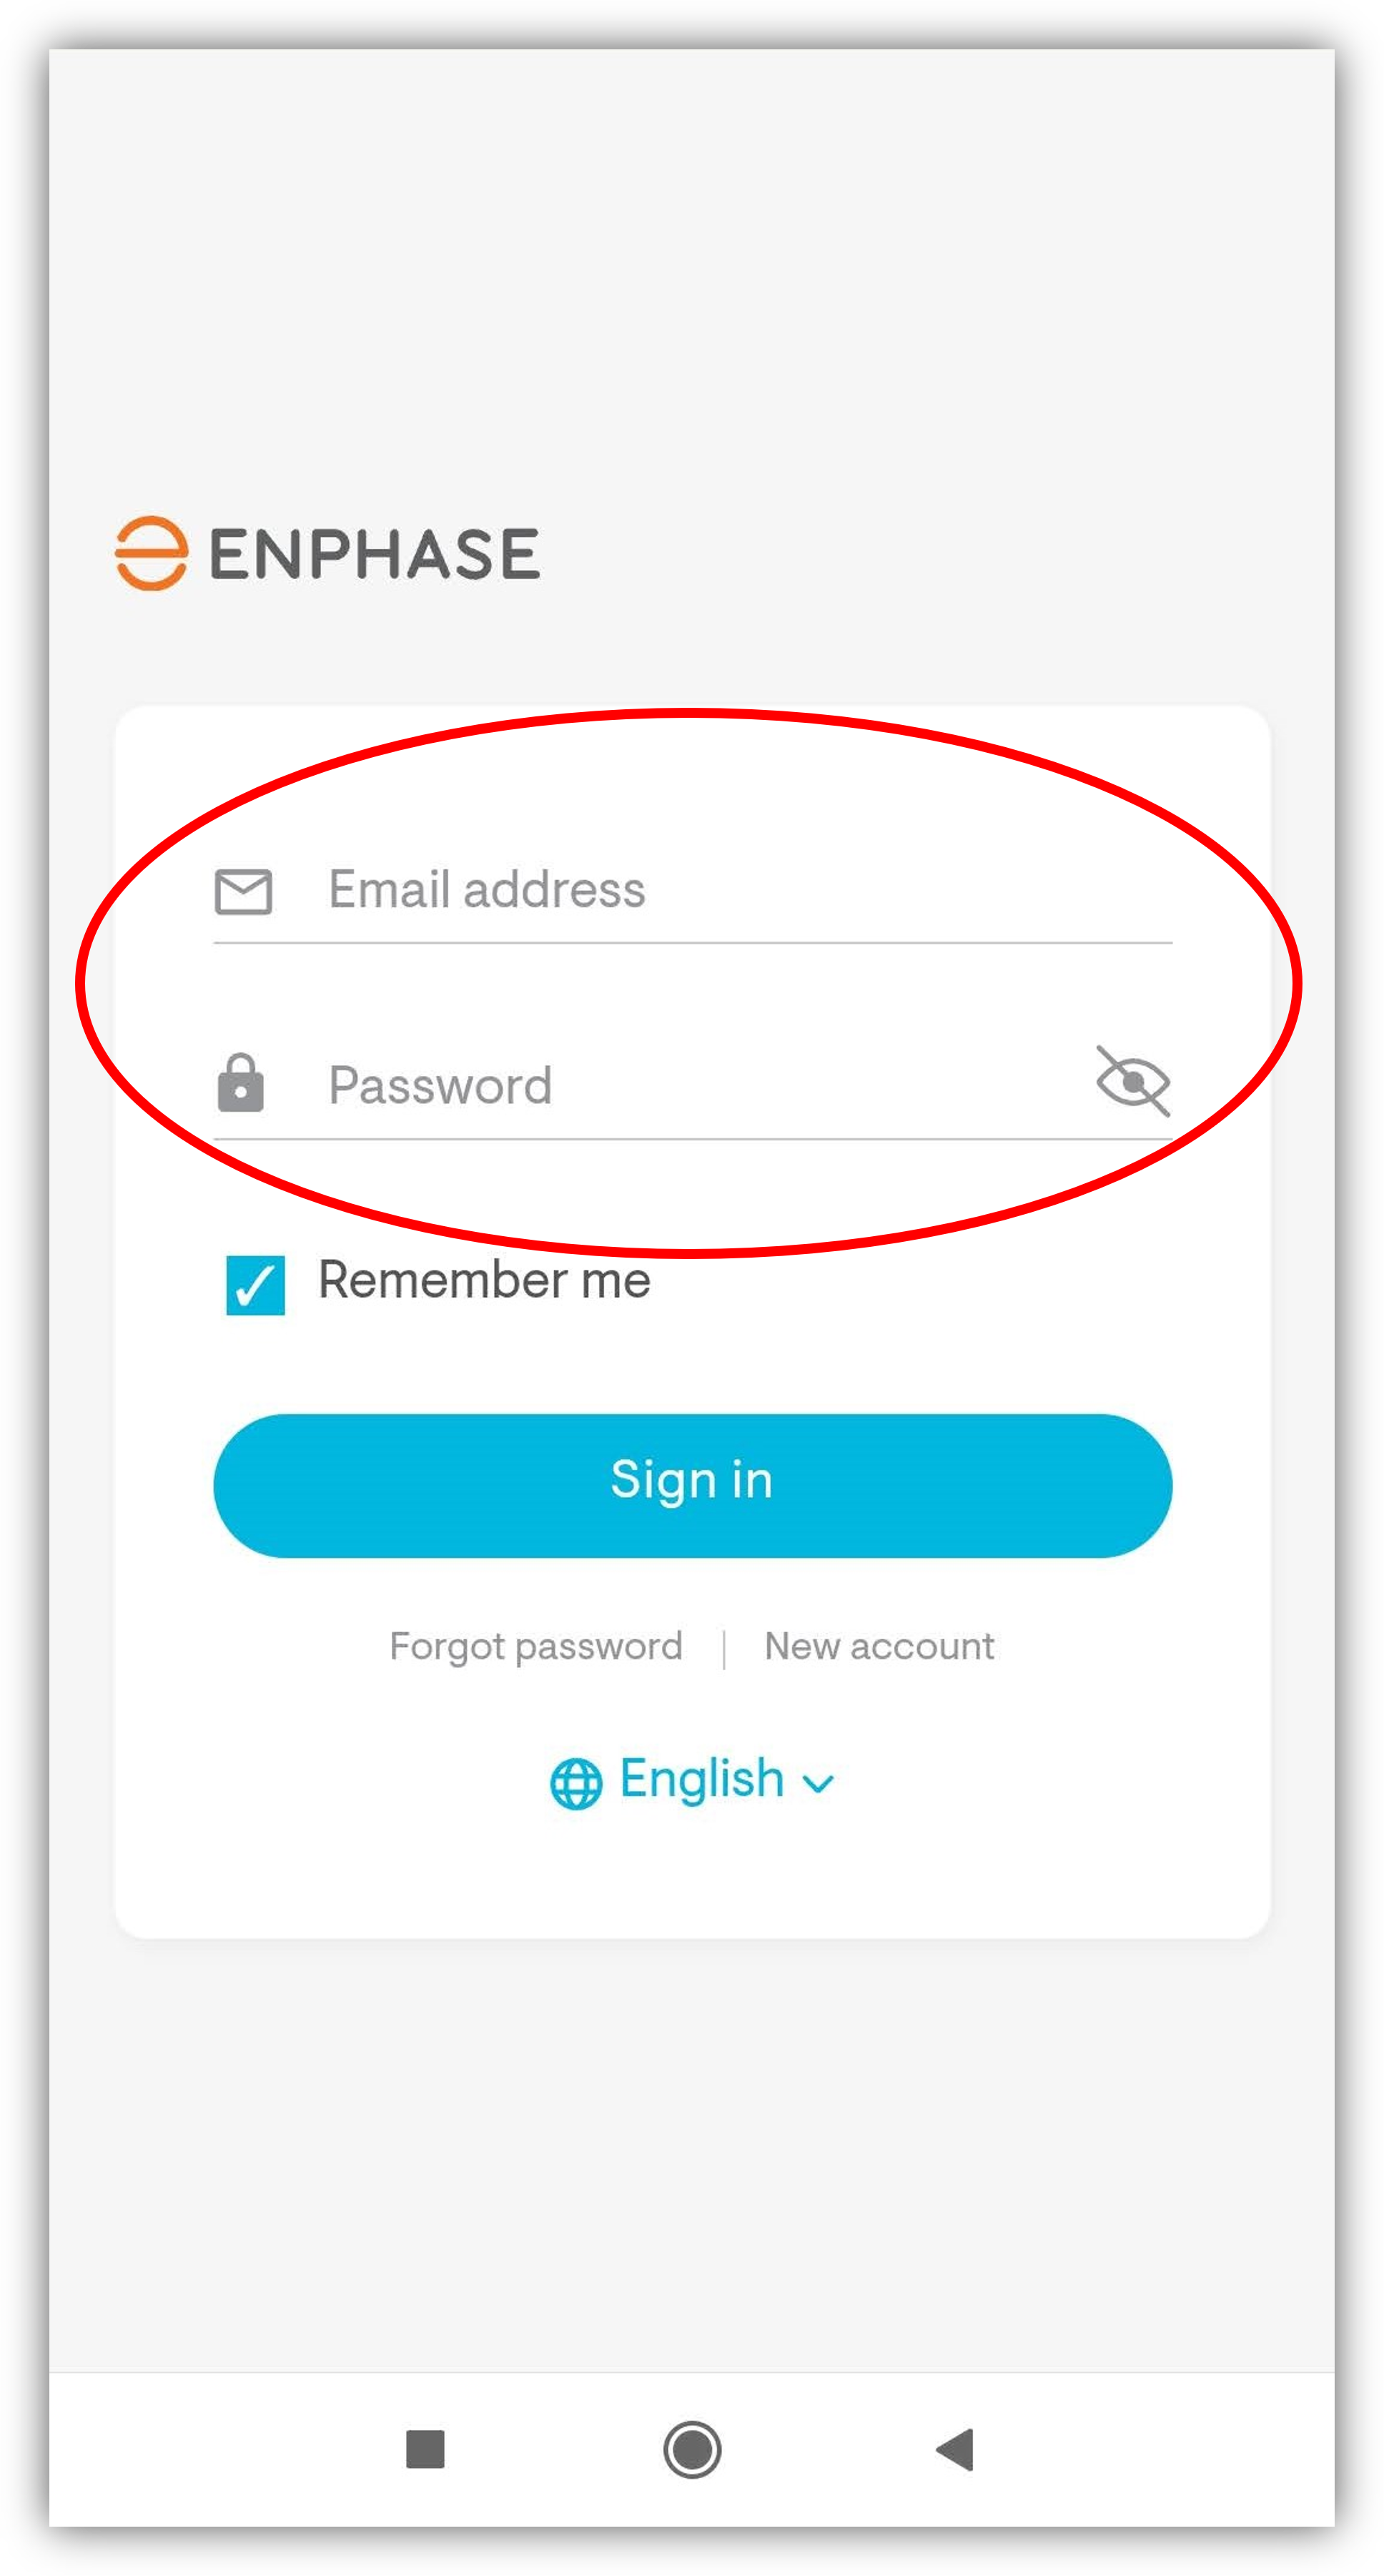
Web access credentials are the email and password used to access the Enphase mobile APP.
The Envoy serial number can be found here:
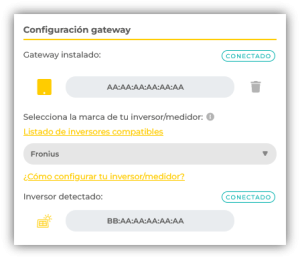
Fronius
Access to the data of Fronius inverters is done directly after selecting the brand (within a few minutes) and does not require special configurations.
Huawei
Some Huawei inverters allow direct access to production and consumption data via local network and without special settings. However, in some cases, direct access is not available and must be done via direct connection to the WiFi network generated by the inverter itself. In this second case, the Gateway must be within the WiFi range of the inverter’s access point.
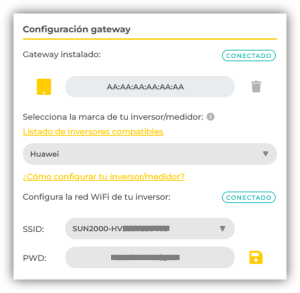
The system in the first place tries to connect directly. If it succeeds, nothing more needs to be done. If, after a few attempts, communication is not successful, the system prompts you to enter the name of the WiFi network of the inverter in question and the password.
The name (SSID) shall be selectable from a list and shall be in a format such as “SUN2000-XXXXXXXXXXXX”, where the “X” is part of the serial number.
The default password is Changeme.
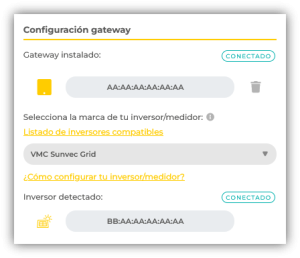
Sunvec
Access to the data of VMC Sunvec inverters is done directly after selection of the brand (within a few minutes) and requires no special settings.
SMA
To access the SMA yield and consumption data via the local network, the password of the inverter’s “Internal web server” must be known. The installer of the inverter has this information.
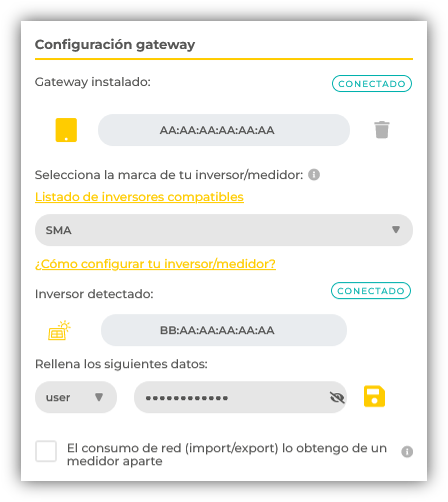
In some cases it may be useful to combine the solar yield data from SMA with the grid data (import/export) from a universal meter. To activate this option, the checkbox at the bottom must be ticked.
Sungrow
Access to the Sungrow inverter data is done directly after selecting the brand (within a few minutes) and requires no special settings.
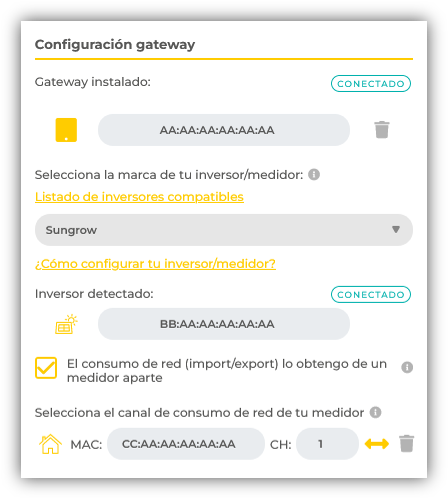
In the cases found for this brand, only the solar production data could be obtained. Therefore, it is necessary to combine it with the grid data (import/export) from a universal meter. To activate this option, the checkbox at the bottom must be ticked.
Solar Edge
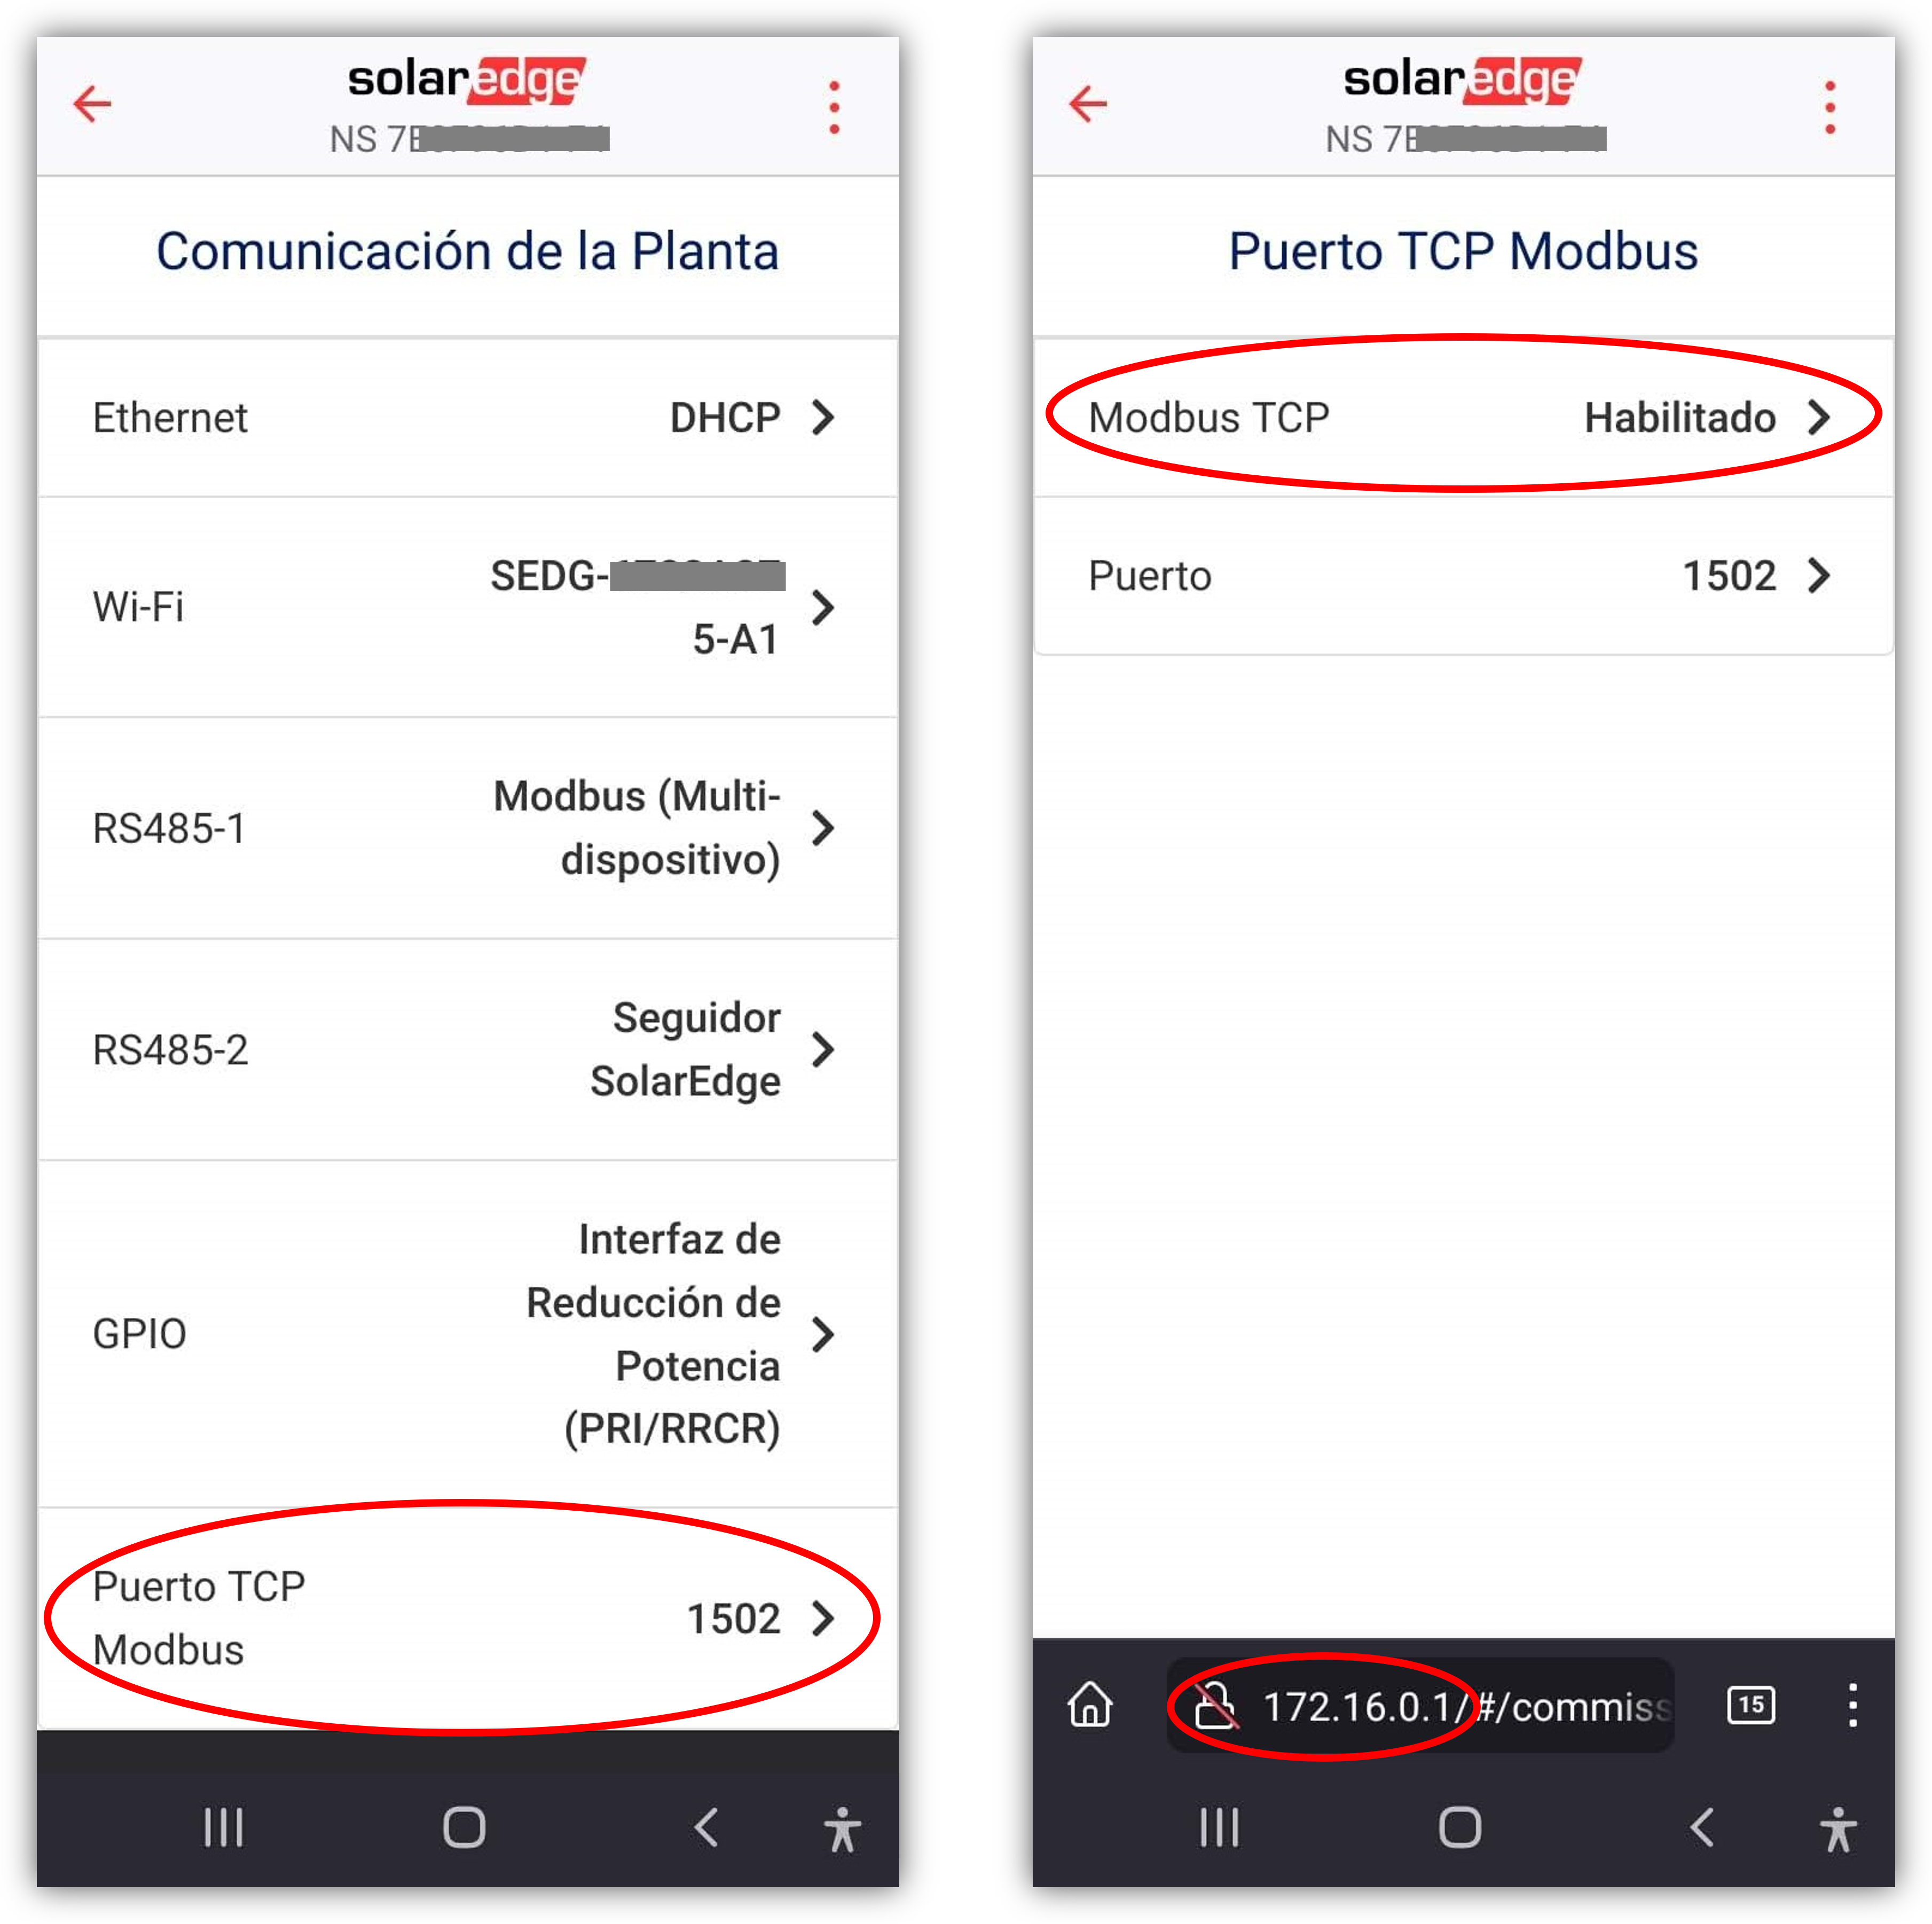
Accessing Solar Edge data over the local network is a little more complicated than usual. A two-step configuration is required:
- Enable Modbus communication from the inverter
- Connect directly to the WiFi network of the Solar Edge gateway
To enable Modbus communication of the inverter, the following steps must be taken:
On the inverter, move the red lever to the left (P position) for two seconds to activate the access point.
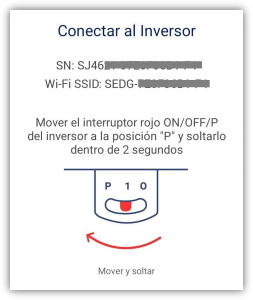
Now, with the mobile phone or computer, connect to the SEDG-XXXXXXXXXXXX WiFi network with the password indicated on the side of the inverter (or on the QR code).
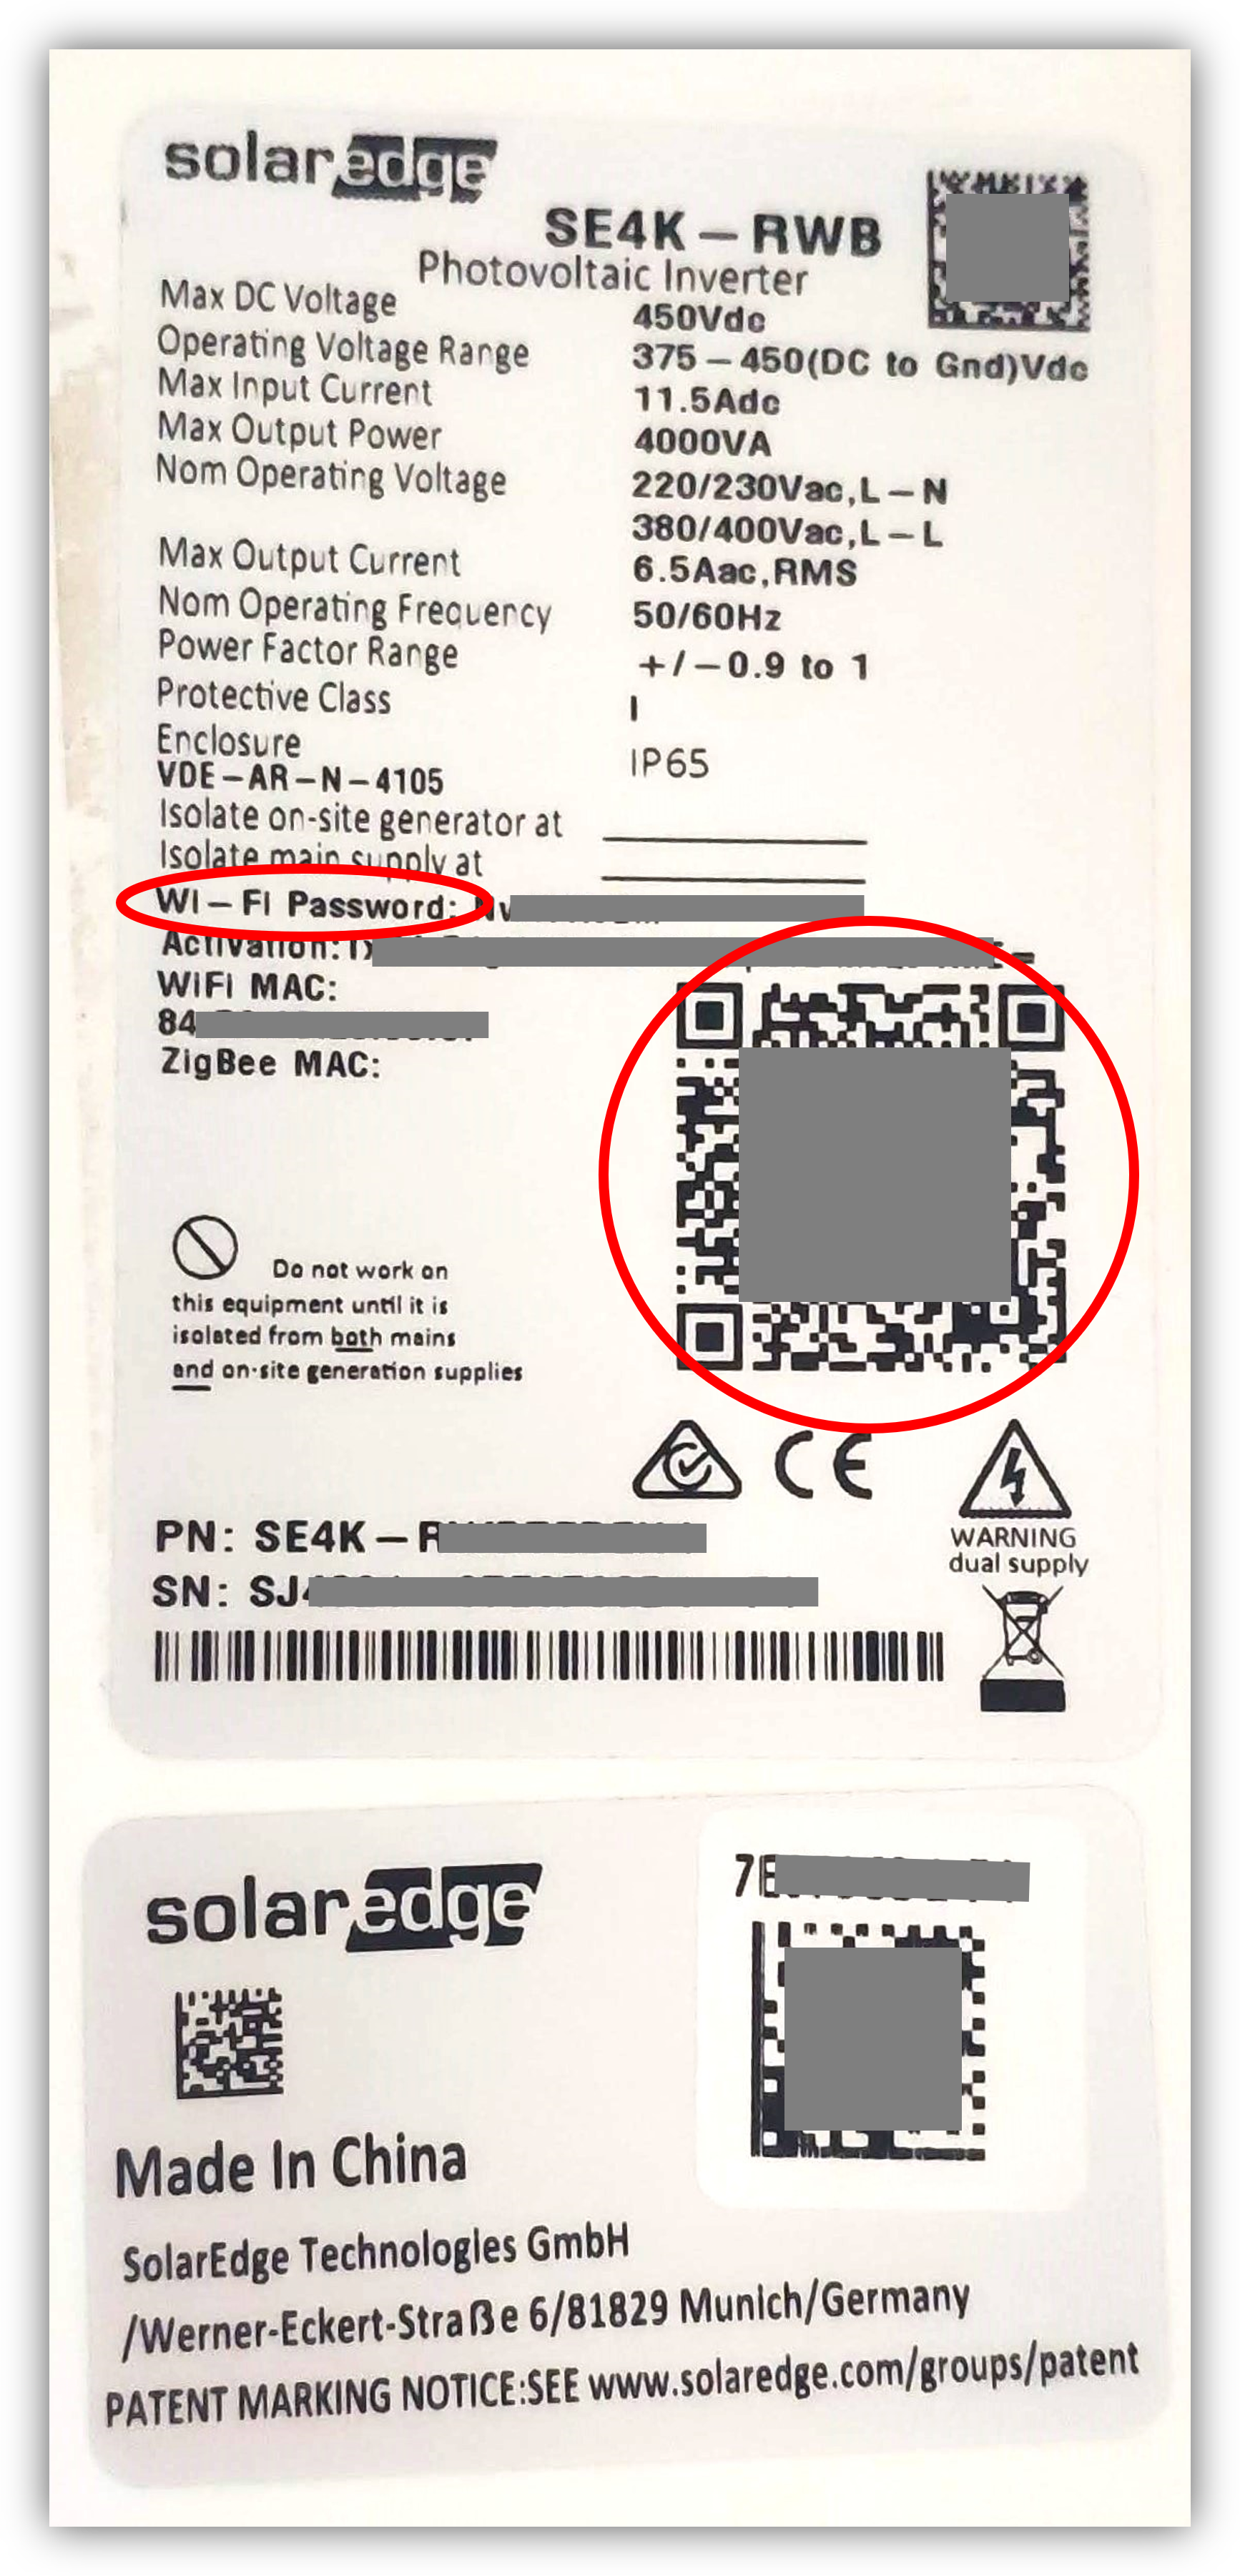
Next, open a web browser and go to the address 172.16.0.1 . This will open a configuration page that will allow you to enable the Modbus TCP port.
The last step is to connect the Mirubeee Gateway directly to the Solar Edge gateway WiFi network. To do this, the Mirubeee Gateway must be within its WiFi range. The access credentials to that WiFi network (SEDG-XXXXXXXX) are on the label of the Solar Edge Gateway itself, both in text and in the QR code.
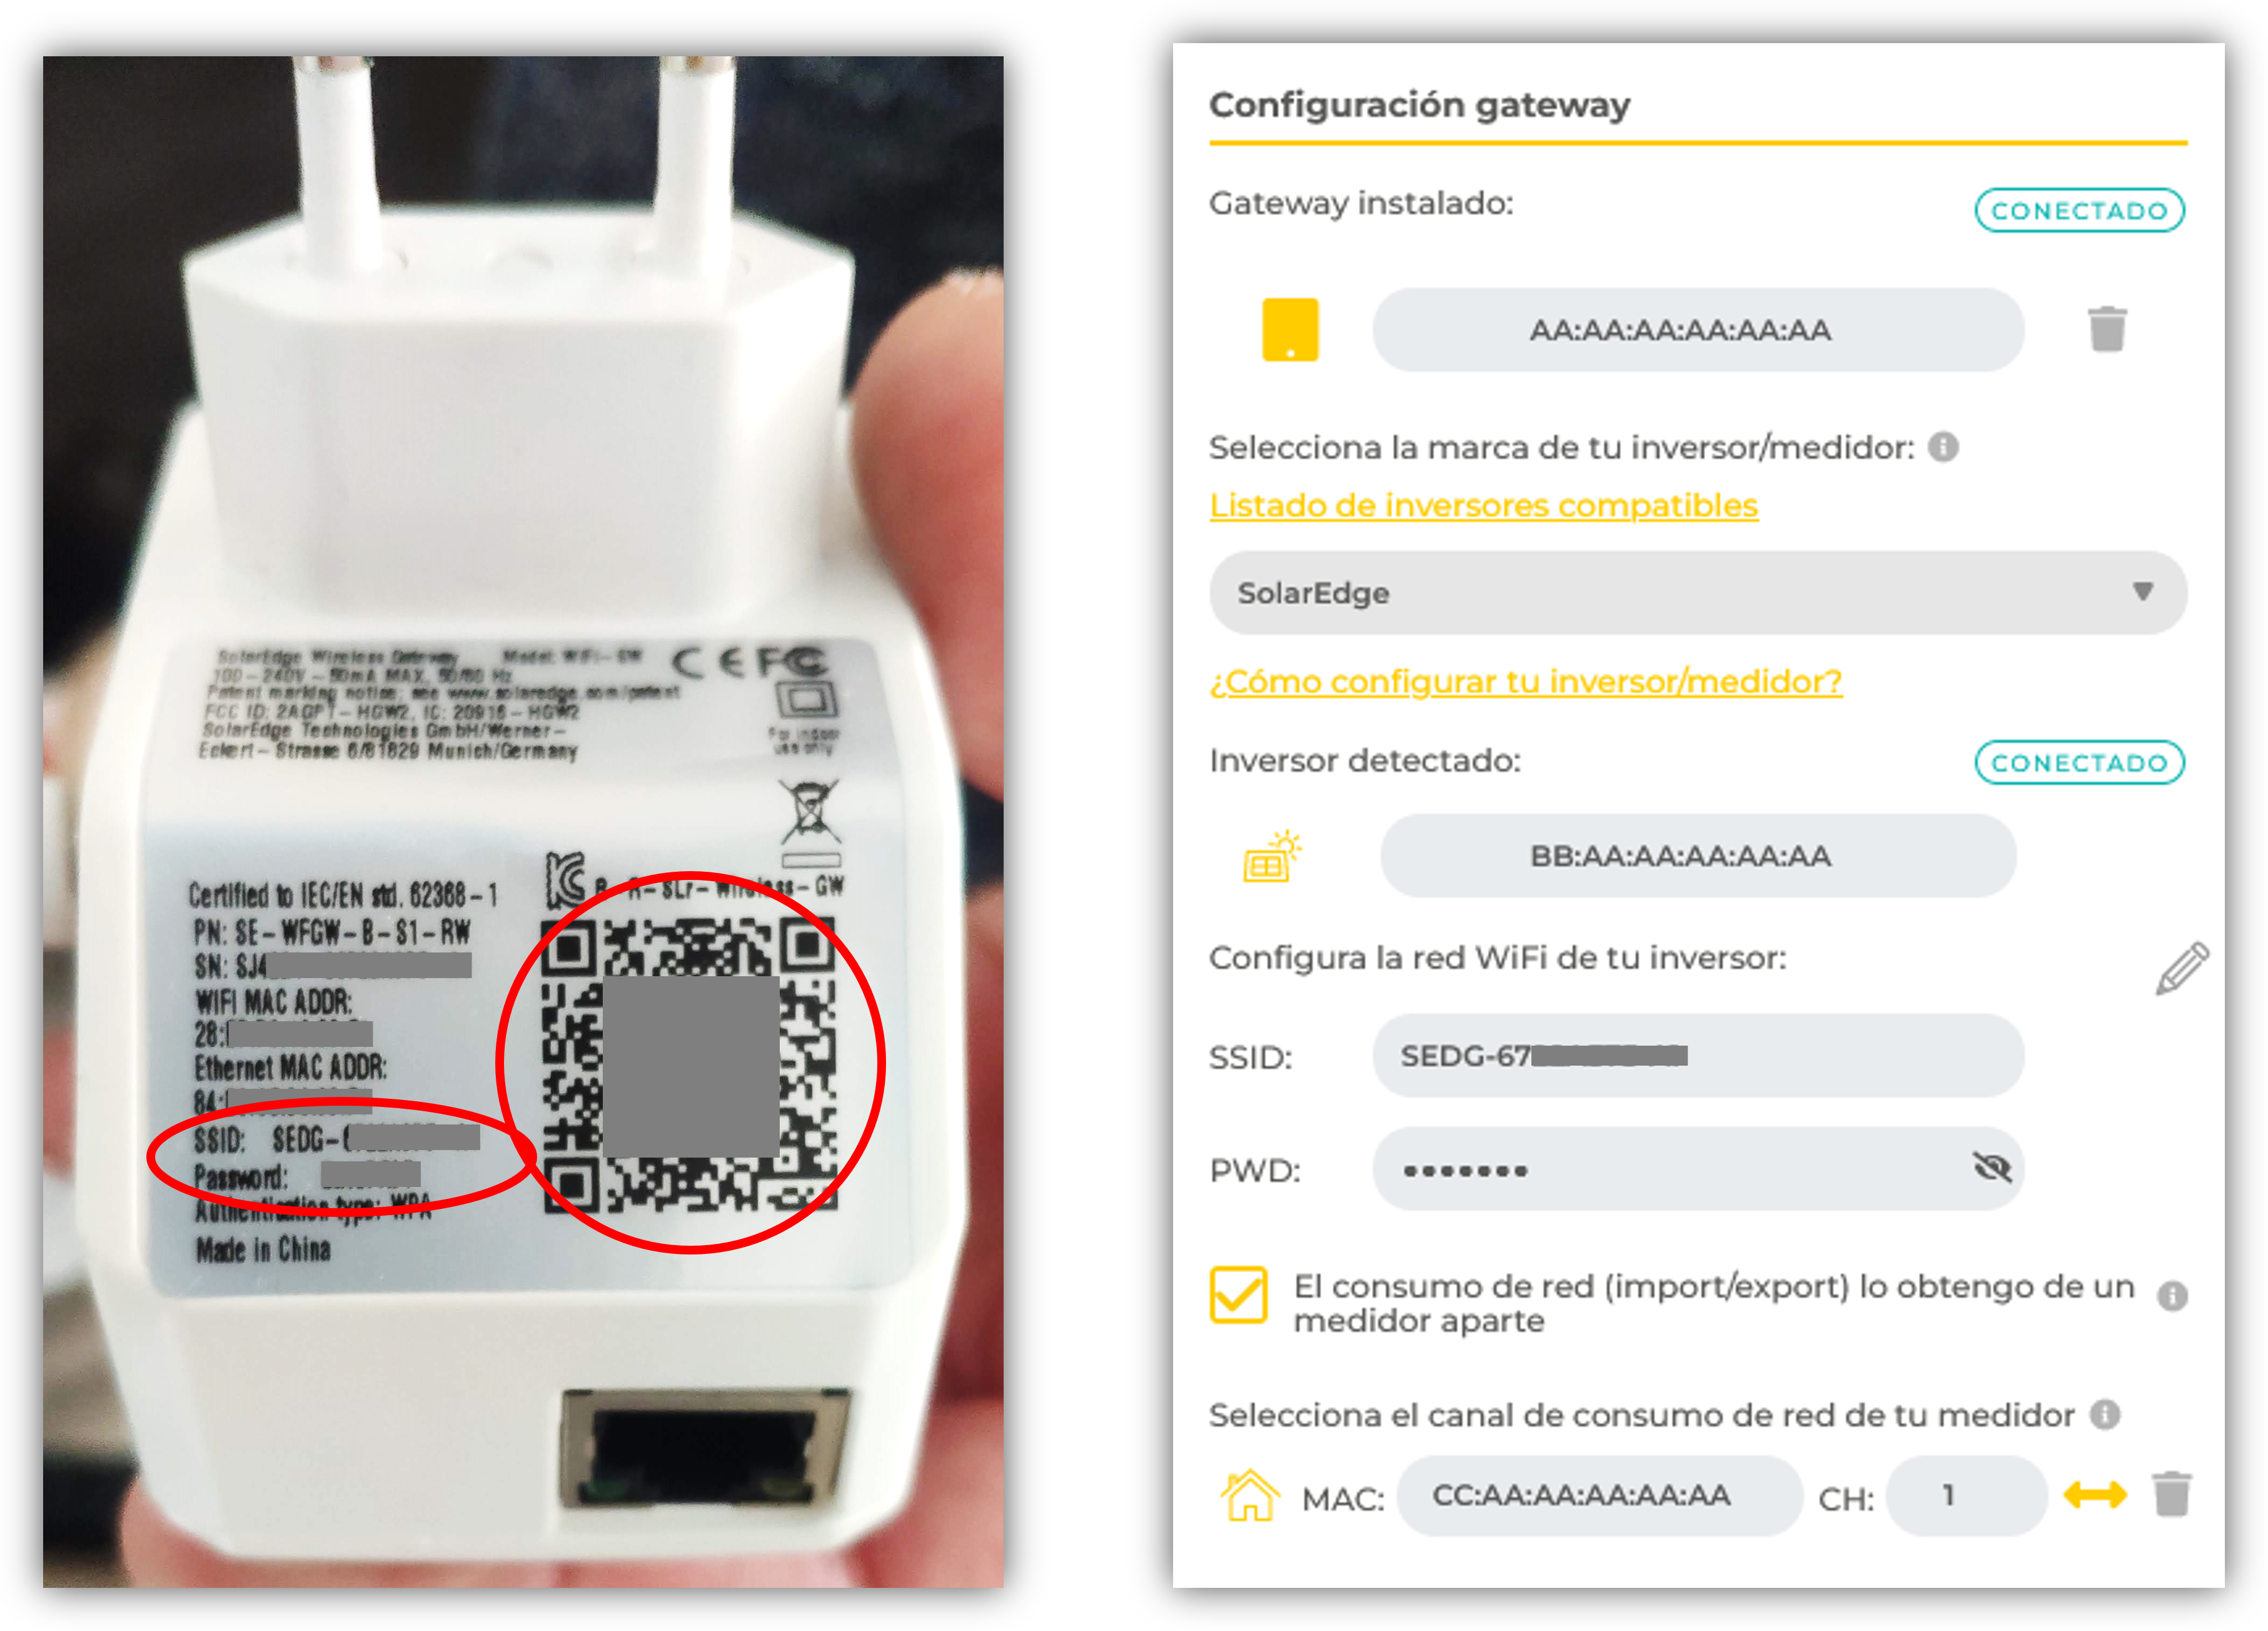
In some cases it may be useful to combine SolarEdge solar production data with grid data (import/export) from a universal meter. To activate this option, you must mark the checkbox at the bottom.
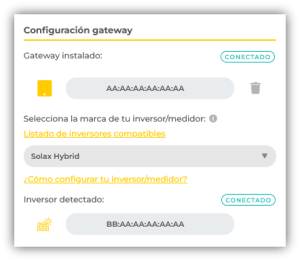
Hybrid Solax
Access to data from Solax hybrid inverters is done directly after selecting the brand (within a few minutes) and does not require special configurations.
· Installation of the Smart Switch
The Smart Switch is the only Mirubeee device that is not 100% self-installable. It is an actuator that is normally installed inside an electrical panel and is connected directly to the electricity cables (230V). Therefore, the installation of this device must be done by a qualified technician.
The Smart Switch on Mirubeee can be used to control the pool filtration system . Normally, in swimming pools there is a dedicated electrical panel that incorporates a timer in charge of activating the filtration a few hours a day. The Smart Switch will replace the function of the timer you currently have installed.
Typically, there will be a connection with at least these elements (simplified scheme):
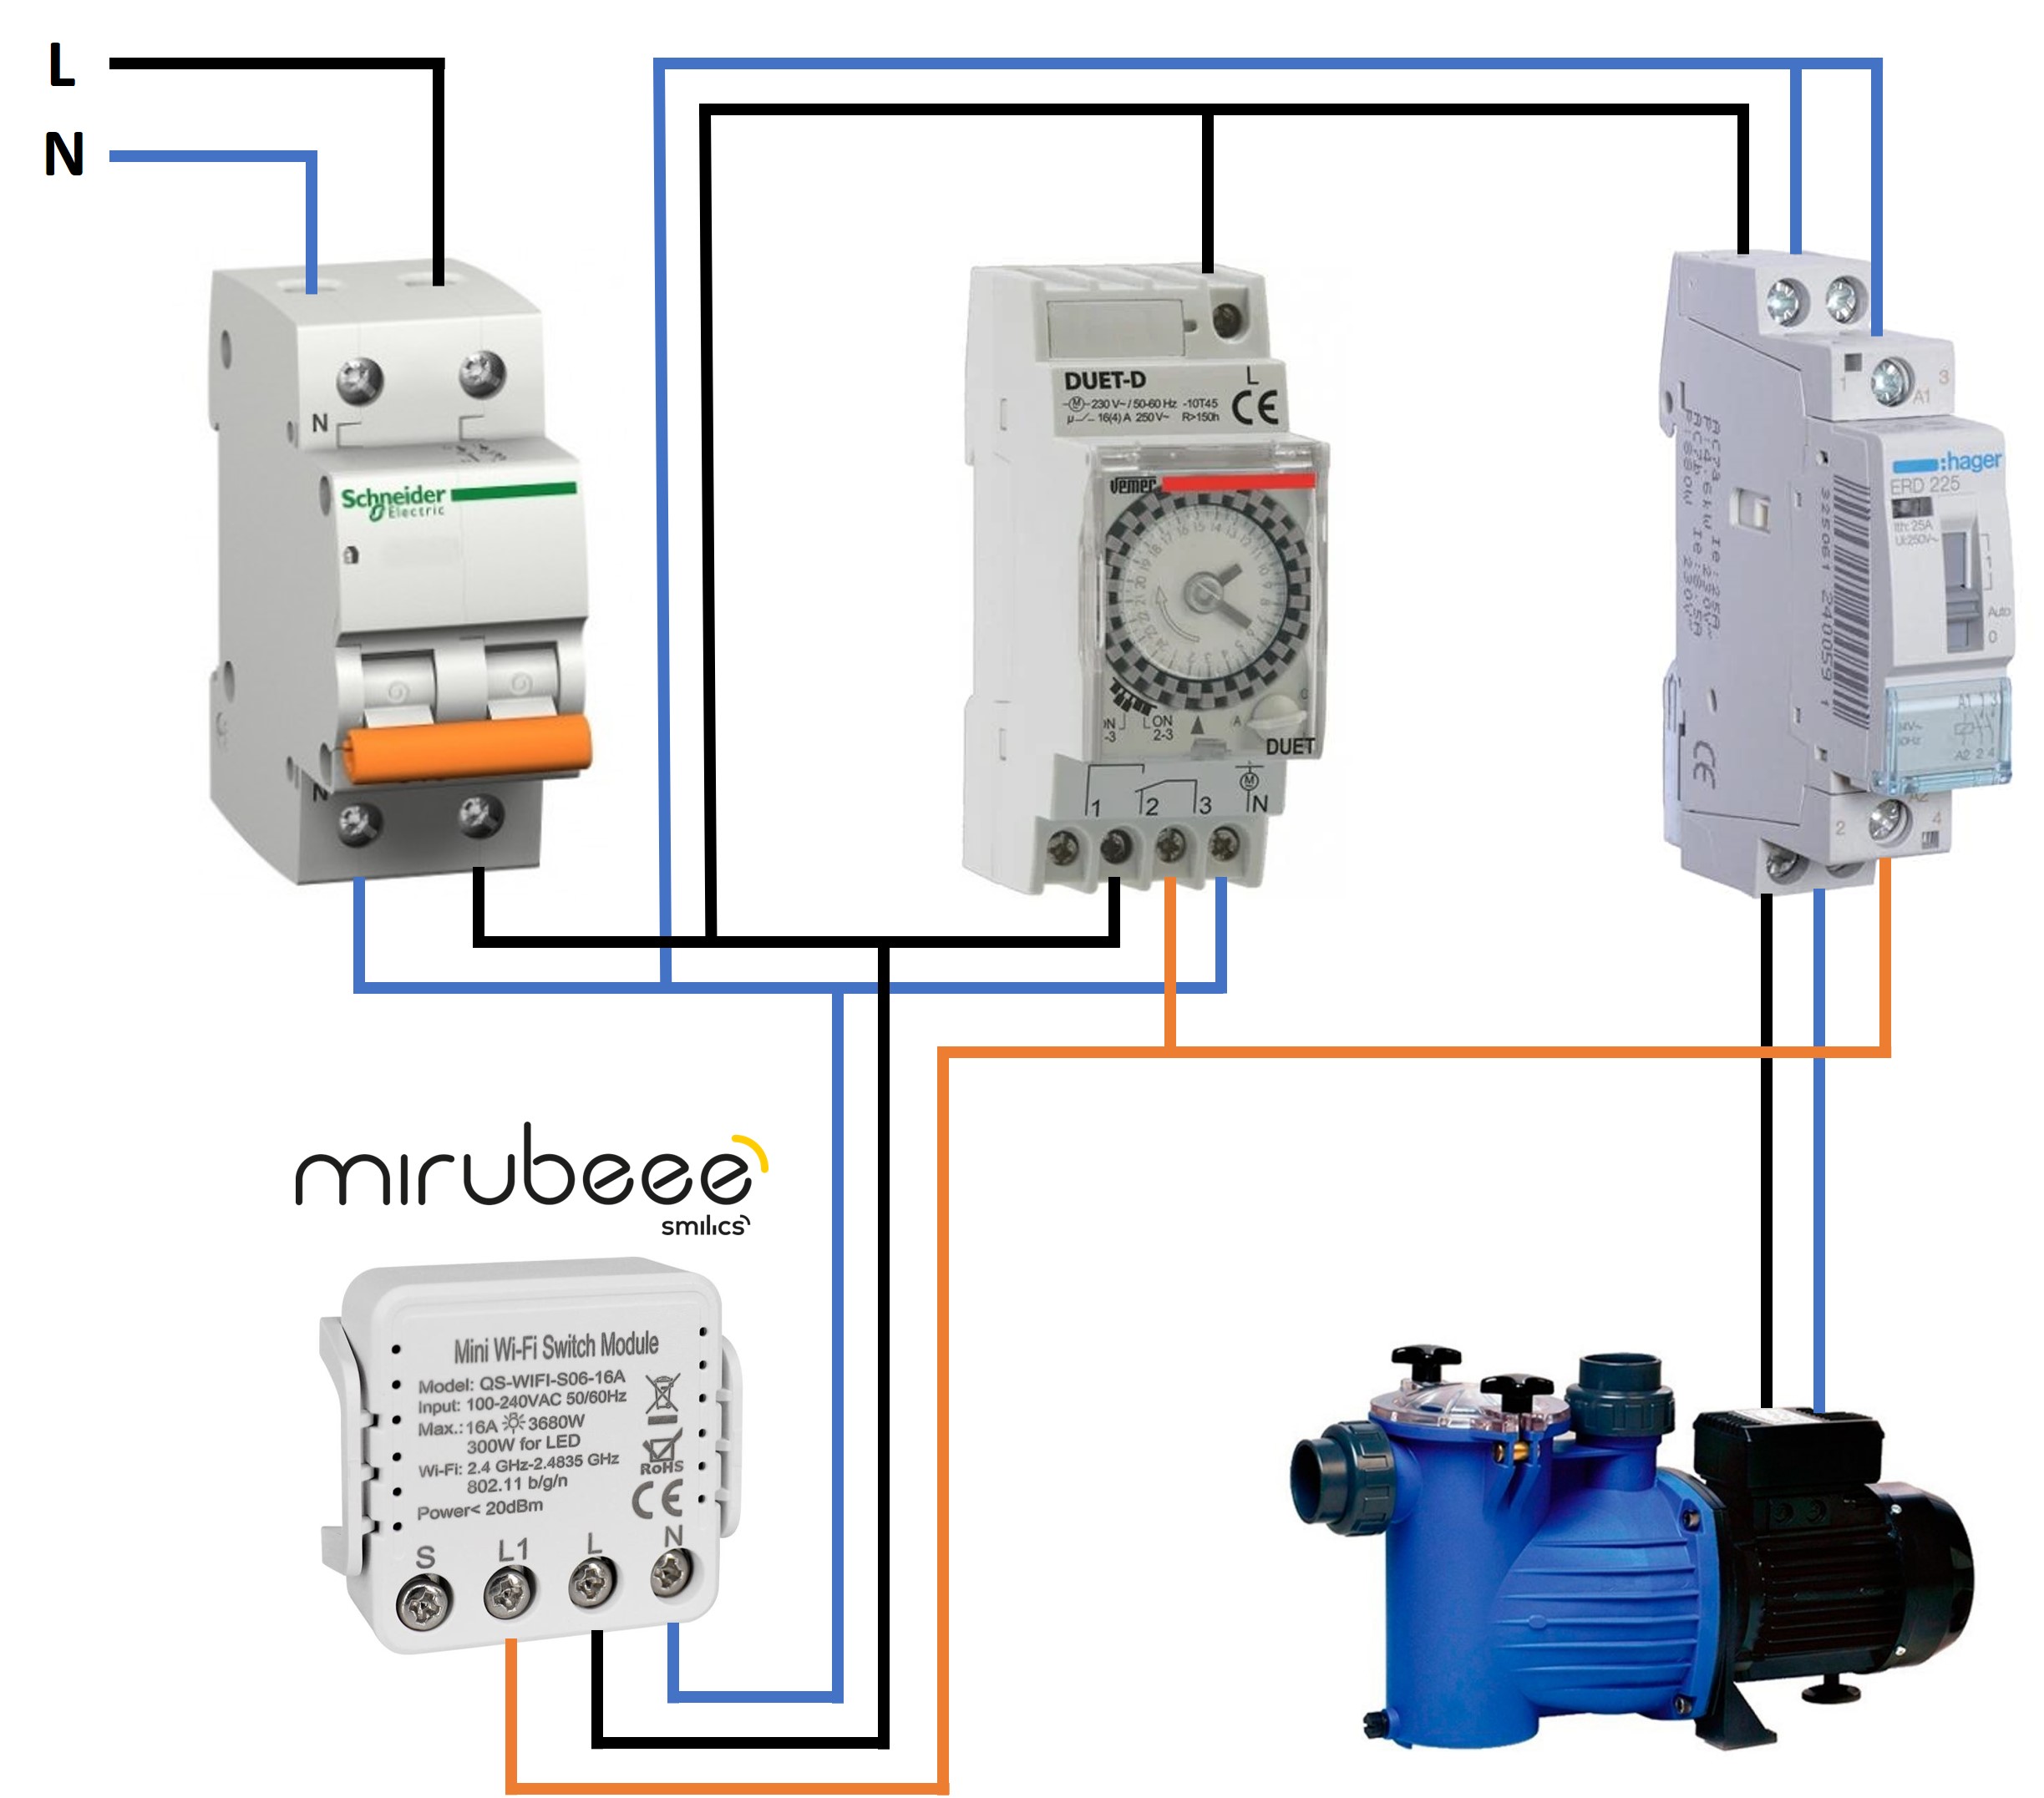
It is recommended to put the Smart Switch in parallel with the timer and leave the timer stopped or without programming.
The “S” input allows manual activation via a switch. In some models the input is double: “S1” for switch and “S2” for push button.
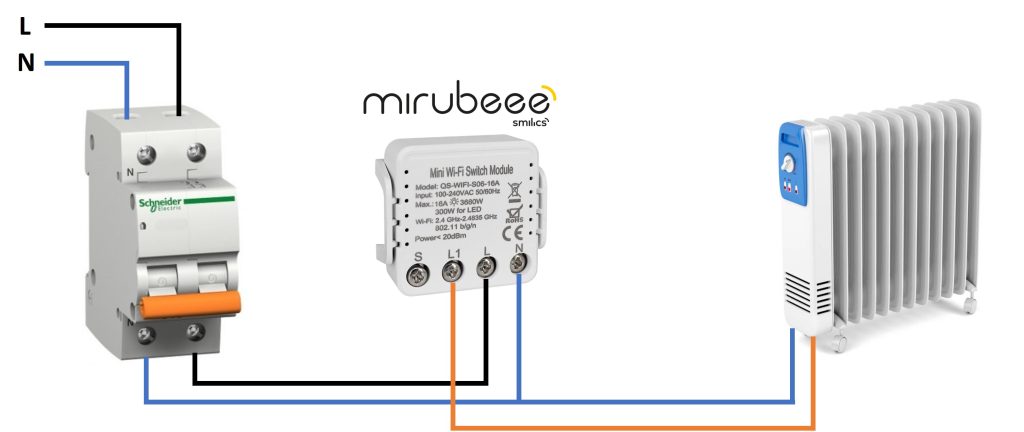
Another typical use of the Smart Switch is direct power to an electric radiator or heating circuit up to 16A. In this case the connection diagram is simpler:
In case of managing an aerothermal system (heat pump), a contactor must be placed between the Smart Switch and the contacts of the electronic control of the aerothermal system:
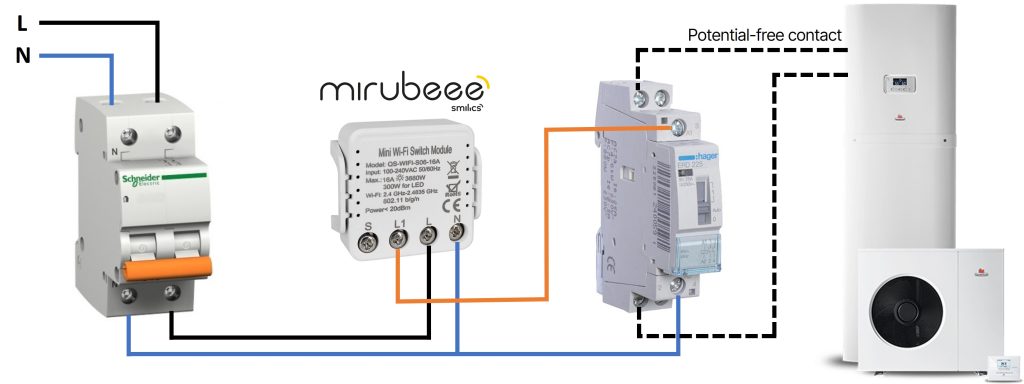
It is important to keep in mind that a contactor must be placed between the Switch and the aerothermal unit since it needs a potential-free contact while the Switch has a 230V output.
After the physical connection and linking to the WiFi network, in the mobile APP you must select “Aerothermia” as the load to control and leave it configured in “Automatic mode”.
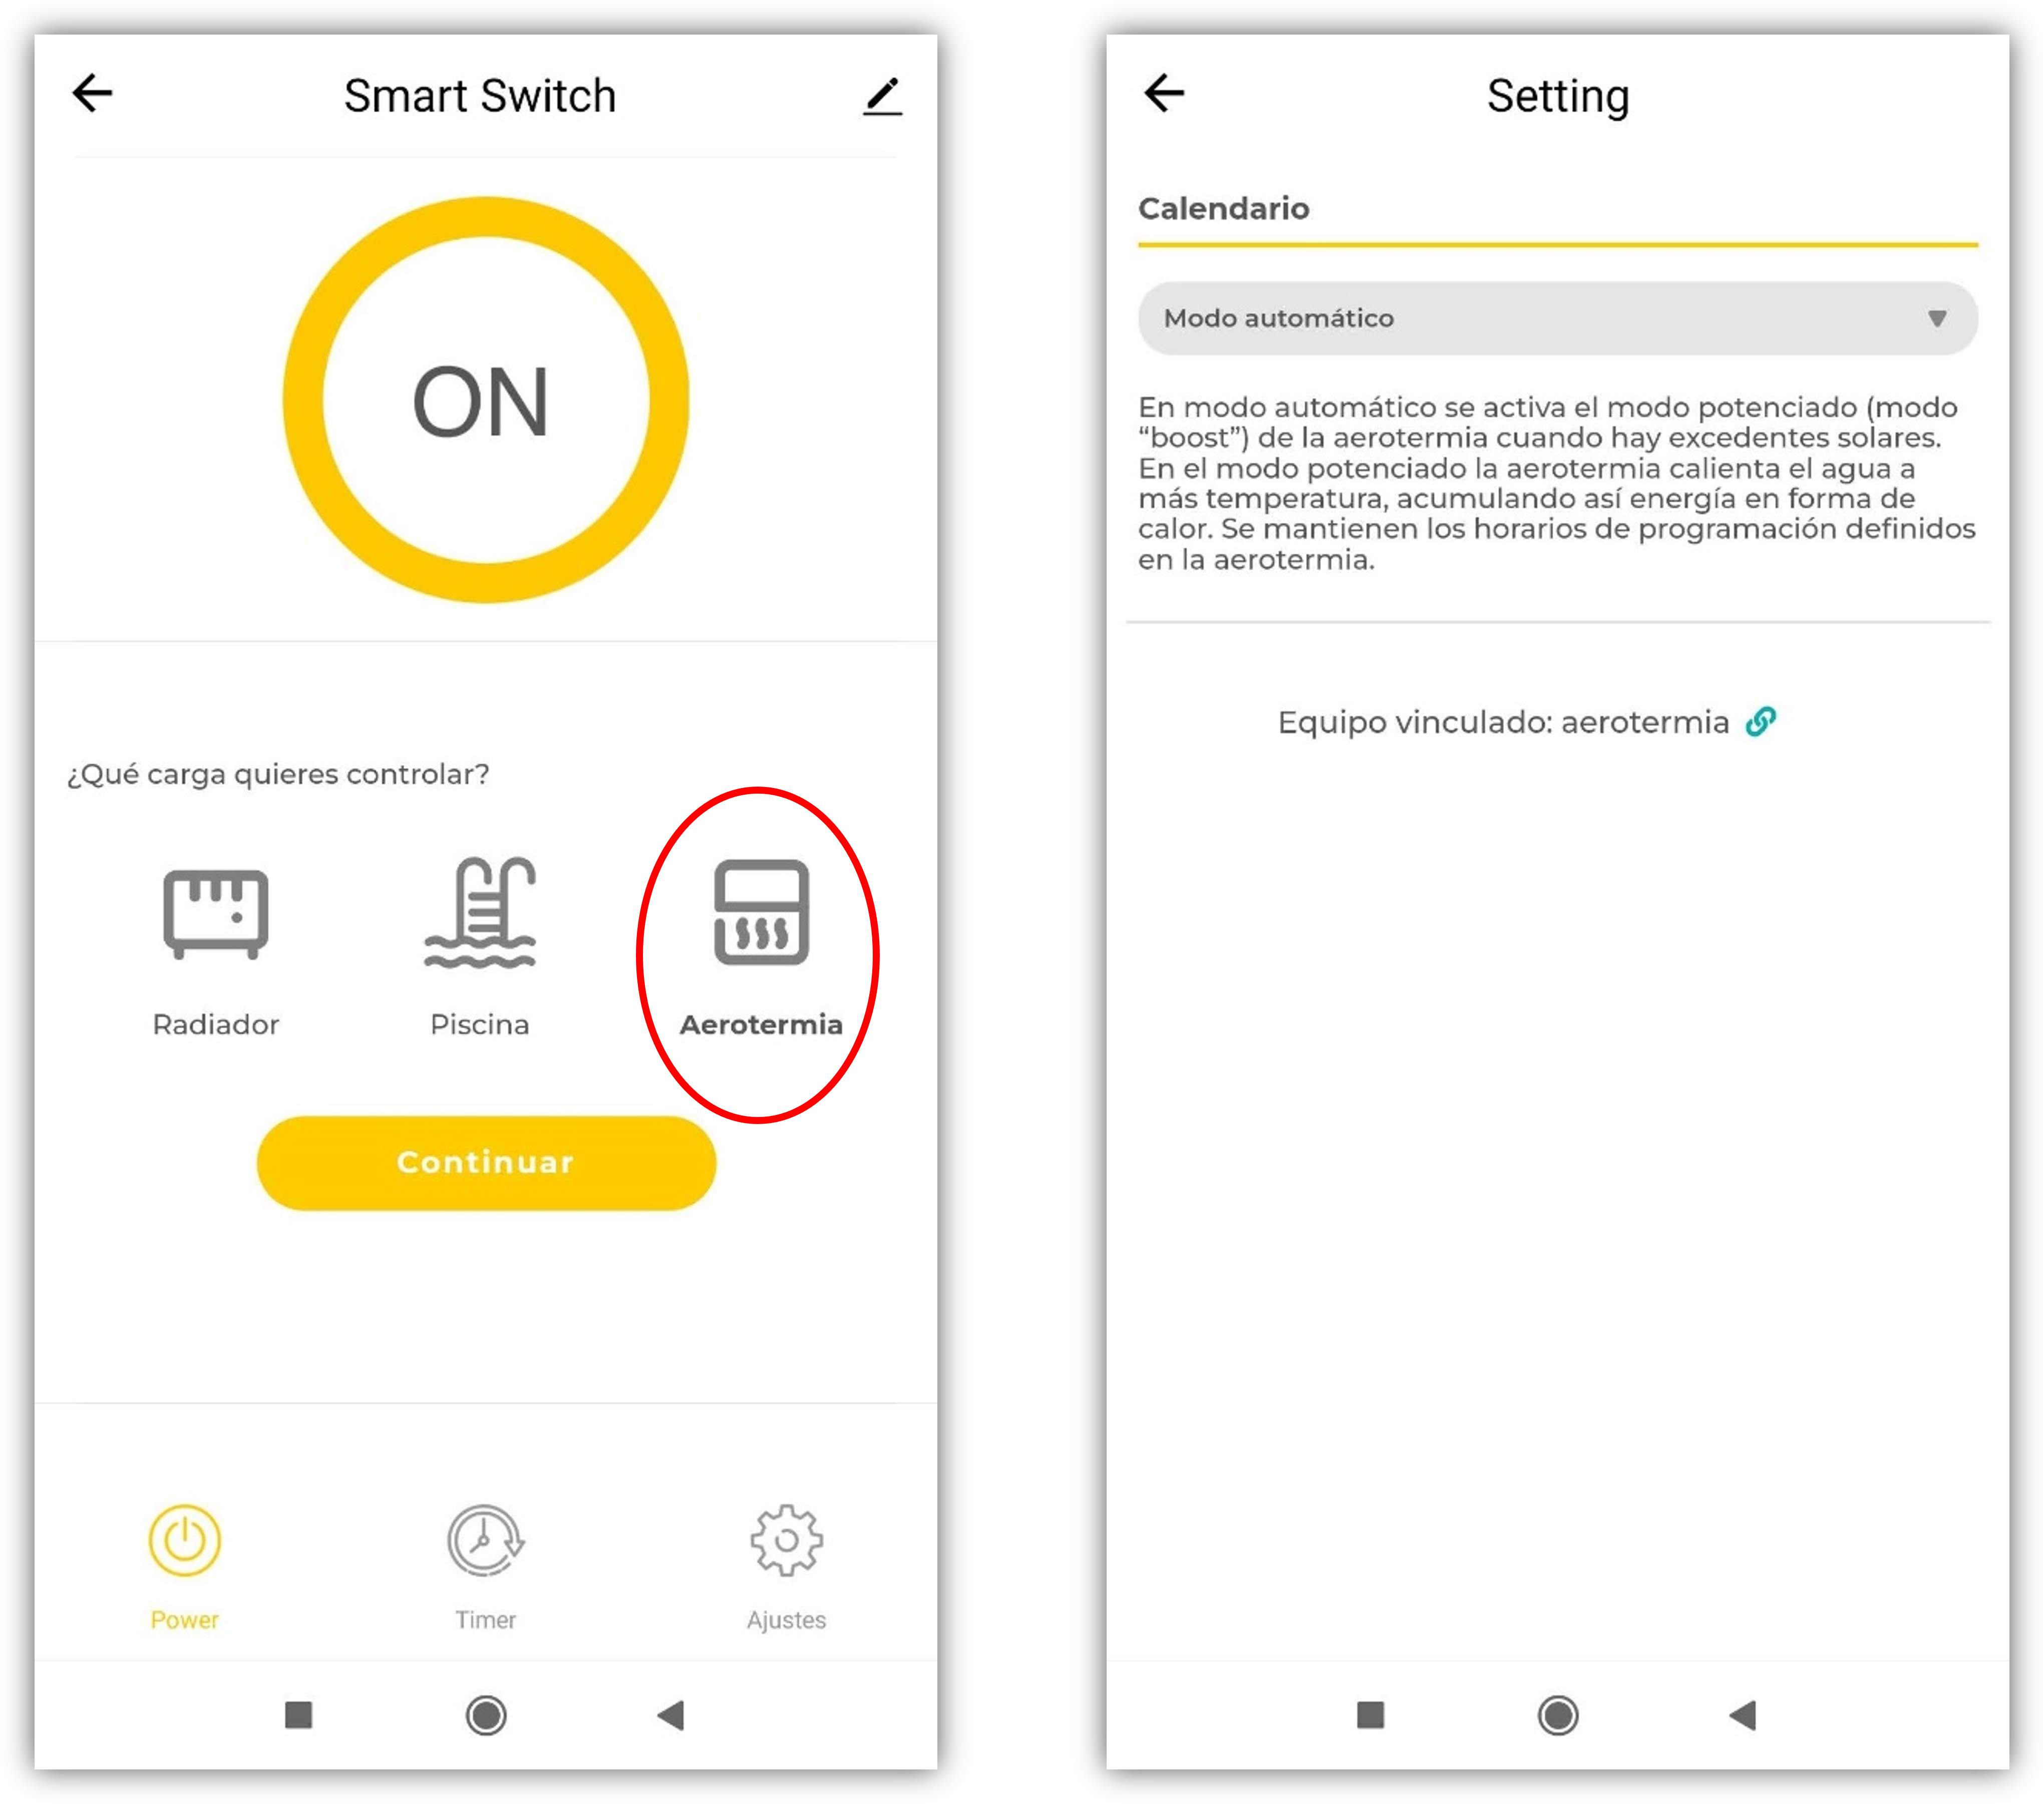
The next step, outside of the mobile APP, will be to configure the aerothermal machine itself according to the desired behavior for the Boost mode (services on which it acts, DHW and/or heating, and thermal gaps). Different brands and models of aerothermia have different electronic connections and configuration menus.
Programming of the system
Once all the actuating elements and the Gateway (with the inverter configured) are installed, the last step is to configure the system so that it works as desired.
System configuration is done through the individual “control panel” of each actuator. Depending on the device being managed, there will be some configuration options or others.
Both electric radiators/heaters, air conditioners/heat pump (AC/HP) and electric hot water boilers are programmed in a similar way, based on weekly usage schedules. The creation and management of calendars is achieved by clicking on the “Settings” button on the individual control panel. Multiple calendars can be created to apply in different situations (normal calendar, holiday calendar, etc.). Each new calendar is created based on a standard template that can be modified according to individual needs.
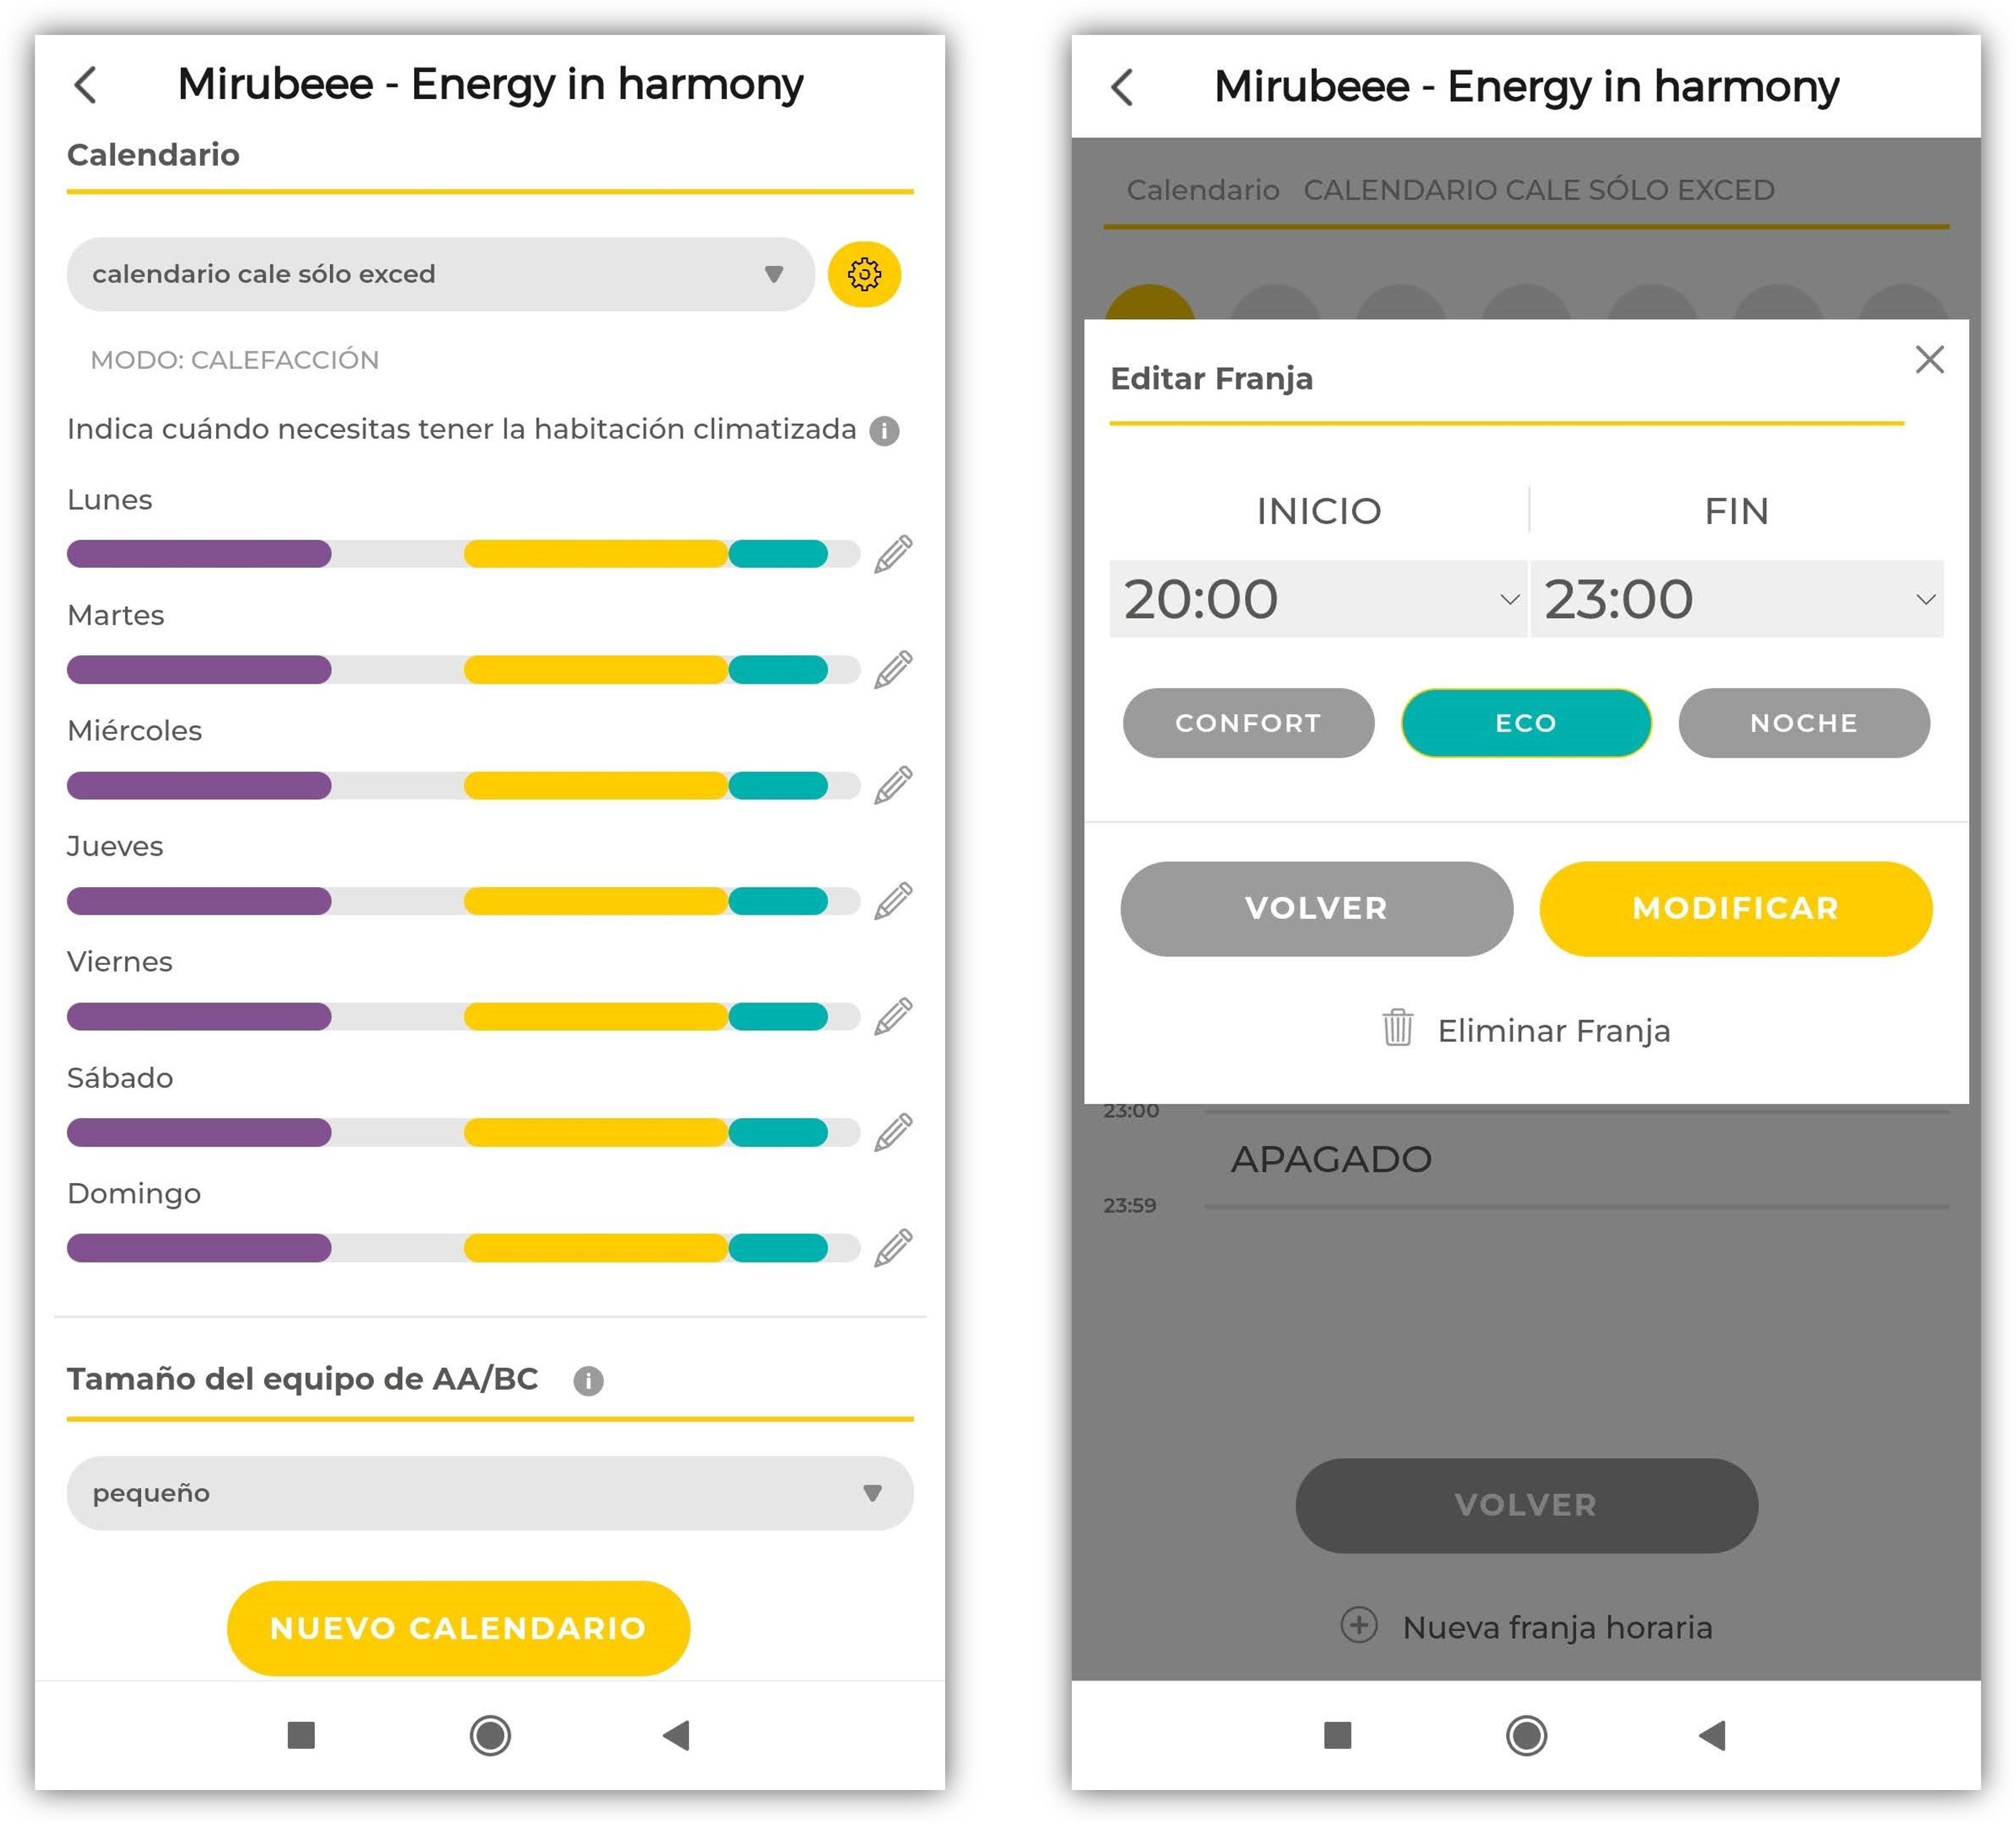
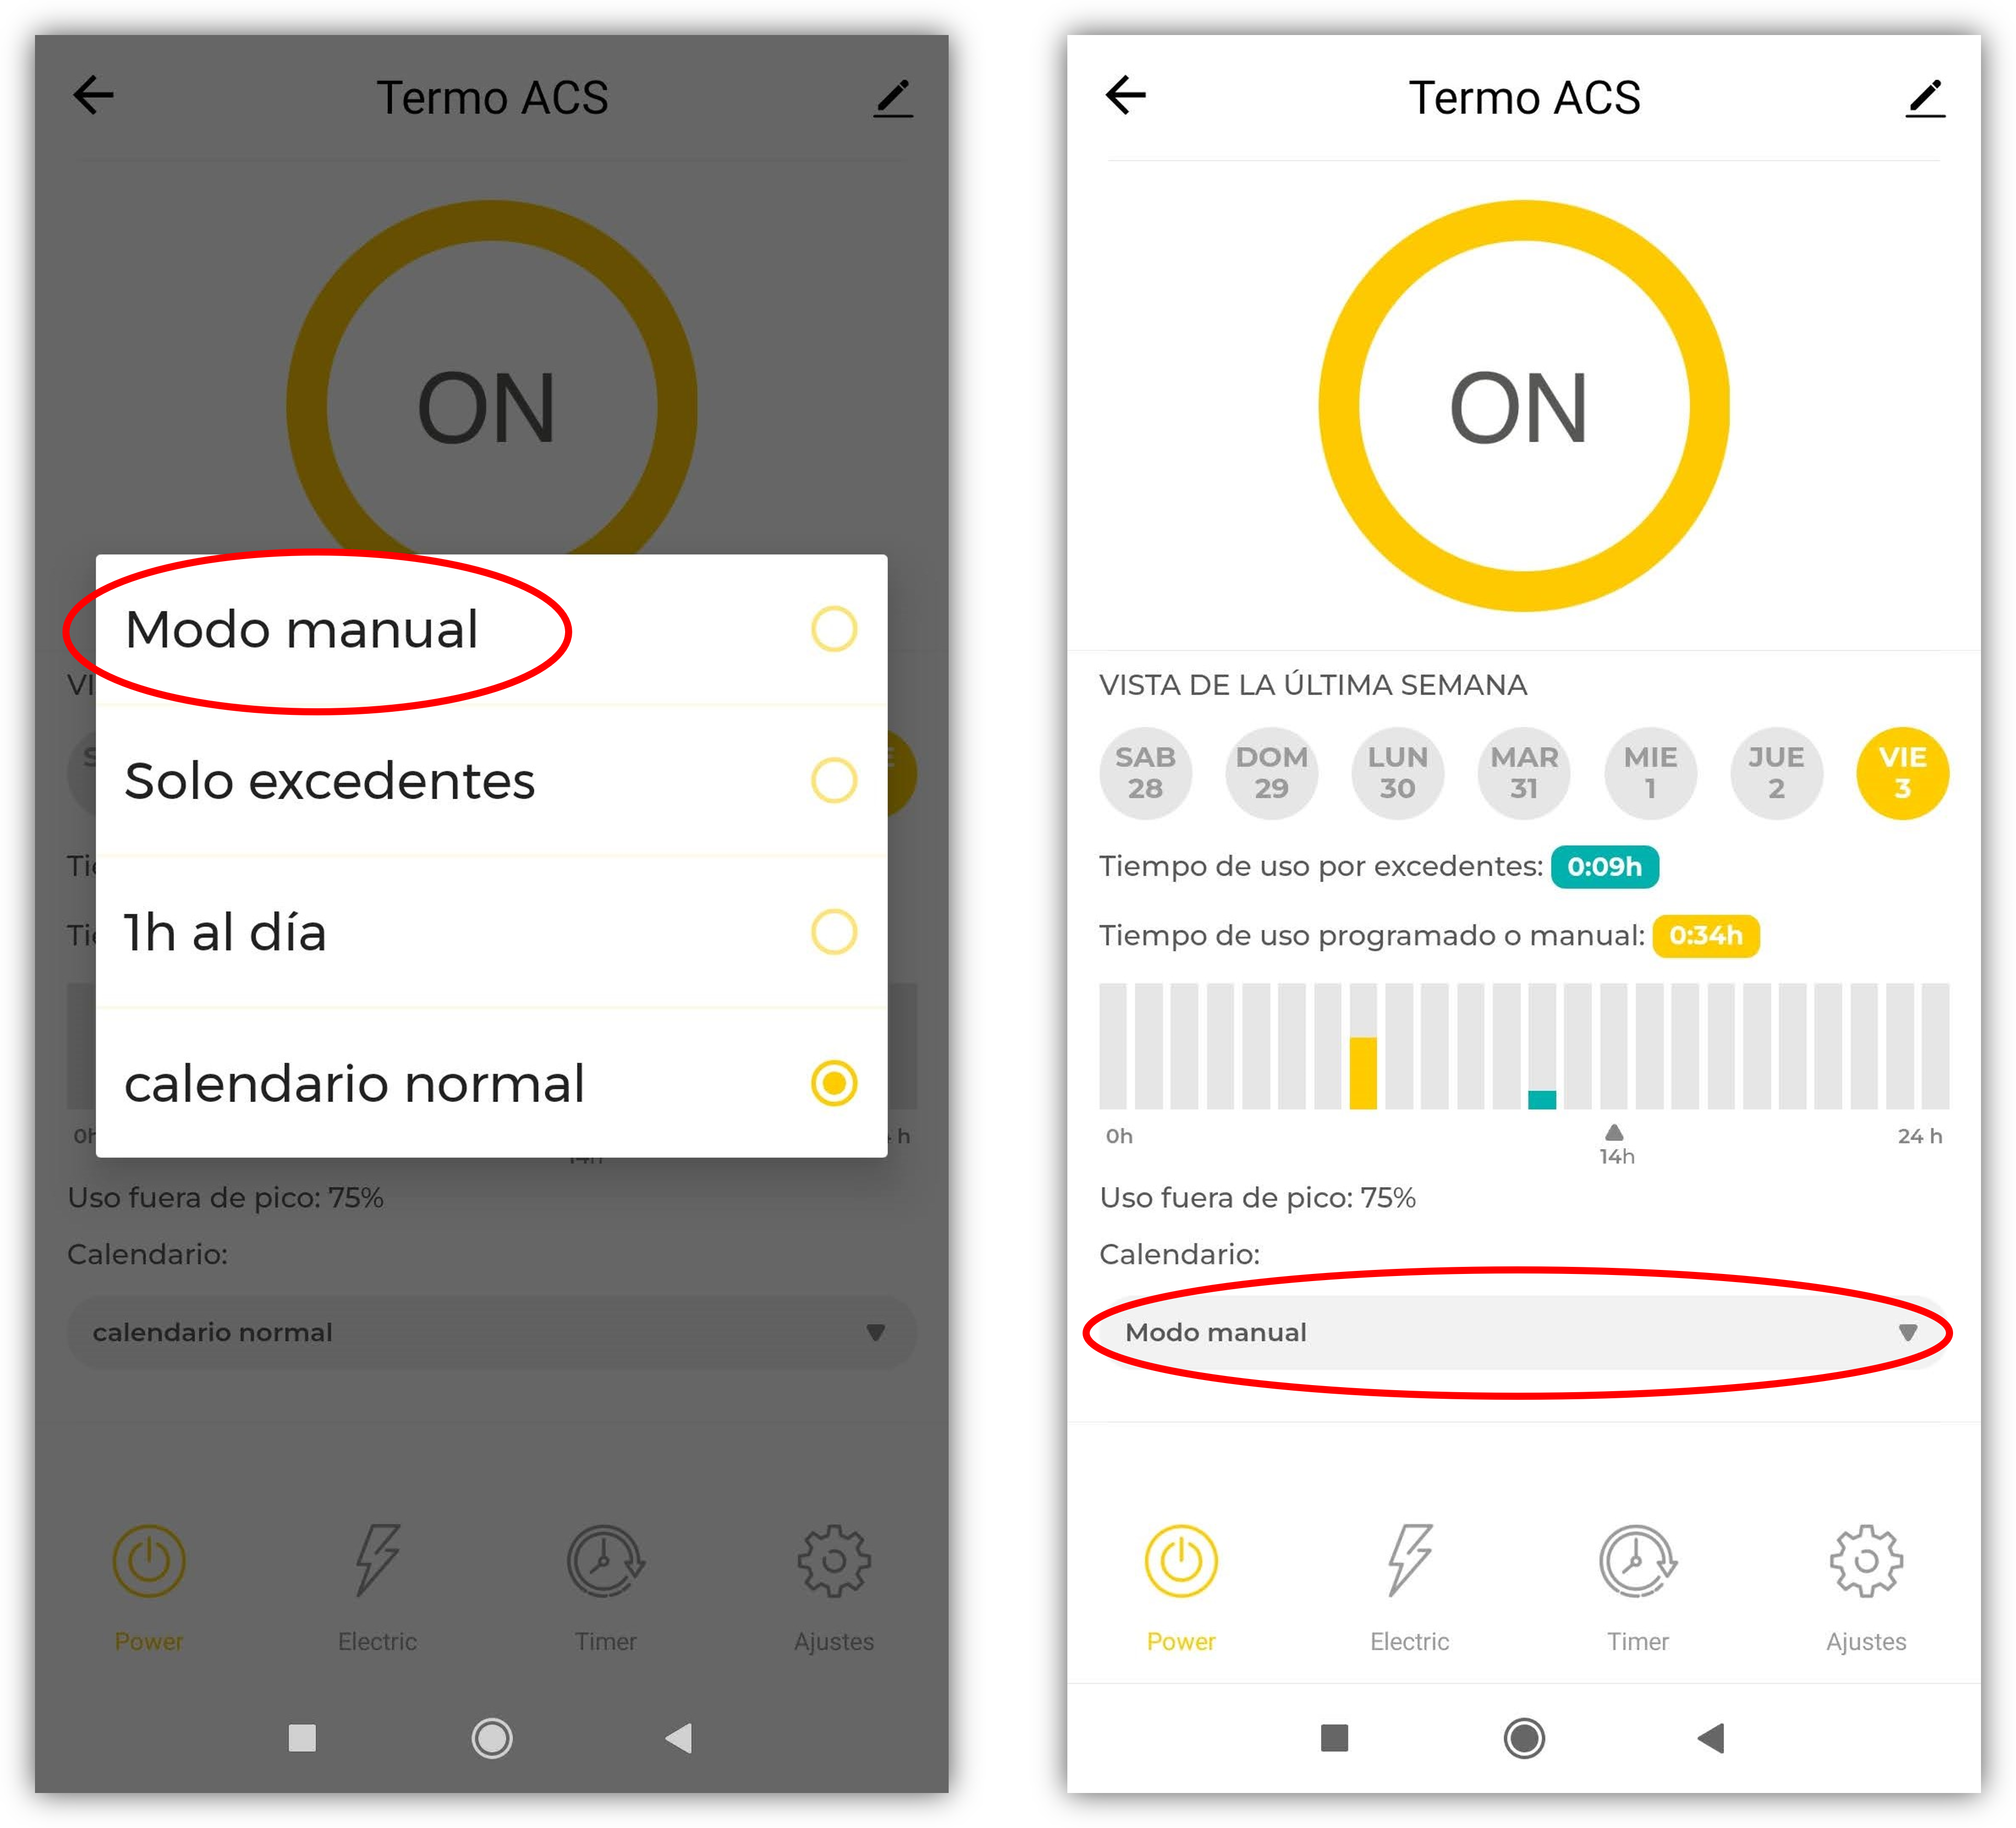
At any time, from the control panel, it is possible to select the operation calendar to apply or also select “Manual Mode” (which is another “schedule” from the list that comes by default and cannot be deleted). If you want to modify the status of the equipment manually, it is essential to first put it in “Manual Mode” since, otherwise, in the next minute the system will put the equipment back to the status that corresponds to it according to the programming.
Air Conditioning equipment is an exception. If manual manipulation is carried out, both with the physical control and with the APP, the Gateway will not be aware of it and will consider that the equipment continues in the last known state. Therefore, in this case its state will not be overwritten in the next minute.
· Calendar configuration options
Each calendar allows you to model the behavior of the system through the following configuration options:
- Time programming temperatures
- Behavior if there are surpluses
- Behavior during peak hours
- Anticipated ignition
The configuration options menu is accessed through the yellow button with a gear wheel next to the calendar name.
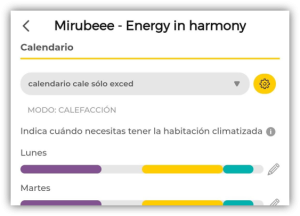
For programming the air conditioning/heat pump and radiators with thermostat, three temperature setpoints can be specified to apply in the operation calendar: Comfort, Eco and Night. It will be the base working temperature in each time slot.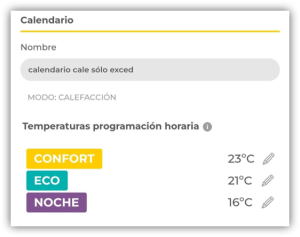
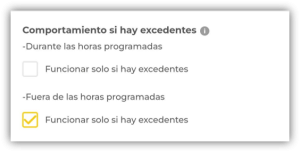
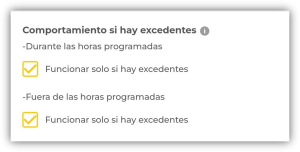
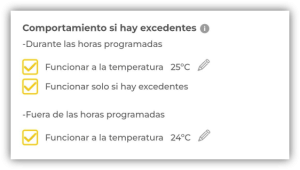
It is also possible to indicate the behavior of the system when there are surpluses of PV production. Behavior with surpluses during scheduled hours and outside of them is differentiated. Depending on the boxes that are checked, it is established that the system works only when there are surpluses or that it works according to the normal programming but only changes the temperature setpoint. It is also possible not to alter the behavior during the scheduled hours and simply activate the equipment outside the scheduled hours in case there are surpluses (at a certain temperature).

For equipment without a thermostat, these options are somewhat simpler as there is no variation of the setpoint temperature, only options to switch on or off due to PV surplus within and outside the programmed operating hours.
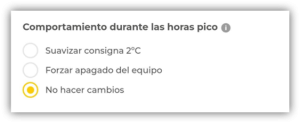
In this menu, the behaviour of the system during the “peak hours”, the most expensive hours of the day, is also set. The options are “Make no changes”, “Switch off the unit” (to avoid consumption during the most expensive hours) or “Soften setpoint 2ºC”. The option to soften setpoint is an intermediate point between switching off or making no changes. Soften setpoint means lowering the temperature by 2ºC in heating mode and raising it by 2ºC in cooling mode. This makes the equipment less demanding and consumes less electricity. When the peak time is over, the normal situation is restored.
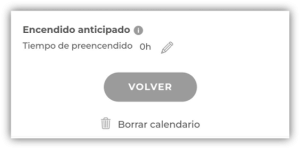
The last option on the menu is anticipated ignition. It is an energy optimization consisting of taking advantage of the thermal inertia of the house to shift consumption to more convenient times. It works according to the circumstances of energy prices and surpluses. In this way, if some time before a scheduled use the energy is cheaper (or there is a surplus), the air conditioning equipment will be turned on to accumulate heat or cold in the room (as appropriate) and reduce consumption during the most expensive hours. A pre-ignition time must be indicated in hours (e.g. 2h). To disable this function, indicate a time of 0h.
· Order of activation of loads
It is possible to manually establish the order of priority for the activation of loads as there is more availability of PV surplus. Modifying the order is done from the main screen of the application in a very simple way, dragging the icons to the left and right. The first load in order of priority will be the one on the left and the last the one on the right. To activate the “reordering mode”, click on the small unlock padlock on the right. At the end of the reordering, the established order must be locked again.

It must be taken into account that, despite the established order, the system can turn on a non-consecutive load on the list if, due to programming, at that time it is necessary to keep the next load on the list off.
Performance analysis
- Main screen (My Home section)
- Individual control panel
- Analysis Section
Main screen
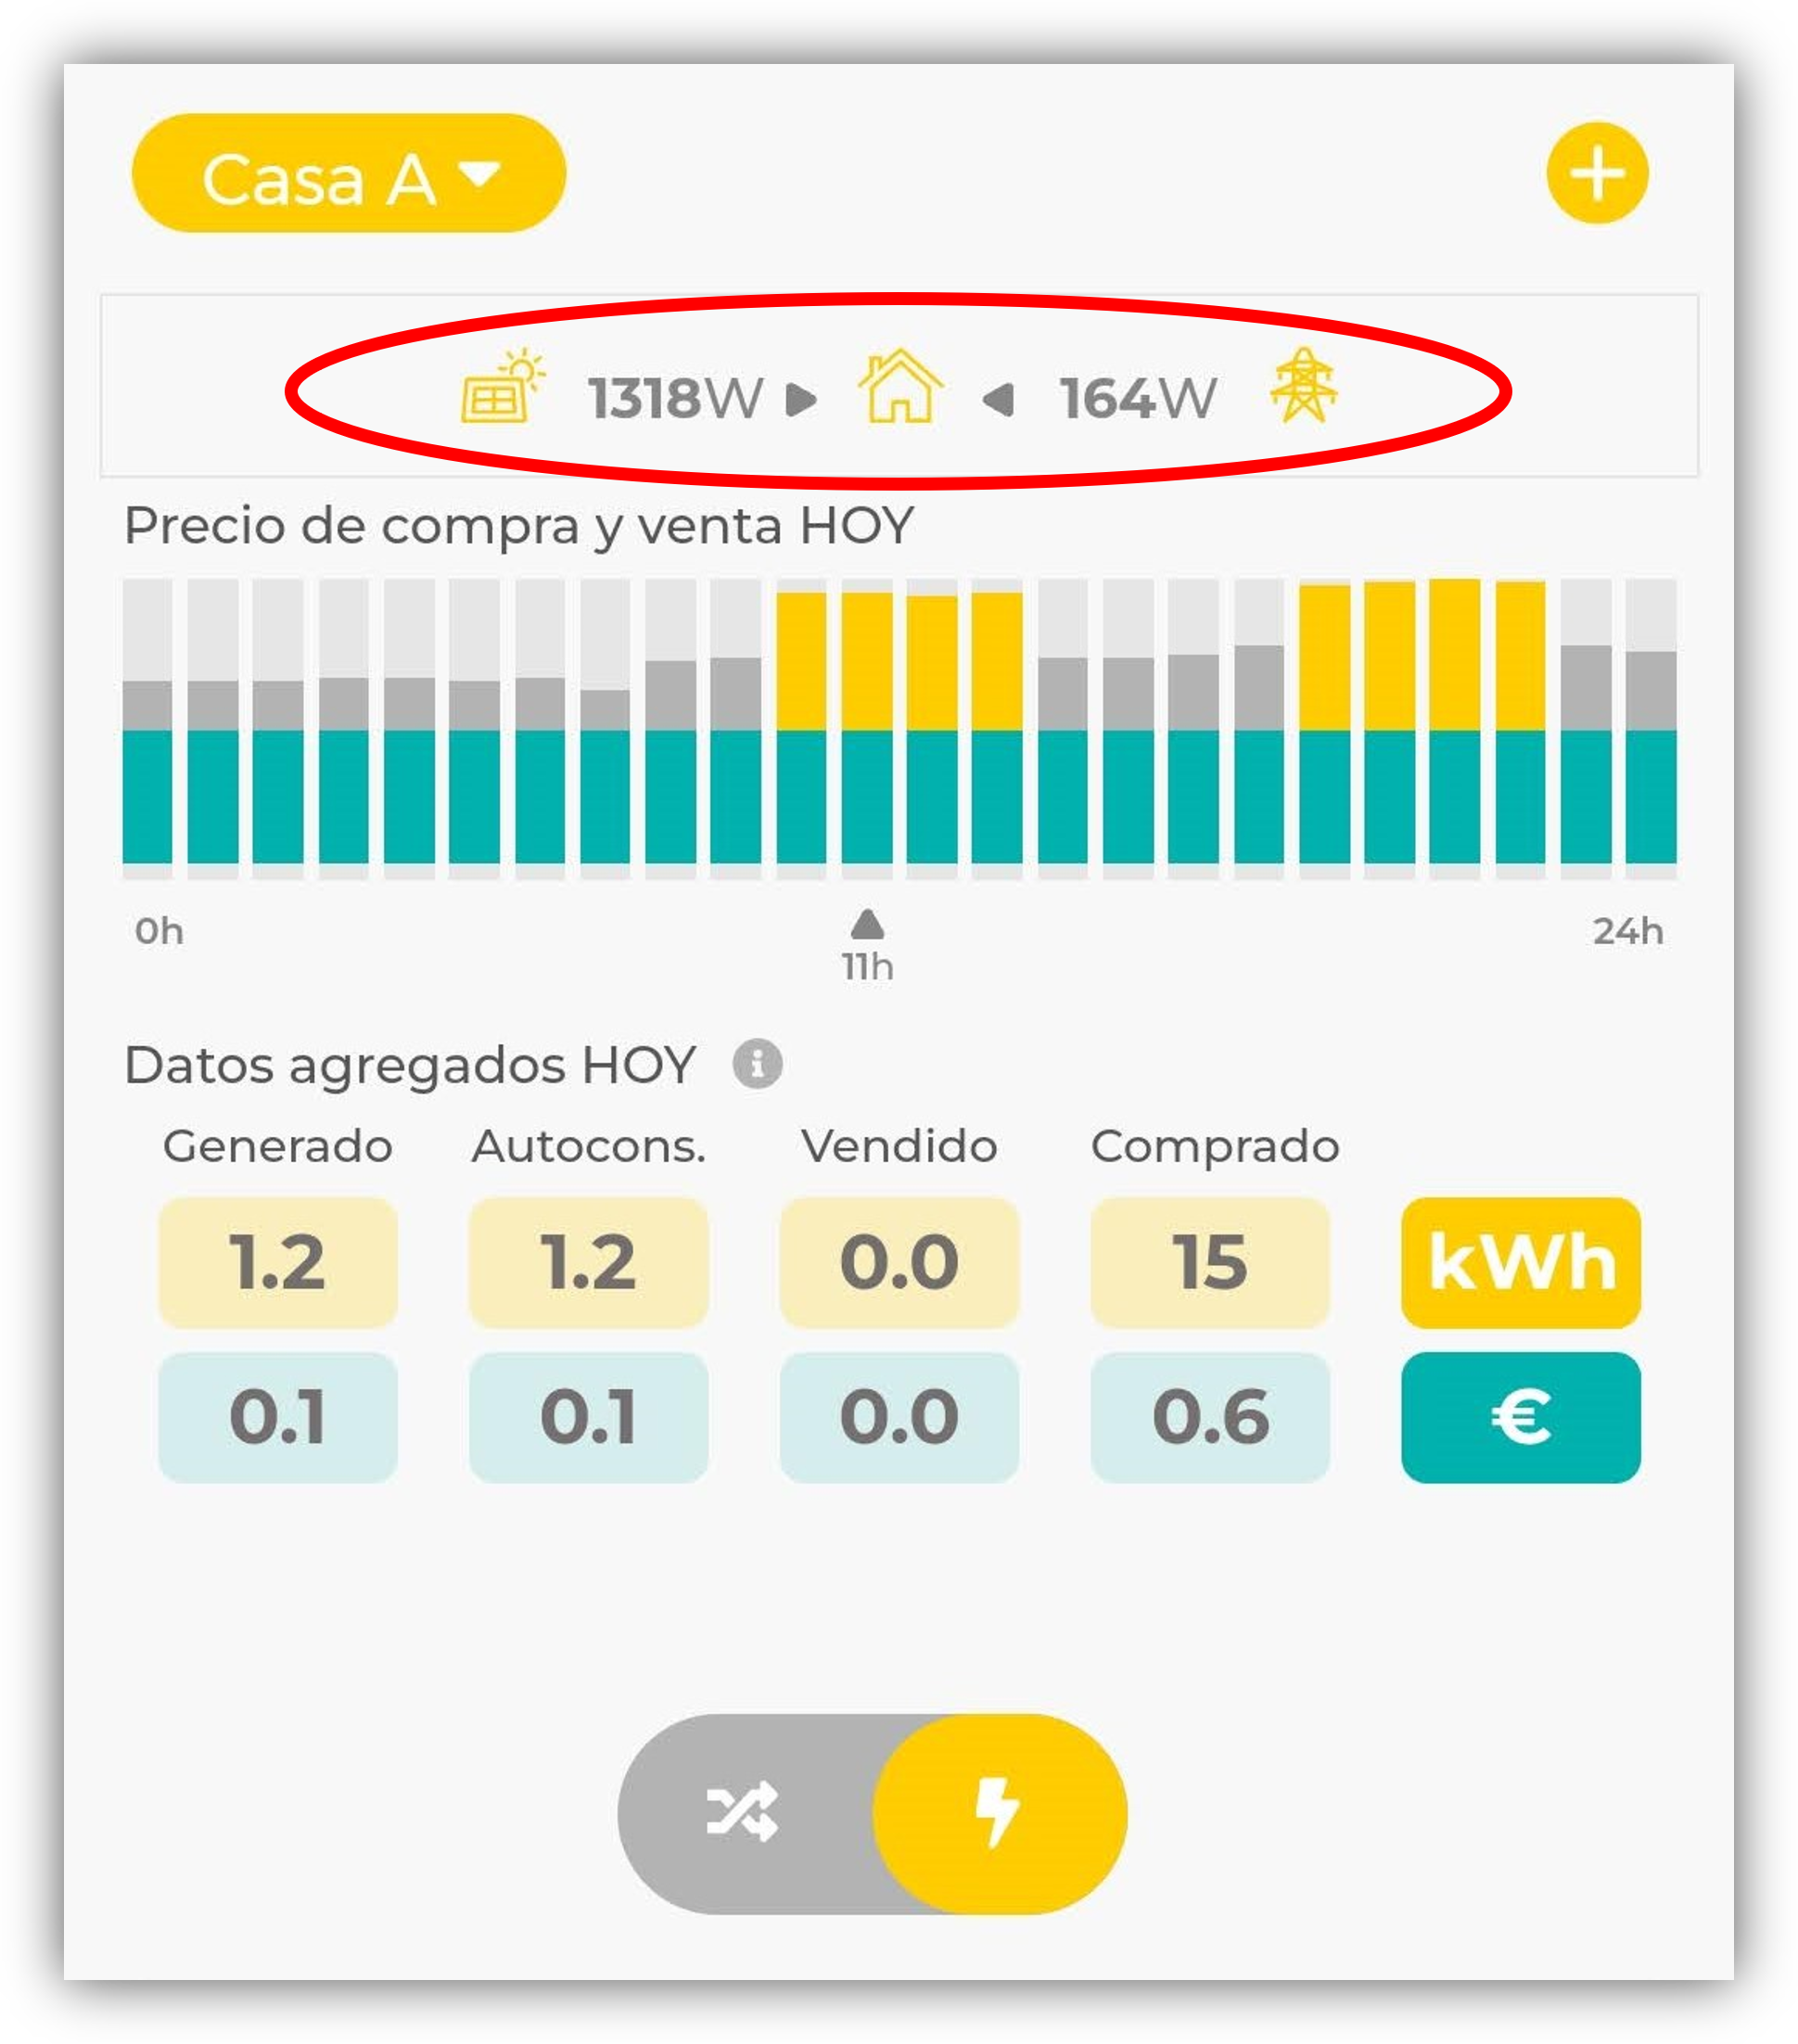
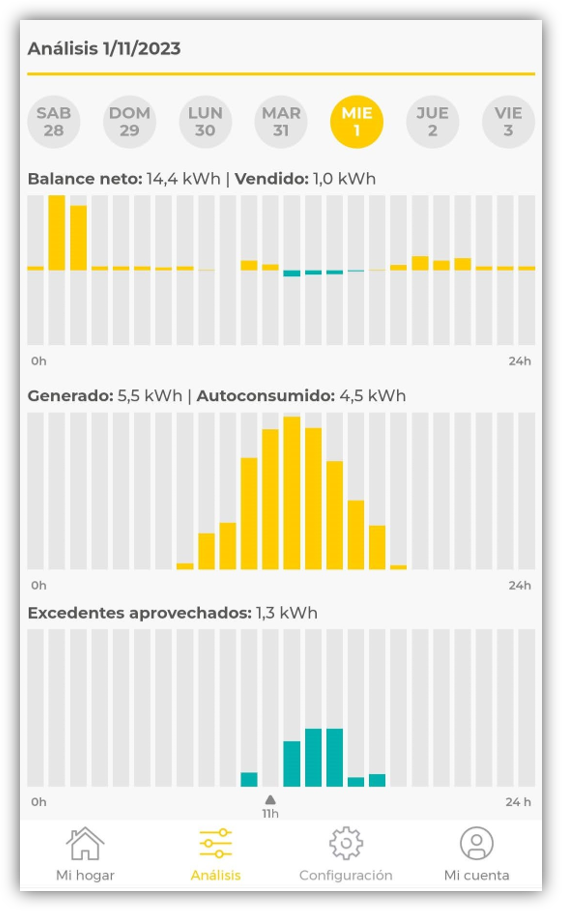
The screen shown in the My Home section is the first screen accessed when the APP is opened. Shows the current operating status of the system.
At the top you can see the data on solar production and energy import/export in real time (updated every minute). With this information you can see immediately if the system is connected and producing, and if at that moment there is surplus energy or not.
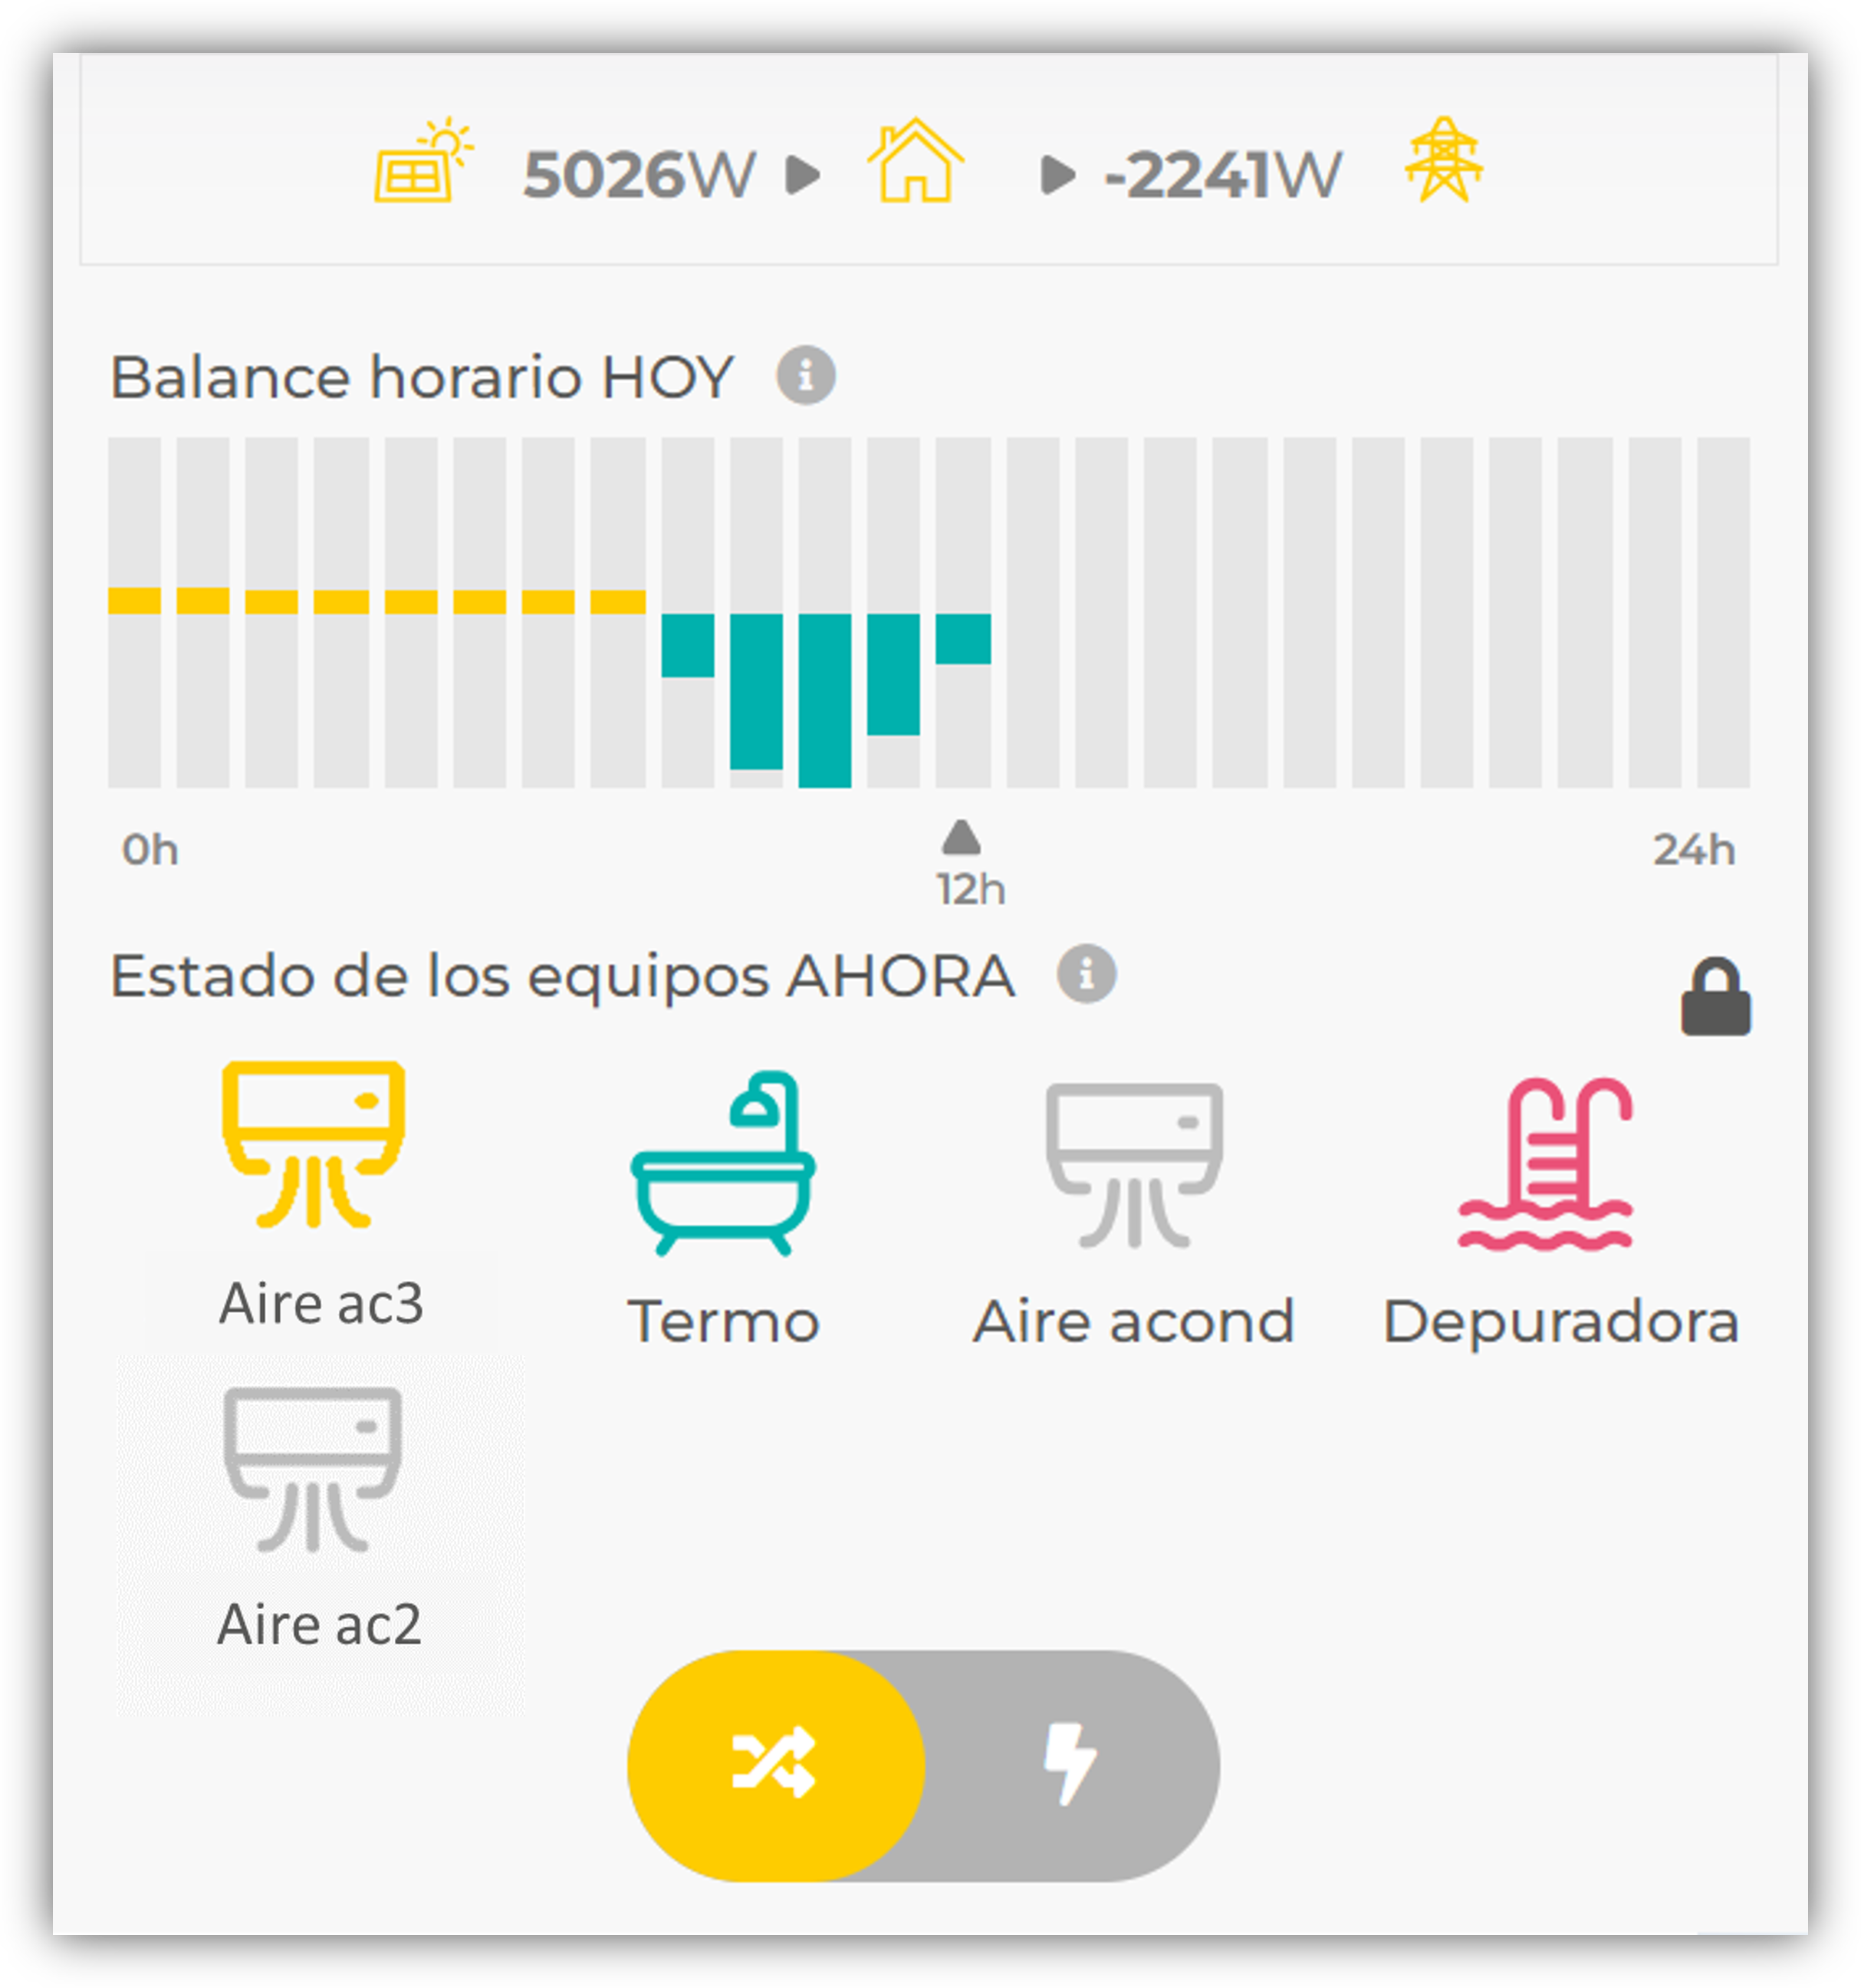
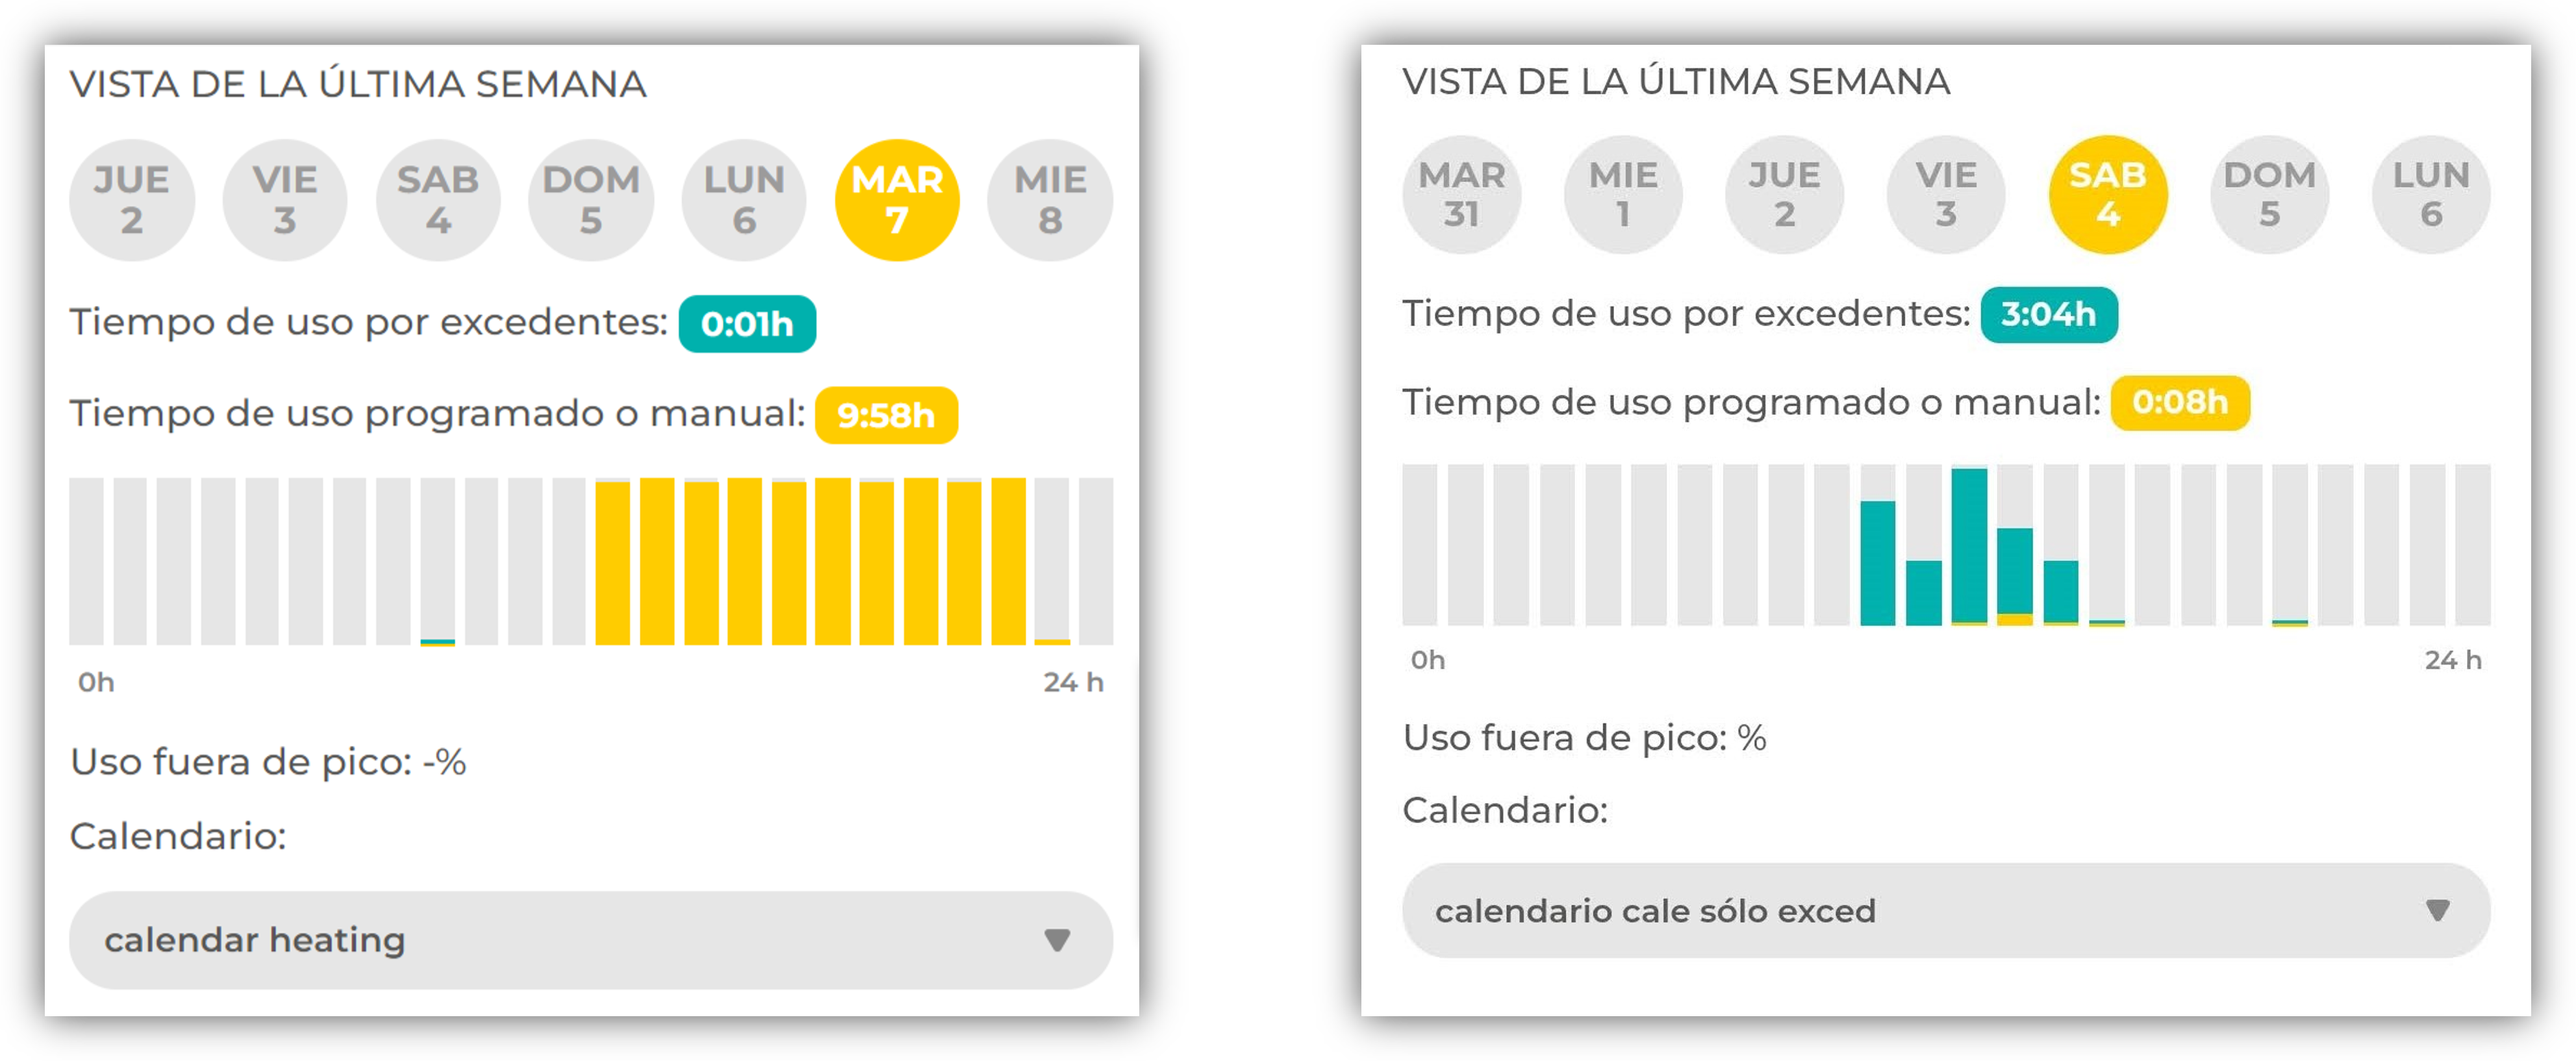
Below the instantaneous data the hourly net balance for the current day is displayed. This graph is important, it indicates the average energy imported or exported each hour. The system will try to ensure that in the central hours of the day, those of solar production, this balance is as close as possible to zero. Zero means that there is no import of grid energy, there is no purchase, and there is no export of energy, that is, all production is used locally. If at a given hour the net balance is positive, it means that there is more consumption than production. On the contrary, if it is negative it means that, despite having turned on several manageable loads, there have been surpluses in that hour.
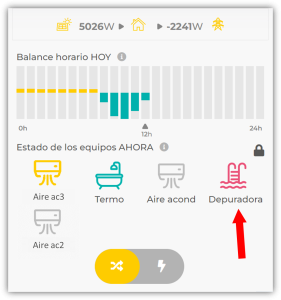
Finally, in “State of the equipment now” it is shown whether the equipment managed by the system is off (gray), on due to the schedule programming (yellow) or on because the surpluses are being used (green). If a device appears in red it means that there is a communication problem between that device and the gateway.
Individual control panel
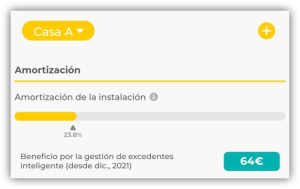
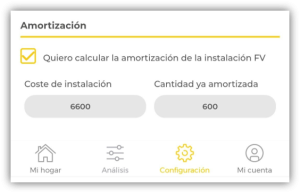
Installation amortization
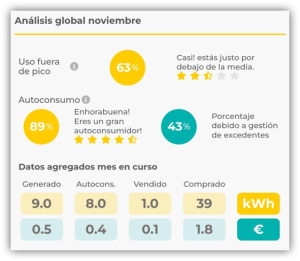
Global analysis of the current month
Analysis of the last 7 days
Share access with another user or with support
It is possible to share access to your “Mirubeee Home” with another user without sharing your credentials. This possibility is useful so that each family member can access Mirubeee with their own account, as well as to facilitate help from support.
First, make sure you’ve given your home a name (and hit the save button).
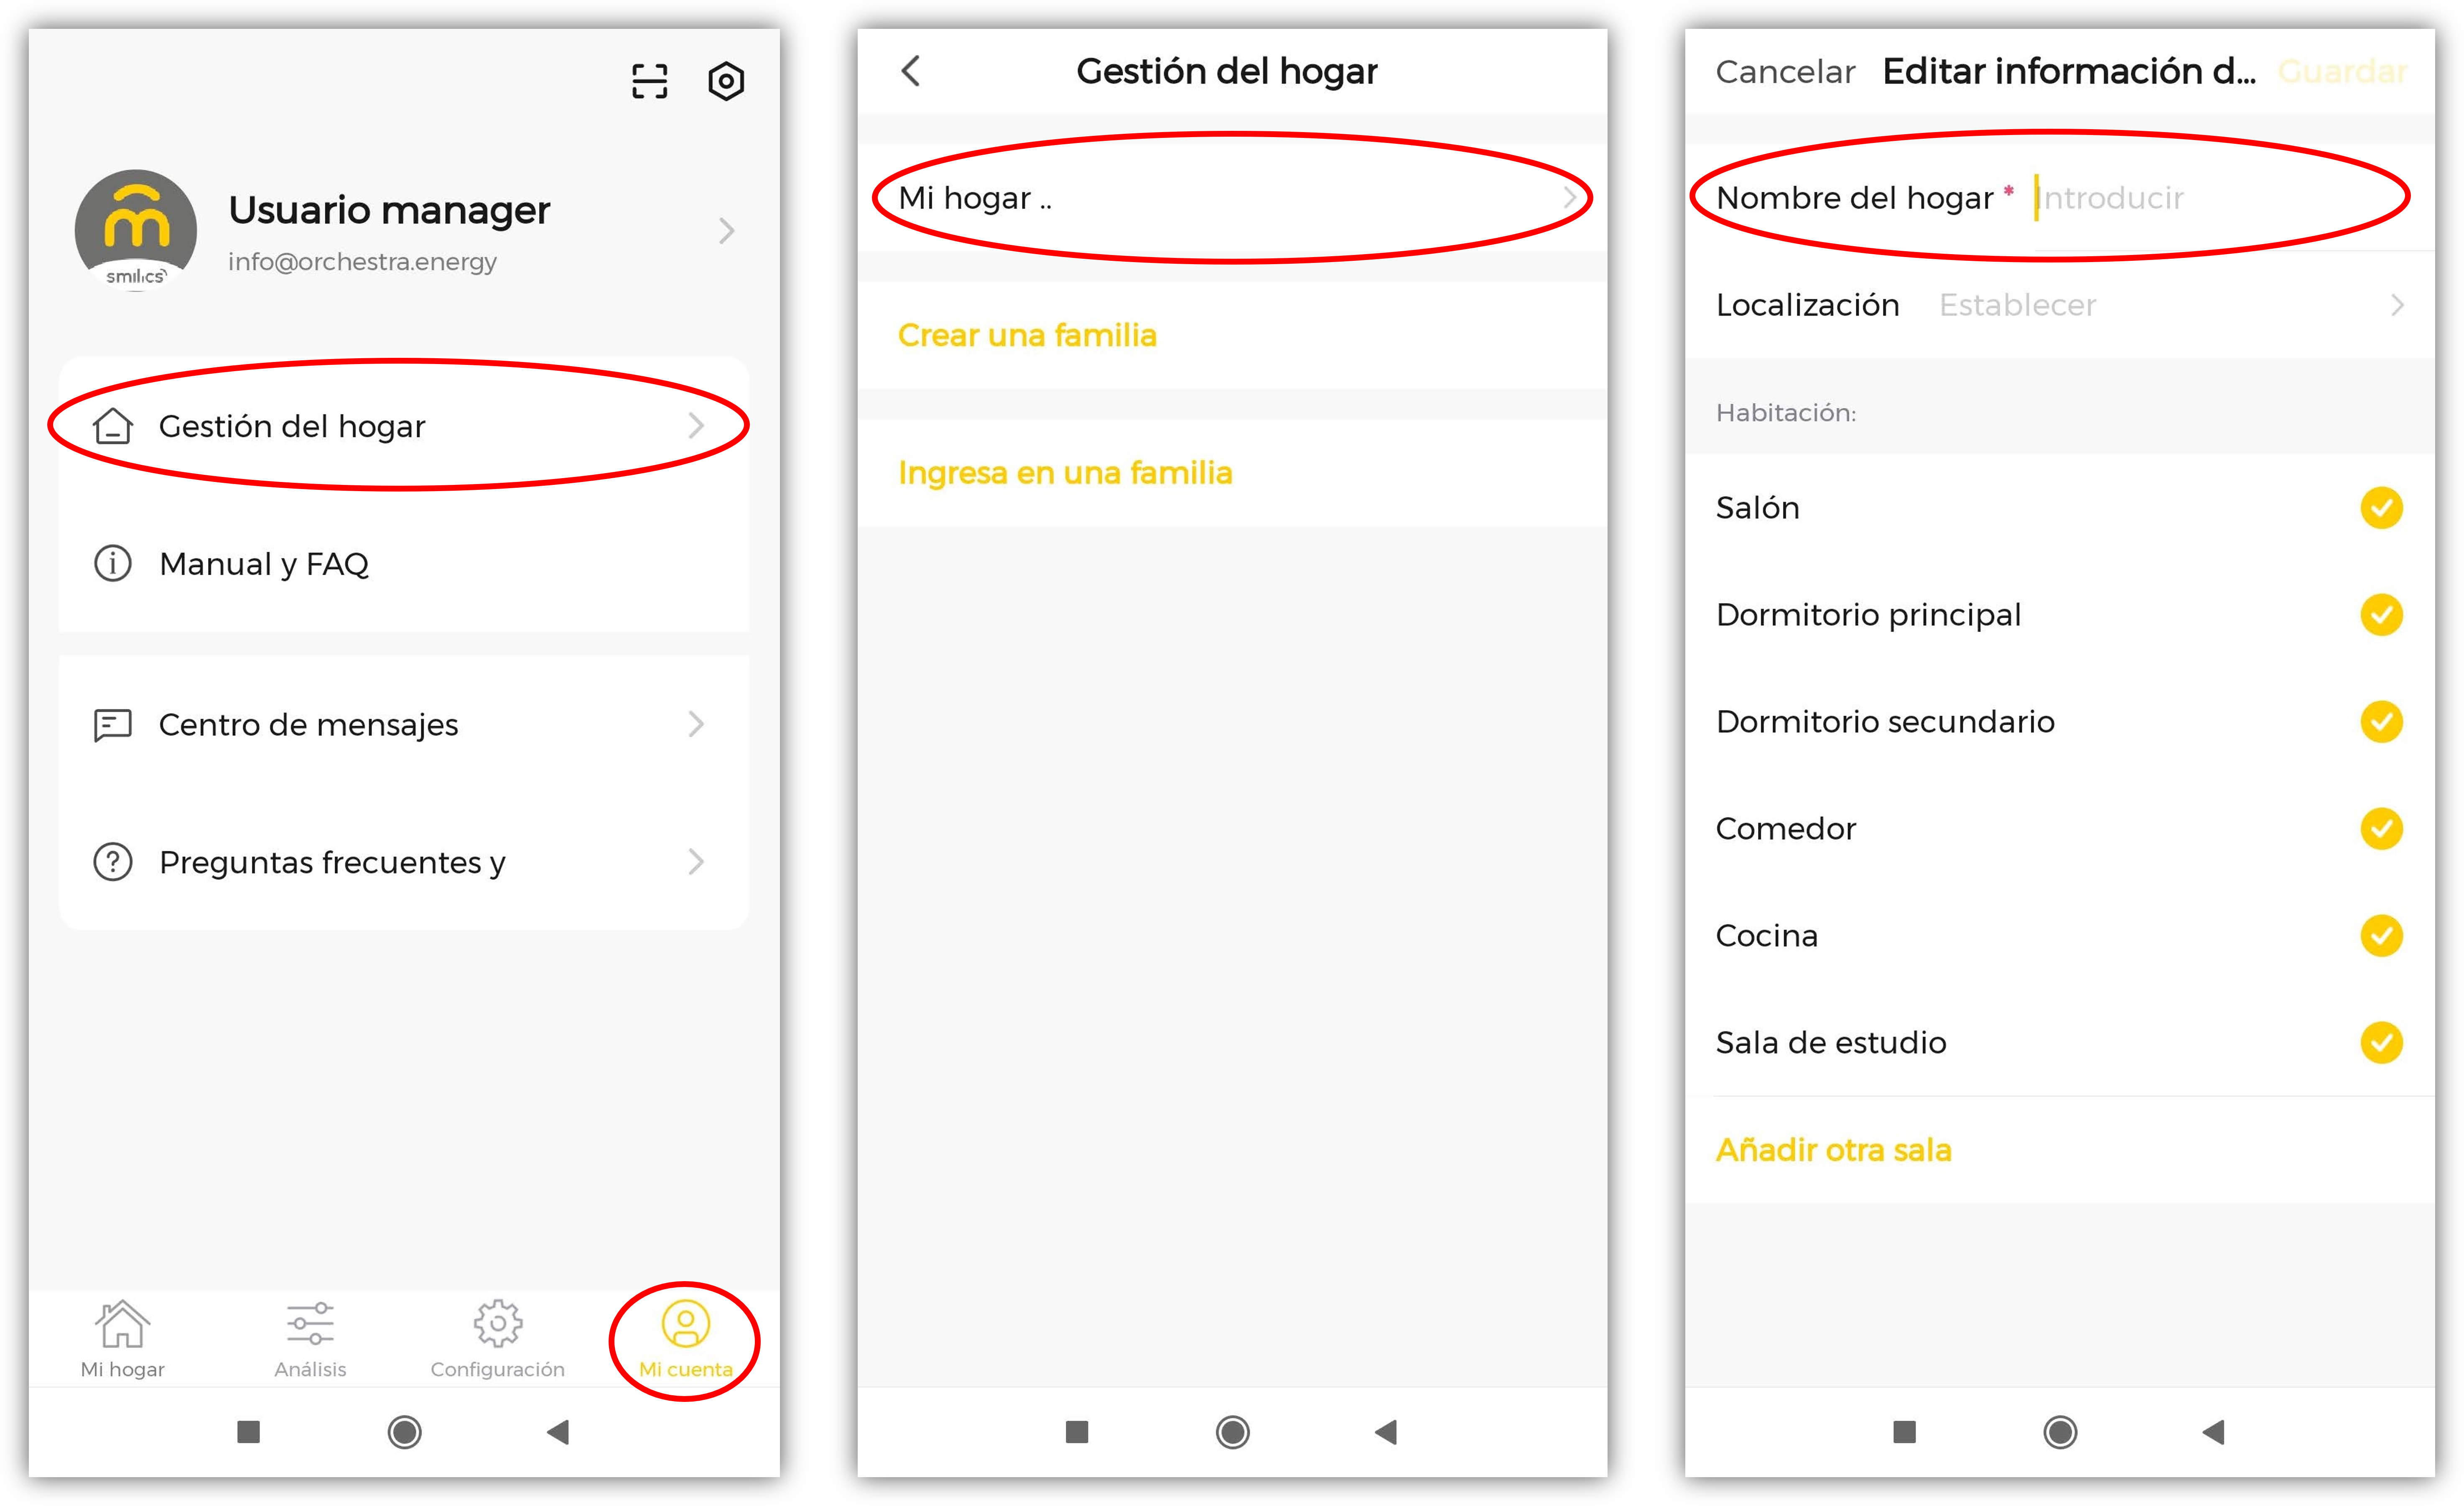
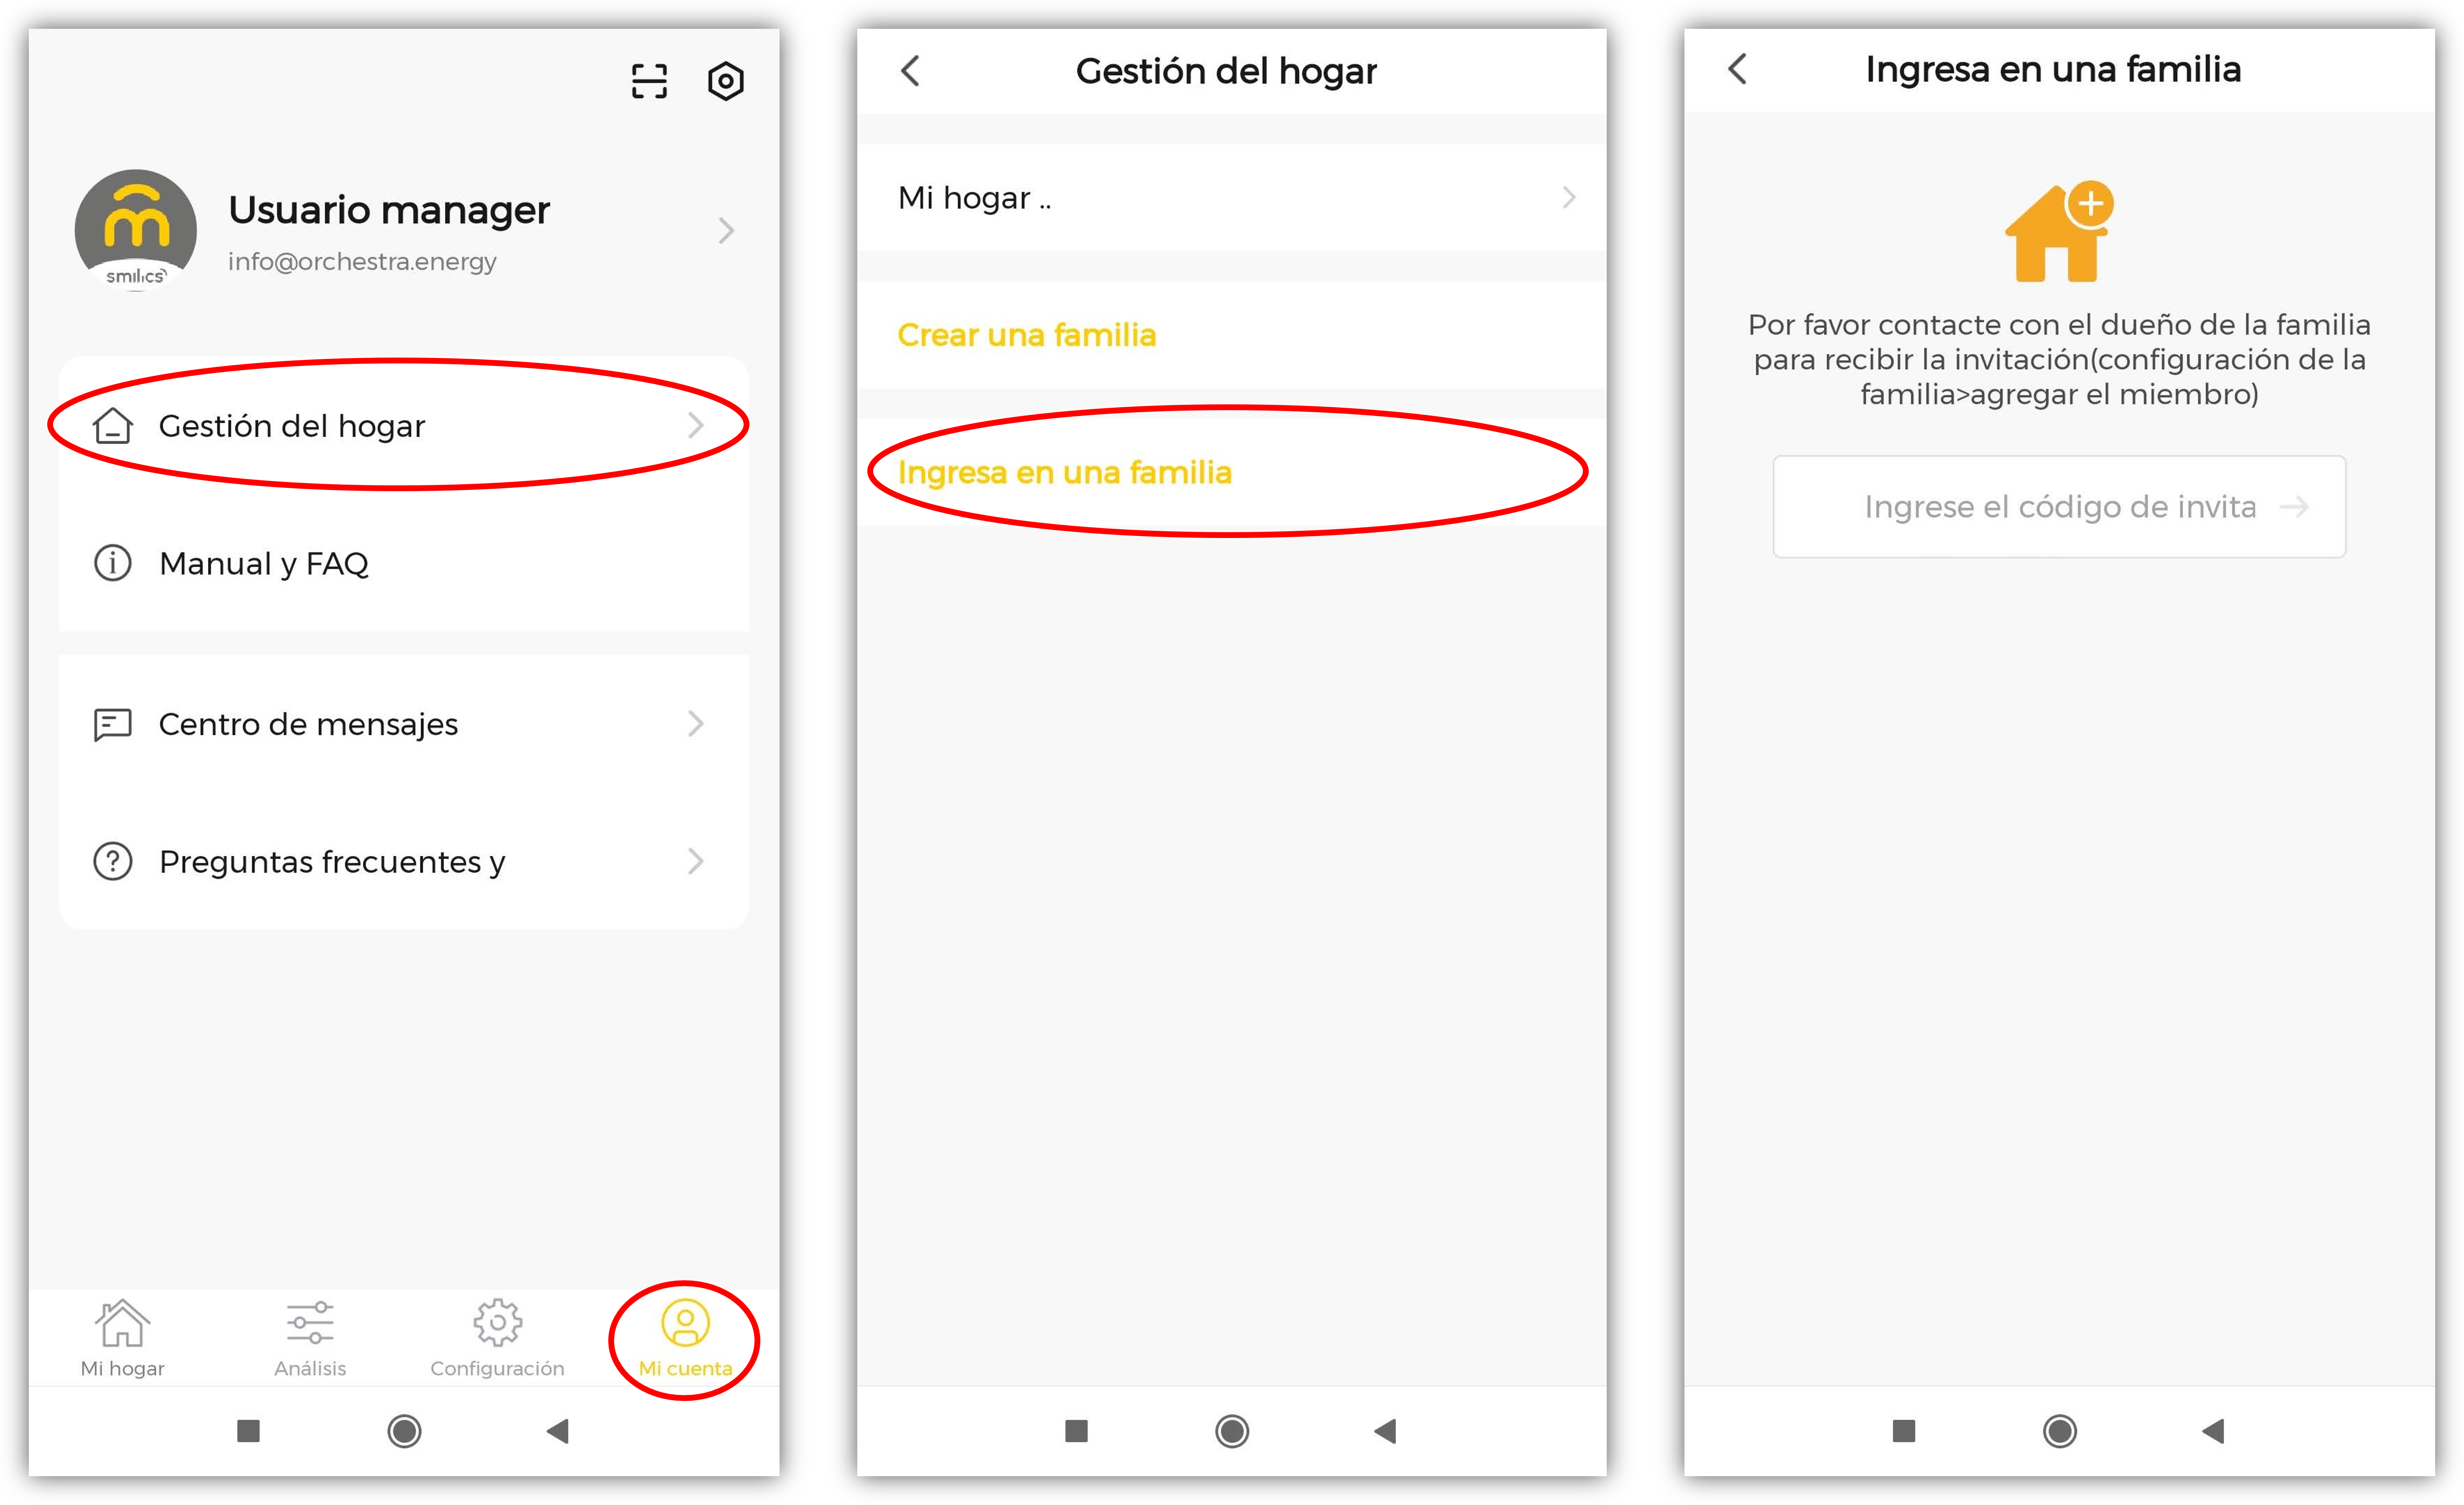
If you already have a name, when you select the household the “Add member” option will appear. This will generate an invitation code that will allow you to join that home. We recommend sending the code by email, although other messaging services can be used.
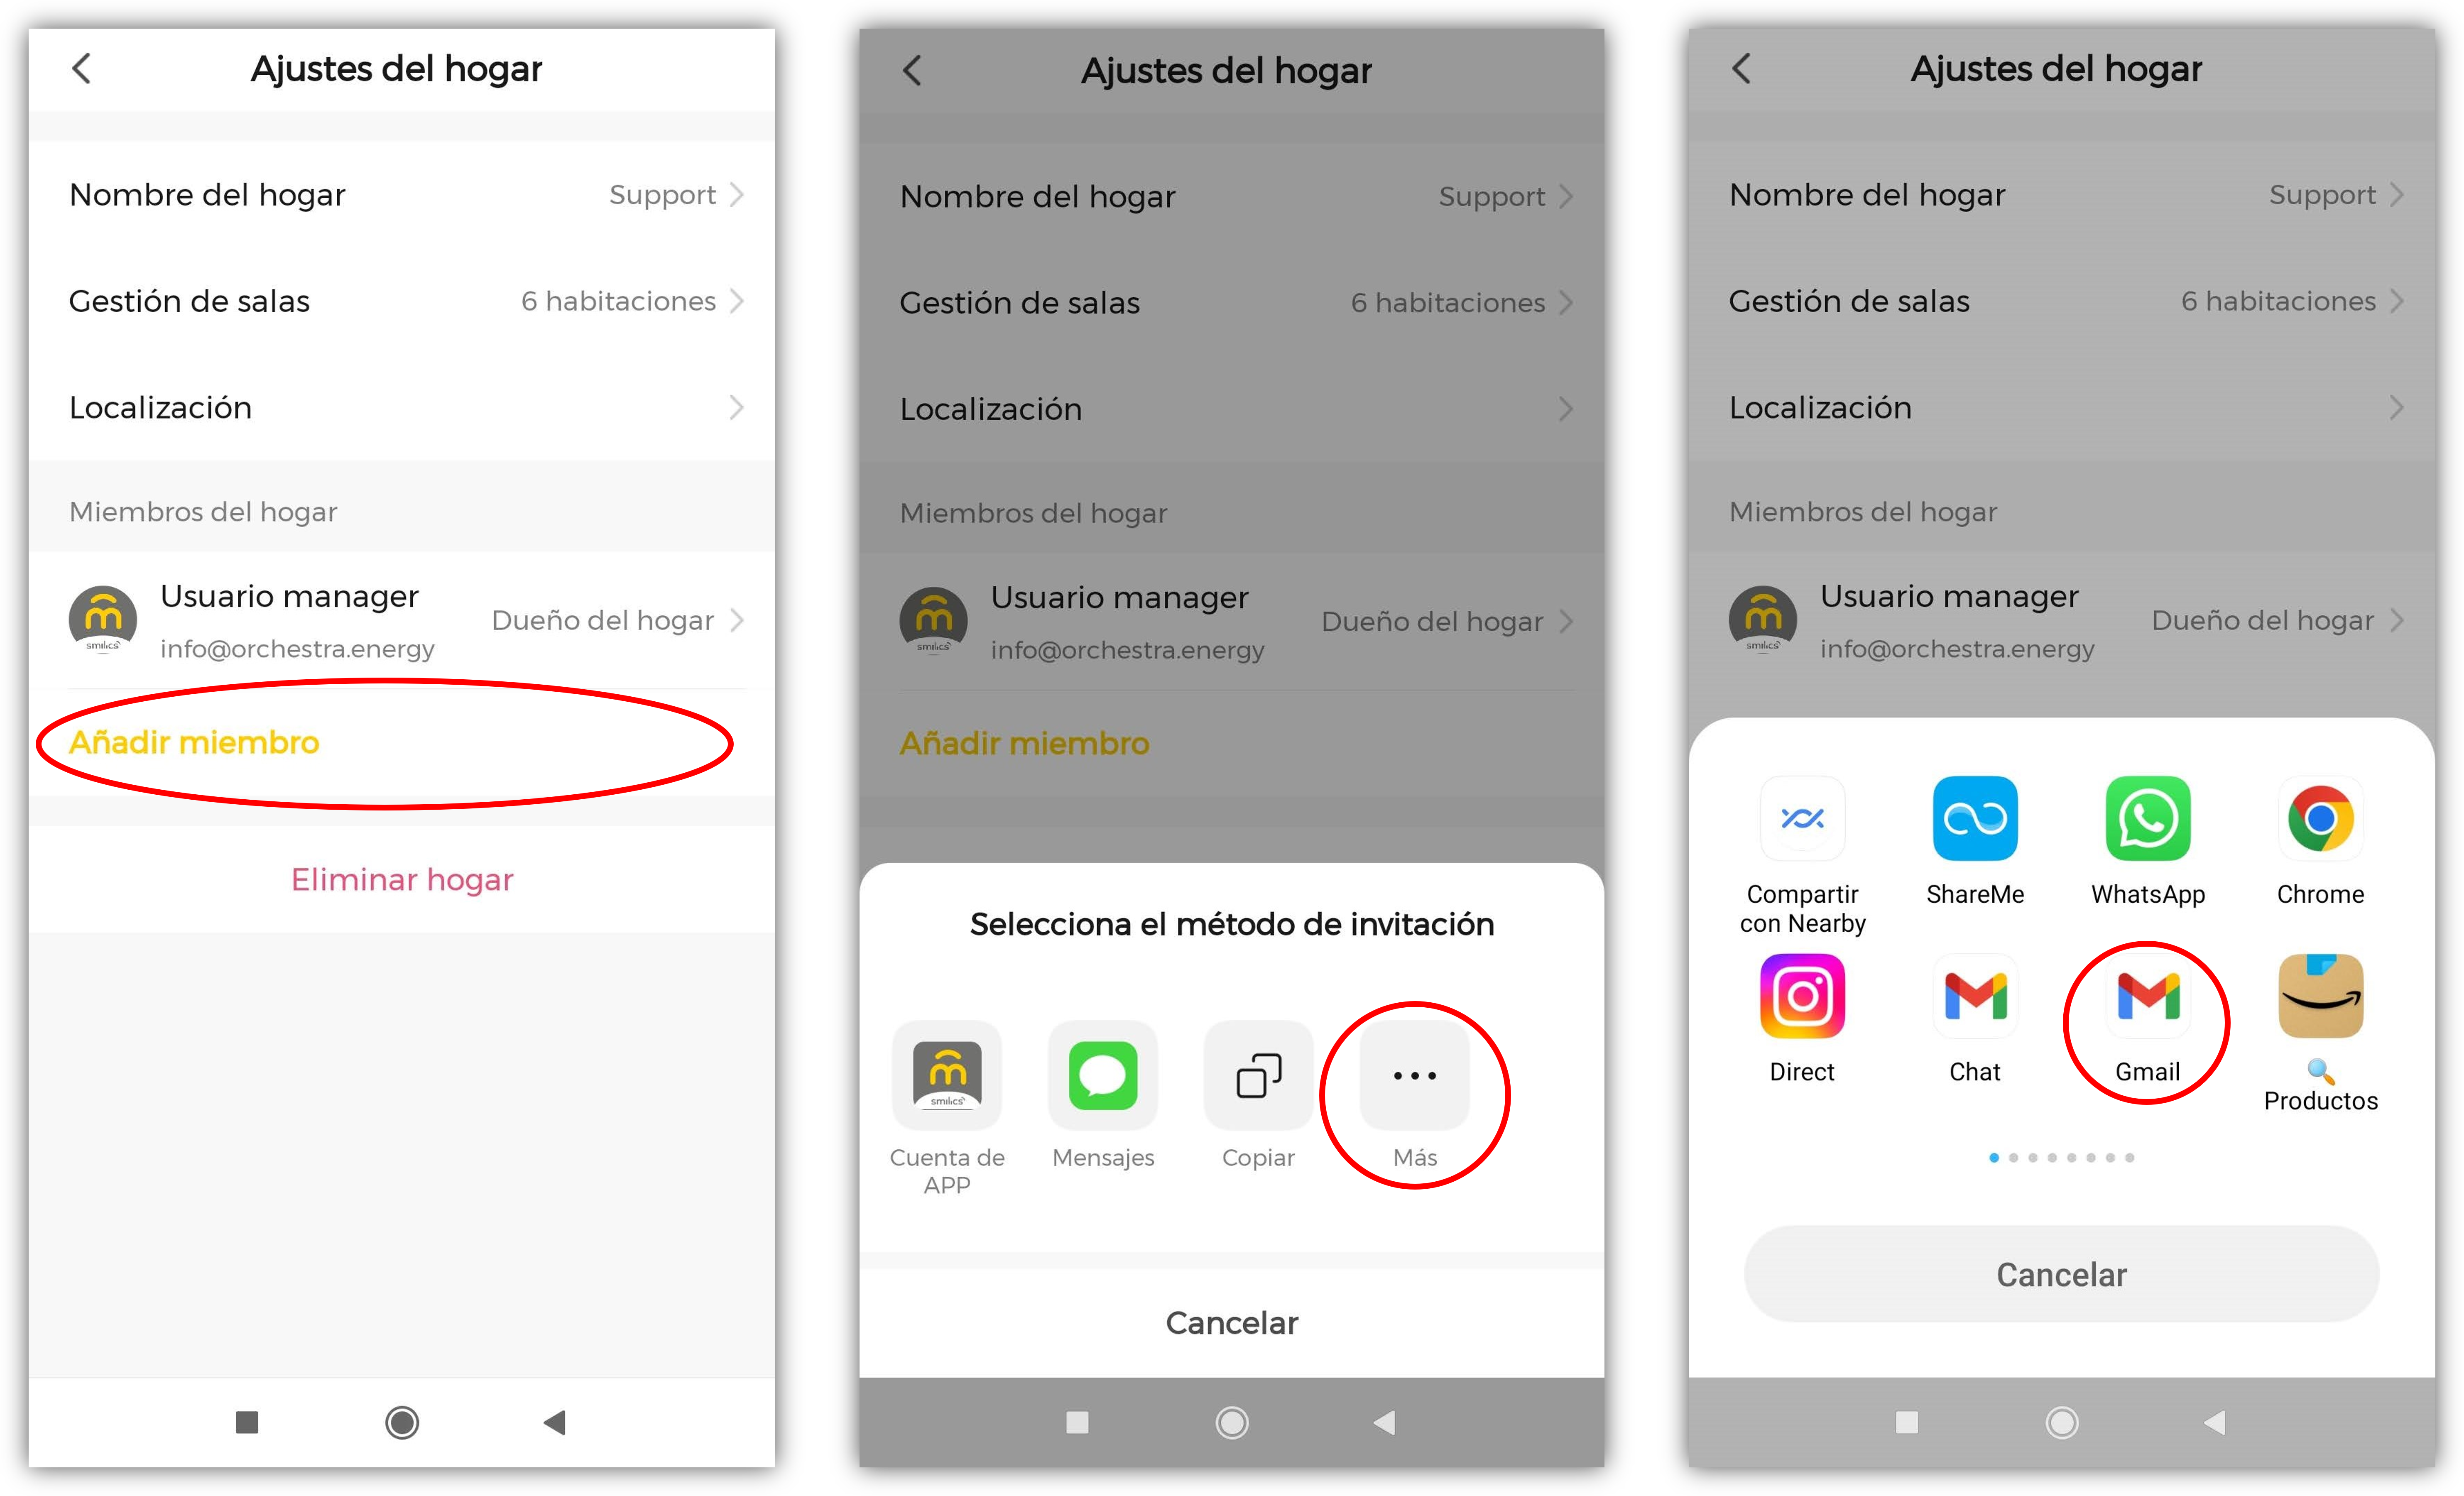
If you wish to facilitate access to support, you must send the email to info@mirubeee.com. The household owner can revoke access to other members at any time.
The invited user must enter the invitation code in the “Join a family” section of the APP.
Guest users, those who are not “Homeowners”, can have two roles :
- Ordinary member
- Administrator
The ordinary member is a basic user who can see and act but cannot add or remove actuating devices or household members. It is the default role when inviting another member.
On the other hand, the administrator has capabilities to register and remove actuator devices and add or remove members. It is managed on the following screens:
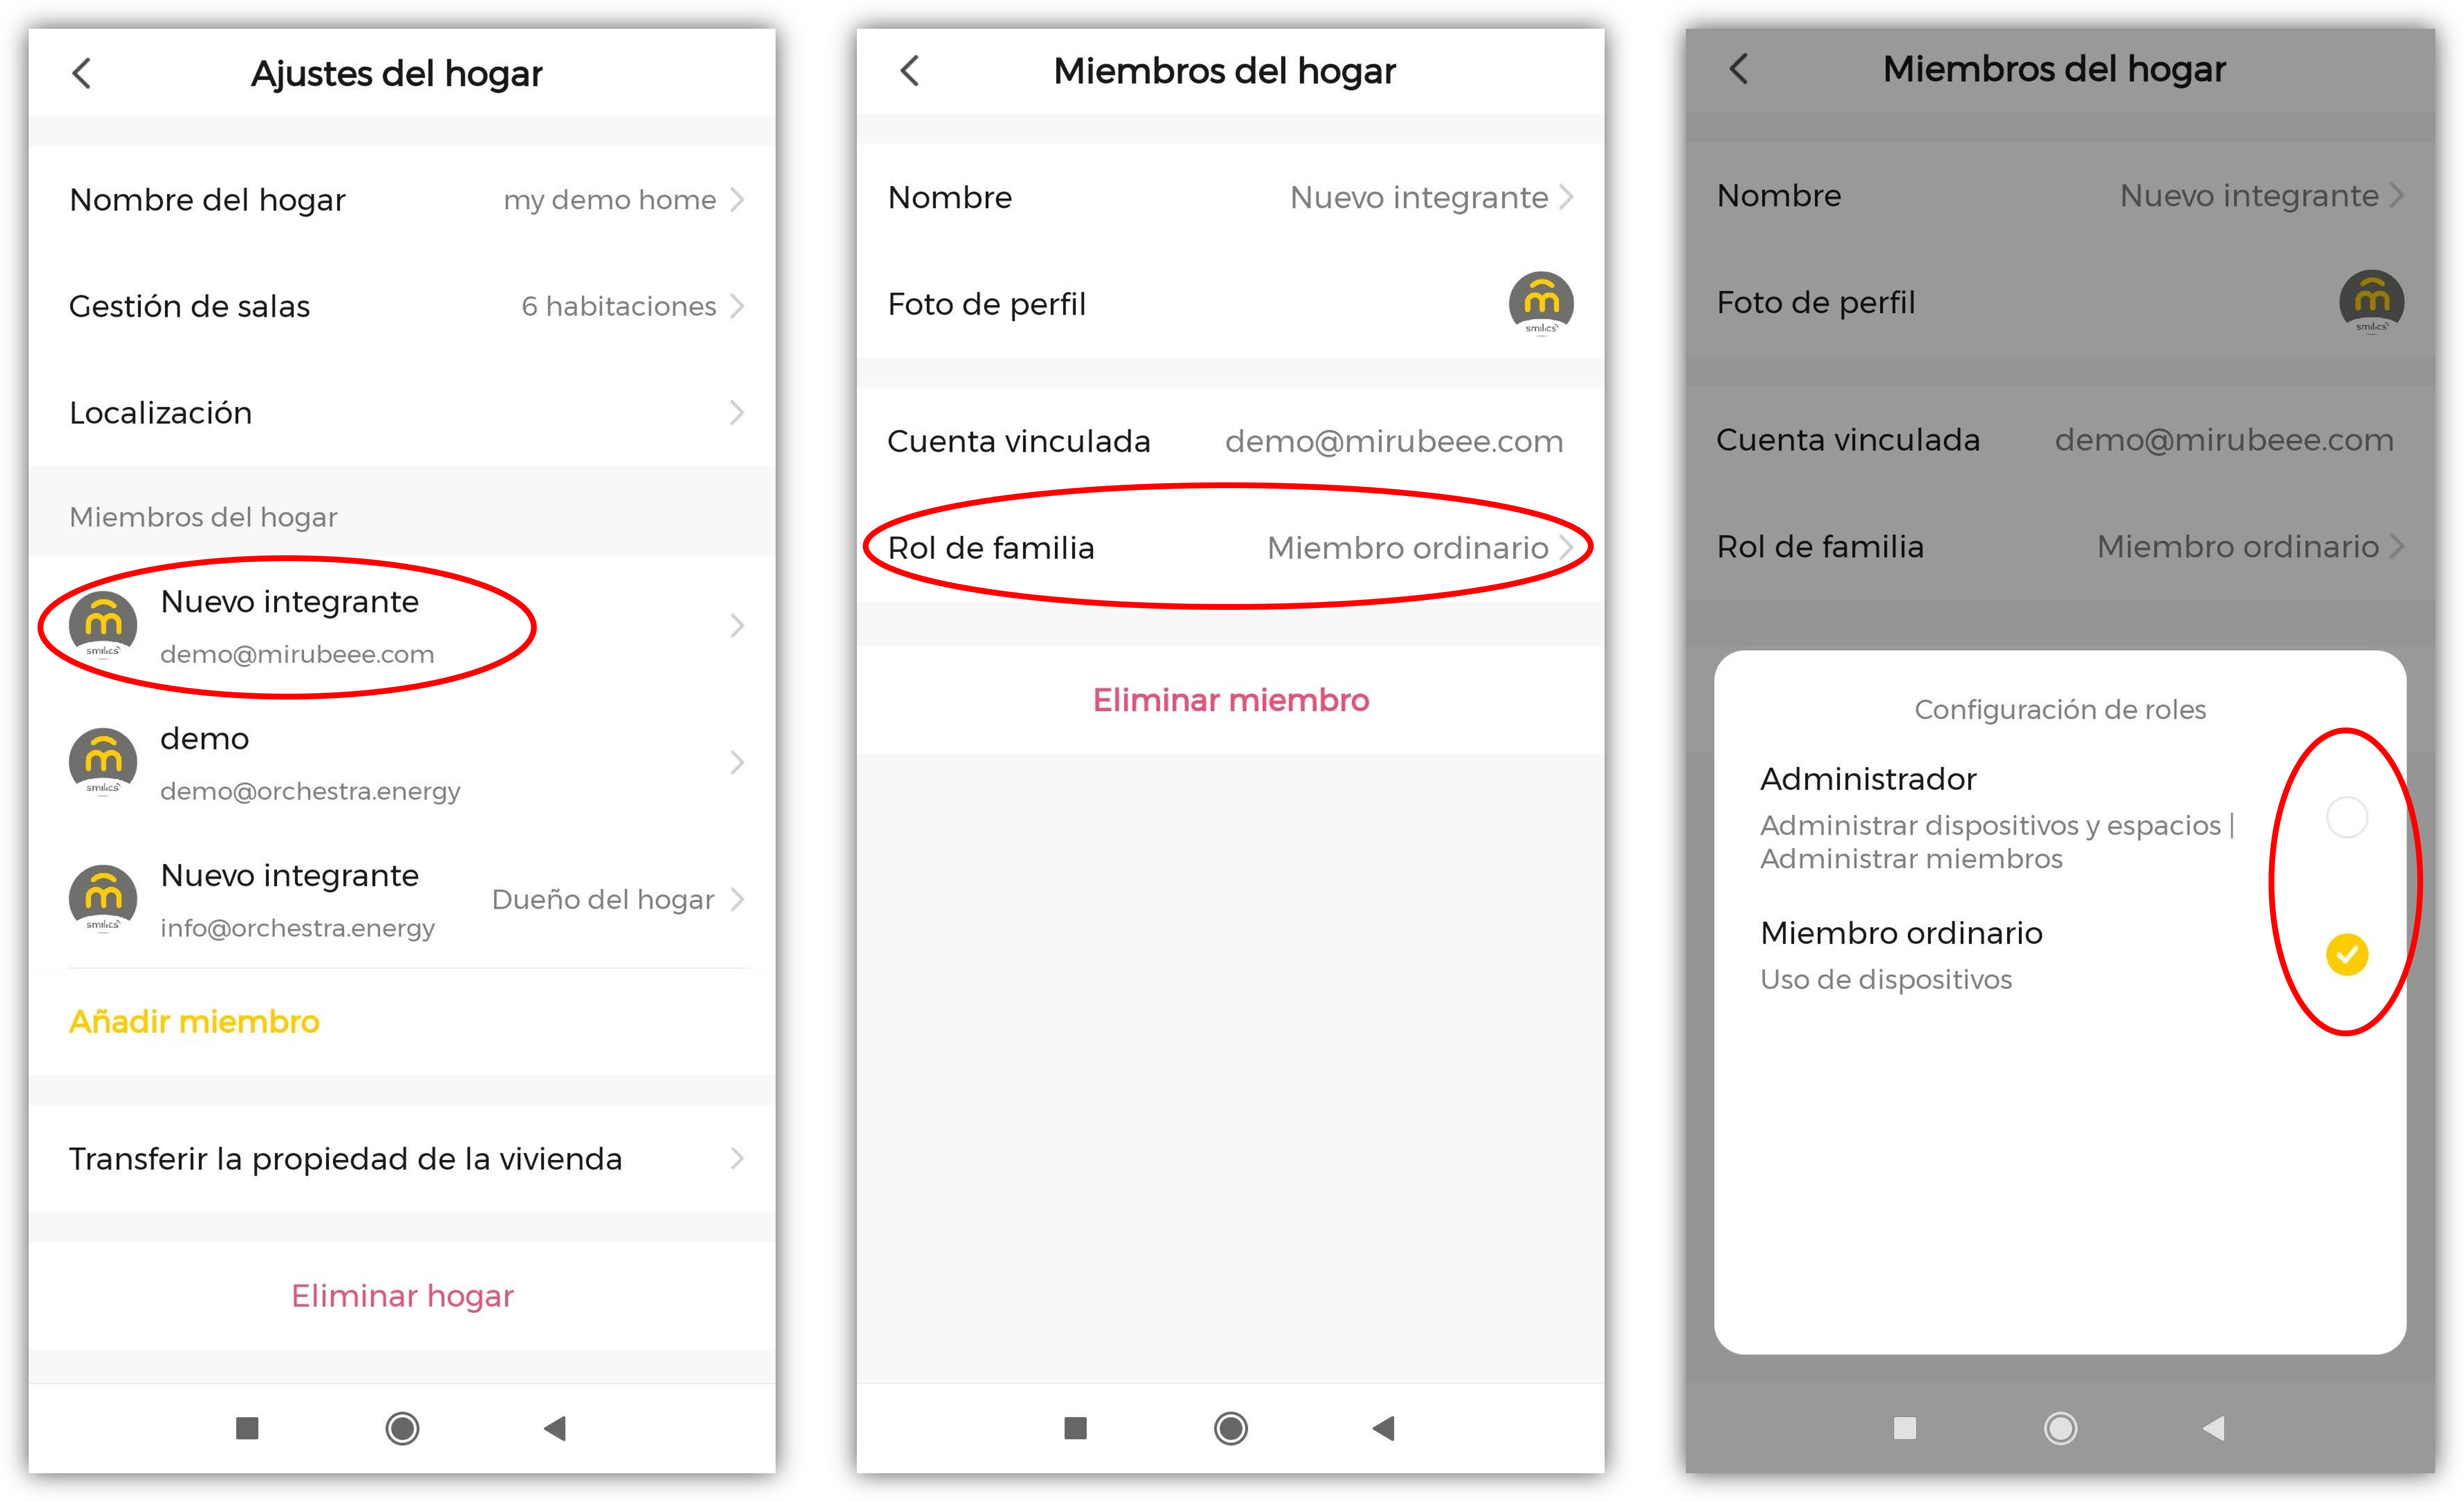
If you want to transfer ownership of the home , it is possible to do so from the same menu from which you add a new member. The only requirement is that a member to whom ownership can be transferred has been added before.
![]()
FAQ
What devices do I need at least to start working?
If I already have actuators from other brands, can I use them with Mirubeee?
How do I program the system to do what I want? Do I need to know how to program?
How much does the software license cost? How is the subscription paid?
How much can I improve my self-consumption rate?
Can I use it in a house without Internet? Does the system work if the Internet connection is lost?
Does an actuator work if it loses WiFi connectivity?
It is important that all the devices are on the same local network so that they can talk to each other. How do I know if the devices are all on the same local network?
Are there any further conditions that my local area network (LAN) must meet?
In home networks the system usually works without any problems as there are usually no special security settings as in corporate environments.
In any case, it should be noted that the LAN and firewall (if any) should allow UDP (6666, 6667 and 7000) and TCP (6668) traffic.
Can equipment be controlled manually?
How to make an appliance switch on only with solar surplus?
In what order do the devices come into operation when there are surpluses?
Does the Mirubeee system cause a lot of switching on and off of devices?
I have programmed a device to switch on at a certain time but it switches on earlier. Why does this happen?
Can I control the charging of an EV (Electric Vehicle) with a Mirubeee Smart Plug?